How To Make A Glueless 6X6 Closure Wig
- Posted on 06 March, 2021
- Closure Wig
- By Anonymous
Hey guys in this video I will be showing you how i constructed my glueless 6x6 closure wig for my birthday! If you would lie me to make another video going into more detail please comment below. Be sure to check out part 2 for more details on the color. I hope you guys enjoy! Remember to LIKE, COMMENT & SUBSCRIBE! Byeeeee
My Social Media
@lifeaslaurenash
Hair Info
Instagram @lafluxe
#lifeaslaurenash #6x6closurewig #gluelesswig #howto #lorealhicolor
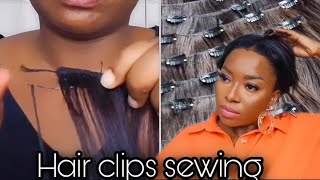
His life is hey guys, so first we're going to start off by just sewing the wig together. As you can see, i have a 6x6 closure from my raw hairline and we're just going to start off by sewing that on the stocking cap, i made sure to leave just a little make. The closure just go like a little bit above the stocking cap, and i do this just so. A little bit of hair can fall in front of those tracks and we don't see tracks along the front and, as you can see at the back of my stocking cap, i went ahead on and made it kind of square. So i just go ahead and take my stick pins and i pull it so that the bottom is straight, and this helps us lay our tracks just a little better those roses so guys. I hope you can tell that every time i put the needle through the cap, i'm pulling the closure out this way that little buckle that you see will won't exist. So, as you like put the needle through the uh the closure and you pull it out, then it's going to slowly flatten the closure. So now i'm going to start by sewing my first bundle onto the bottom and i like to double all of my tracks. Up until the last bundle at the top just to make sure that not only is it thick, but by leaving that last bundle at the top single that it's going to be flat. But i hope you guys can see that making that bottom straight with my pins and taking the curve out of it makes it a lot easier to lay this track straight. Please make sure before you start sewing to measure your head from your hairline or wherever you want your wig to lay to the back of your neck because closure wigs that fit tighter than regular wigs. Well, when i say i mean frontal wigs, so it's going to fit snug, so, whatever size you have or length add an inch. So when i measure from where i want my wig to lay to the back of my neck, it measures to 13 inches. But you want to make it 14 inches because, as you sew, the cap is going to shrink just a little bit from the sewing of the tracks, so make sure to keep that in mind. So, ah, as you can see, i'm almost done. This is three bundles right here. This is 2 30 inch bundles in 28. Now, i'm about to add my last bundle right here. I doubled all of these tracks down here um, but this last bundle is about to be single. This is how i get it to lay flat. I double all my tracks, except for my last bundle, um, so nice and flat at the top and yep. We are almost done. She'S gon na be so thick and i am making this with my raw straight hair. Okay, so y'all, i finished the wig, i haven't cut the lace off or anything um. All of the super dripping hey drago big self, but this is like all four bundles. I can't wait. Hey i'm gon na cut in this hey guys. Okay, so i went ahead on and dyed the hair, this beautiful burgundy red magenta color. So if you want to see how i get this hair, this color then make sure to watch my next video and i'll show you step by step. How i get this color and you'll get to see how the wig turns out. Thank you guys for watching. I hope you enjoyed remember to like comment and subscribe and give me a big thumbs up bye, guys. His life is long ashley. She got ice on the feet: ice on the floor ice drift from the walk when she hit the dog got ice on the feet. Ice on the floor ice hit the drift from the new walk when she on and i walk with it, not sweating. I walk not walk with it. It'S a life with lauren ashley, it's the life with lauren ashley


Comments
Syria Wilson: Yayyyyy!!!!!! Thank you!!!!!!
NAEE PINKK: Early ❤️