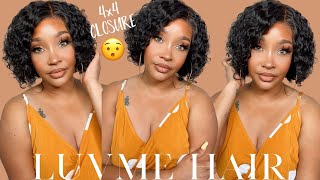
Luvme Hair 6X6 Lace Side Part Body Wave Wig
- Posted on 27 August, 2021
- Closure Wig
- By Anonymous
Hi, dolls! Thanks for tuning in for another video. The wig featured in this video is linked down before. This wig is in an 18 inch, I paid $245. Don't forget to like and subscribe before you go!
Get 25% off all wigs currently using the code: BTS25
https://shop.luvmehair.com/products/6x...
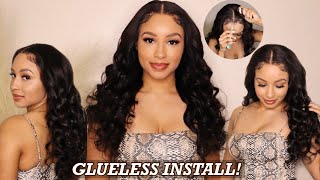
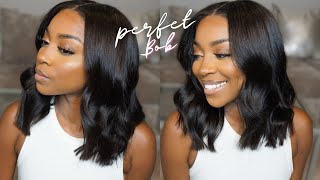
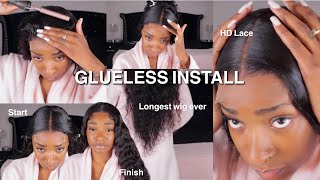
Hi guys welcome back to my channel in today's video we're going to be doing another wig review. This video is going to be another love me wig that i just purchased. It was their 6x6 lace side, closure wig. I think that's how you say it. I don't know it'll be listed in the link below um but yeah. I pick up that wig and i love side parts like when i get my natural hair done. I always do a side. Part. Don'T really do a middle part. That often, but i have been waiting for them to do a side part that was not a frontal, so i was so happy when that they did launch this wig um so yeah. I picked that wig up and we're going to be putting it on today. Just a disclaimer baby, i am not the way goddess okay, so i may not put my wig on the way you put a wig on or the way you lay a wig, but i put it on that works. For me, this is just a review on the wig itself, not so much as my technique. So if you were looking for a technique on how to install a flawless wig, maybe just ain't that video i'm just giving you a little review on this wig um. But without further ado, i'm going to go ahead and insert a clip of me opening this wig on camera, with you guys and then we're going to come back and talk about the wig you, oh okay. So basically, i just um took my little scissors here and i went ahead and thinned out the part a little bit, making it a little bit more distinct. Looking and, as you can see, i didn't take out much hair. This is only the amount of hair i took off, but it just makes the part look a lot more natural with the wig. So hopefully you guys can see, but i went ahead and i bleached the knots on this wig. It kind of got like a little brassy undertone to it uh. This is my first time actually bleaching knots, but um, i believe, should not and i flat aren't well. I took the hot comb to the closure. To kind of just get, is you know, slick as i can, and now i'm going to go ahead and flat on it i'll be back once the wig is styled, so you guys can watch me actually put it on my head. I did not pluck this wig. I'M not really that great at plucking, wigs, um and plus it's a front part, so you really won't be seeing that hairline in the front, maybe just on this side, so just something for reference. Okay, you guys. So you probably just saw that footage of me unboxing. The wig and how it came and everything that was included with that purchase. Now, let's go ahead and just talk about the specifics on the wig in case you were interested like i said it is their 6x6 lace side, part body, wave, lace, wig, that's a mouthful. It'S kind of repetitive, but it's their 6x6 side, part bodyweight lace, closure, wig. This wig is 250 grams in the weight it's 100 virgin hair for one donor. It'S said to last at least a year. It'S a hundred and eighty percent density, the colors in natural black. On the website, except it can be dyed, the straps are adjustable. The circumference of this wig cap is 22.5 inches, which is a standard medium size and the lace is a swish swiss, medium brown and again, as i stated, it is a 6x6 lace closure um the i got, mines in 18 inch and it retails for 319 dollars. I don't think i paid 319. I think i paid like 260 because i think at the time they did have like a 23 off um and then also i had like reward points so yeah. I didn't pay that much. So that's another thing that i will say with um ordering through this company they usually always have some type of promotion going on where you can get money off the price and then, as me, as you become a frequent customer, you start to accrue points and then Those points can be used towards your next purchase, so that's just something to keep in mind, but anyhow, you guys saw me unboxing. The wig here is the wig here um i just went ahead and added some curls and some flexi rods to it and um. I also bleached the knots on the wig as well so yeah before i put it on. I am just going to go ahead and put a little bit of foundation where the closure line is and kind of around the here, the hairline here, and then we can go ahead and install this wig, this okay. So, to put my wig on, i am going to be using this even wonderlace bond adhesive spray. It says extra mega hold. This is my first time using this braid here. I normally use the guys to be glue, but i'm also going to be using their edge control as well to uh glue my wig on so yeah. Hopefully this works, so i already have my stocking cap on i'm just going to go ahead and start to spray. This on and then um put the wig on. I do want to make sure that the bands are already on in the back, because sometimes the bands can come loose. So let me make sure i put this on the last one because i do have a smaller head. So what i mean by that is in the back. They have these little um slots where you can adjust this strap for security. I like to put it on the very last one because, like i said, my head is on the smaller side. So um just you know for reference. You can adjust that in the back to your liking, i'm gon na go ahead with my spray and start to spray. My cap down, actually i'm going to put the wig on first then spray, my cap, just so i can see where i want it. Okay, so now i pretty much have the wig position where i want it. I'M gon na go ahead with my spray and start to spray. My lace onto my cap, i'm also gon na put the cones in that are made into the wig for just some extra security. You totally don't have to do that. It'S definitely a personal preference, but i like to do that. I'M doing this out of order, i'm so sorry you guys i should have cut my lace and then spray, but i didn't so it's okay. If we have to go back in and re-spray it and glue it down, that's fine, but i'm going to take these little scissors to start to cut my lace. Where i want it, you could use the uh the eyebrow razor thing if you want, but i like to use this, because it gives me a little bit more control my slip, stick and kind of just smooth it over, especially these flyaways. I will say that's one thing that i didn't like about this wig i feel like when i was curling it. It was a lot of flyaways like i'm, not sure how they cut this wig, but it was very choppy like very, very choppy. So that's one thing that i did not like about this wig, you, okay guys. So this is the final result with the wig put in um. I just went ahead and comb my curls out a little bit and tighten up the ends with my wand, but i i really like it. I really like her um. I think that fluffing it up with some um wand curls just gives it a little bit more body than wearing a straight, so i would definitely recommend you know wearing this wig, maybe curled and not so much straight um, but i i really really like it. I could have did better with the closure um, but for now it's given what it needs to give i'll have this wig linked in the description box below. If you like, this video, don't forget to like comment and subscribe before you go, and i will see you guys in my next video bye, guys.
Comments
Pamela Herron: Looks good on you
Millie Millie Banana Peely: Ugghhhh! The nets and hair spray/glue scare me!!! I just do the combs and DASSIT! Lol But great job, Meg! ❤️
Kiara Logan: can we get the link to the wig i need a side part