Chrissy Bales|| Yes 5By5 Lace Closure? No Thats A Frontal || How ||Start To Finish ||No Glue!No Gel
- Posted on 14 March, 2021
- Closure Wig
- By Anonymous
Hey Ladies! I’m back with another tutorial
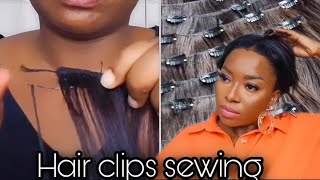
I will be doing a tutorial on how to achieve the lace frontal effect using a lace closure.
I will be sharing tips on Bleaching, plucking and toning of a frontal. Including a fully installation video. Filled with tips tricks and Solution .
Products mentioned in the video:
*Bleaching the knots**
Wella blonder bleach powder
Wella peroxide 9%
Activating Emulsion
Duck clips
Foil
mixing Bowl
Tint brush
Gloves
Foil
Table knife
Osmo violet Mask
Plucking : tweezer
Tail comb
- Baby hair brush https://amzn.to/3lu9WQP
- CB Edge Slayer band https://chrissybales.com/accessory?pr...
My skin: The Cbsoaps
instagram: https://www.instagram.com/c.b.essenti...
The unit I’m wearing in this video - Blonde Bombshell https://chrissybales.com/product_info.....
You can also order one of our custom units online at http://www.chrissybales.com
To learn more please visit our e-learning site https://elearning.chrissybales.com
Please don’t forget to like, comment, share & subscribe!
Stay connected with me on:
Instagram: @ChrissyBales
Twitter: @ChrissyBales
Snapchat: @ChrissyBales1
Email: [email protected]
Thank You!
- [ ]
Hi guys, my name is christy bells and welcome to my youtube channel. So today i'm going to be doing a tutorial on how to achieve this amazing frontal. Look using a 5x5 lace closure. Yes, i said it and the amazing thing about it: they bae it is glue, no glue. They snug, you less brilliant means you need glue, but this is no atom of blue on this hair baby. If you already subscribe to my channel, what are you waiting for? Click the link down below to subscribe. Also, you can follow me on snapchat, instagram, twitter, then chrissy bell and christy bells who won first snapshot baby. Have you seen this hair? Look at this? All i used was this miracle cb edge layer? It'S all i use to achieve this glueless unit. So if you like to see how i achieve this customization customize, my lace closure to look like a front door, please keep watching. Also, this is for women. That is in a hurry to go, but do you wan na lose slay? This is the hairstyle for this. This is the hairstyle, for you also do not forget to check out this week on my website. It'S guadianada in lace, closure. Please check it out and yes, let's begin so today, i'm going to start by bleaching the knots of the lace closure. By doing this, you need to make the nose of the closure to look transparent or to look blonde or brown, but not black, as it is right now so now. The first we're going to do is to mix the bleach powder and the peroxide make sure that these two are in sync, if they're, not in sync, you're, not gon na get anywhere, okay. So now the first thing we're gon na do is to get a full scoop of the bleach powder into a bowl. Once this is done, add three quarters of the peroxide into the same scoop. You'Re using now you are ready to start bleaching, the nuts okay mix. It very well to the extent that it like you're, looking for a consistency like a toothpaste, consistency that kind of consistency you're looking for like a toothpaste, ish kind of movement. So it's still moving, but it's still, it's still stiff, but not too stiff. But it's not too liquidy either so now, once this is done, you're gon na use the baby wipes to make sure that you to tame all the baby hairs backwards. Okay now turn the um the closure upside down and begin to bleach the closure. Okay. Now, yes, i am still using a knife because it's still the best incense live spread. However, if you want a full tutorial like a full detail, tutorial on how to bleach your closure or a frontal, please watch my elenin video, it's very, very good and it teaches you how to properly bleach the measurements you need, and everything like that. This is just a quick sweep through to show you guys how to make the lace closure look natural. It'S literally the same thing you do with the frontal, but, however, you do take less time using a closure. Okay, once this is done, cover the closure with the foil that you used to apply it make sure you do not put your hand in the middle of where the claw of where the bleach is or it will seep through now, you only all you need is About 25 minutes and voila, so i'm using this closure for myself. All i have to do is to actually turn it. I have a detailed tutorial on how to turn your hair on instagram. Please check it out. It'S called christmas. Also, another method. I found a way to turning. It is by using the violet mask, which is what i'm using right now this violet mask is so powerful, so it conditions the hair and also tone it all. At the same time, okay, however, if you are darker than me, i would advise you to actually use a tint. Now i have a tutorial detail tutorial on how to tint the lace frontal. You can apply the same method to this, but obviously it would have to be a lesser time. I'M talking about seconds not minutes anymore. Now i keep this on in for 10 minutes and voila is ready to go now after 10 minutes. I will go and rinse it off, and that is all you need to do now. The next thing we're going to do is called plucking of the lace closure. Yes, i pluck my lace closure and then i plug my lace closure going backwards. I can do forward and i can do backward again. I know i keep talking about my e-learning, but i actually have a detailed 30 minutes plus tutorial on how to pluck on my e-learning. However, what i'm gon na say to you is plucking is one of those things that it requires. That is actually practice makes perfect. You know there's no way someone's like there's different ways where you i can teach you my techniques and teach you everything that i know about it. But if you do not practice and practice, you will not be able to get it now. I'M gon na use the black hot chrome. You guys already know i've been talking about this black outcome is everything it's amazing and don't forget to use cb 10 to get you a cheeky 10 percent of cb 10., i'm going to put it on the screen right now, cb10 for a quick, 10 percent off Now, that's what i did i used to achieve this um look! Okay. However, when it comes to plugin this time, i don't actually try something different like trying to pluck more um trying to create the widow's peak using a plucking technique. Normally, i would created with this peak by the way i cut the lace, but this time around, i tried to use plucking to you know, to create a widow's peak and for my first time it's actually not bad. I'M gon na have to continue practicing on it and actually work on it, because i feel like this can actually looks. This actually looks incredible, but yeah, but let's see actually see where it looks at my head. The reason i've done this with this peak is because i'm not even sure if i'm gon na use a middle or a side, so, whichever one i decided to do, it was to look good okay. Now, let's move on to the installation so now installation time! This is what this wig looks like on my head and to be completely honest, i'm actually quite impressed with how that widow's peak is looking like wow, but um. I'M just gon na target a little bit to the side because i love. I love. Love, love a side pattern. So now i'm going to actually try to define the side pattern by using a talcum, a mousse and also yes, our religious black, hot crumb. That outcome is needed, every single person to have a hot scrub. If not, what are you doing? Who are you playing with okay? So now that's what i'm going to use to define it right now, i'm actually applying mousse to it. You could use the ors mousse. You could use the head smooths. There are so many mousse out there as long as it's for styling mousse. It'S ready, it will actually do once you've got to put the mousse in and sometimes i'll add a little bit of. You know hold on spray and i'm going to use the hot comb which is really really super hot to actually flatten flatten it. So it looks really really flat. Now i'm going to get into cutting of the lace when it comes to cutting a hd lace. I beg you to be patient, please be patient, you will need a scissors and a razor to cut it, because you need the razor to get you that amazing. You know edges and also you need the scissors to give you a cleaner look after you've used the eyebrow comb. Okay. So now i'm just gon na go ahead and cut my lace. My little lace closure, like you guys, can already see. This looks incredible. Like look at how that plucking change my whole look: okay, now, as i'm using the razor to literally cut through some of the laces, the extra laces. Remember, i'm using a decreasibles hd lace. This is not as simple as this lift is actually high definition and it's so thin, and it's so flawless and look at how amazing it looks. When i talk about glueless, it's glueless, like i believe you me now, i'm just gon na add some baby hair because of you. I know people are loving baby hair right now, so i have to incorporate some baby hair to my wigs to make it look more natural and help it look more realistic. Okay. So now i'm just gon na do it on the screen. All you have to do is to if you're watching this video follow me if you're making. It also follow me, okay and if you have not subscribed to my channel - and we are halfway through here - baby girl you're halfway through what are you waiting for just please. Please please go and subscribe to my channel, so i can, you know, do more videos now i've done the baby hair, because i had to do that off-screen because it was so hard to do with us with a middle five. Ten inches away from me. I'M just gon na pin my hair up and um. This is the this. Is the amazing thing that you need? Okay now, because this wig is fully glueless, all i've used on my edges is actually mousse. The next thing i'm gon na use is to use the chrissy bells edge layer to make sure that this is behaving itself, guys this edge layer is my newest invention, guys. This is everything you need to lay the edges of your lids with glue or without glue because boy, oh boy, it's it's literally. It'S adjustable guys. It'S not it's adjustable, there's no tying involved and the material is not like the material you use to place a band on your wig. The material is so soft and it does not mark like it does not. You know, you're, not struggling okay. So what i do all the time is to leave it on for two minutes. Make it really really tight for two minutes, then release it and leave it to literally relax for a good 15 minutes once this is done 15 to 20 minutes once this is done. You'Re actually ready to go now. I'M gon na spray, some of the holding spray to my white tooth comb just to combat that curls, because i'm a slay mama, okay, like we, cannot be going around with ringlets or ropes. Like i call it, you know, i need to look like. I woke up like this, so now after 15-20 minutes. This is what it looks like. It lays your edges to perfection. Ladies. Yes, this is the end of this tutorial. I hope you guys love and enjoy this amazing lady. We have people. Thank you guys so much for watching this tutorial. Please do not forget to like comment and subscribe to my youtube channel. As you can see, this hair is laid for the guys. Okay. Also, if you want more detail tutorial, please check out my e-learning programs. It has a lot more detail on plucking ambulation, okay and also check it out. Okay,


Comments
nemi banigo: Chrissy you are so talented, I love all your tutorials ❤️❤️
Mrs Jo Danquah: Chrissy this is really valuable information. Thank you!
Flatoutfabuloushairandlashes: Hi Chrissy You make everything you do look soo easy Your one of my fav hair stylist Thanks soo much for this...
Eyes On Nique: Loved this video - very informative! Thank you!!
ThatsSoBlessing: This was so detailed and neat
Siyai Fazo: Wow this is amazing. Good job
Jean Obeto: Thanks for sharing. Very beautiful
Tokslaboss Sanni: Thanks for sharing I definitely learned a lot
Ju Renner: On , thank u, the way you do it looks easy.
Luxurious Hair Wigs: Wow this is amazing
Chinasa Ogwe Ogwe: Beautiful very detailed
42Laj: Your work is amazing. Wish you were here in California to style my wigs. I can never get the lace to melt down and blend.
Chanel Kershaw: I live in the and I just purchased the iron it cost €51.99 I hope it’s worth it!! ❤️
Dammy Saint Claire: Love it
Oluwakemi Kuejubola: Wow!! You’re the GOAT. This is so amazing
Princess Ivwurie: OMG Chrissy I loveeeeeee. Can you please tell me what camera and lights you use. If you can, do a tutorial on you YouTube set up! I know loads of people would love to see the BTS of your work!
Emmanuel Yankey: Chrissy, thank you,,,this is a service to mankind
Chanel Kershaw: Question where did you purchase your purple mask specifically from ? Or the web site please and thank you
Regina Hall: I am mesmerized ❤️
Ali Pearl Hair: Love your video sooooo much! Hun, could you please check the email?
\charlene_M: Slayed! What dye did you use to go jet black?
Seehola Etim: Thanks chrissy, super helpful. Love from Nigeria
Dia K: Your info is tha Bombb. Thanks Siss
Oyebimpe Tella: Love love this
Toyo Bright: Beautiful
No Frauds: Girl your wigs are IT!!
Kesha’s Comedy Set: Beautiful Queen
Afia Belle ♡: The hair is really nice did you colour it jet black or it came like that ?
Maryse Slovy: Yessss
Marichelle Jozefa: ❤️
Mwajuma Mkonya:
faith khathi: Is this a 5*5 or a 6*6 closure I quite didn't hear in the video.
Afia Belle ♡: Sis ❤️
E.brown Brown: Slayyyy Mama
hair by fizzy:
Khaleesi: I want a makeup tut
Kay Campbell: Lipstick details please..makeup tutorial
angela wahome: Your commentary