Diy Ghana Weaving Wig Without Closure *Beginners Friendly*
- Posted on 20 April, 2021
- Closure Wig
- By Anonymous
Hello Lovelies, this week I will be showing you how to make a ghana weaving beaded braided wig with expression braid extension without using a closure. I also showed how to put your beads in using the rubber band method, I hope this braided wig tutoral is helpful and easy for you to achieve yours. If you have any question, let me know in the comment secton and also leave ❤️❤️❤️in the comment section as well. I love you always ❤️
_____________________________________________
INTRO: 00:00 - 01:40
ITEMS YOU NEED: 01:41 - 01:55
MESH CAP PREP: 01:56 - 06:06
BACK BRAIDS: 06:28 - 07:53
VENTILLATING MIDDLE PART: 07:54 - 09:47
CROCHETING LACE NET: 09:48 - 15:34
FEED-IN BRAIDS: 15:35 - 17:04
PUTTING IN BEADS: 17:05 - 18:34
PUTTING ON WIG: 20:25 - 22:47
OUTRO: 22:48 - 23:52
____________________________
Small crochet ventilating needle : https://amzn.to/3fNj9lO
_____________________________
#ghanaweavingwig #wigwithbead
____________________________
FOR A MORE DETAILED VENTILATING VIDEO;
FULL LACE VENTILATED BRAIDED WIG: https://youtu.be/i32FFS3-nso
_____________________________
CHECK OUT MY OTHER VIDEOS:
HOW TO MAKE A TURBAN WIG FROM SCRATCH;
HOW TO DIY YOUR OWN CROCHET BRAIDS;
HOW TO MAKE A BRAIDED PONYTAIL WIG;
______________
+ FILMING EQUIPMENT
- Canon 750D
- Ringlight
- A soft box
_______________
+ PLACES TO FIND ME
INSTAGRAM: https://www.instagram.com/the_basil_me...
EMAIL: [email protected]
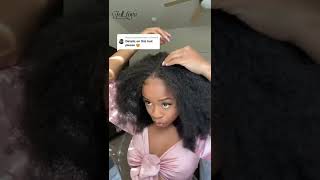
Hey lovelies welcome back to my channel. I am the basil mercy in case you don't already know, and in this video i'm gon na be showing you how to make this gorgeous gorgeous wig. I have on so this wig. I would call it a ghana, weaving or i don't know, ghana weaving feed-in braids. I really don't know what it's called if you have an actual name for it. Let me know in the comments section down below all right, so i did this without any closure without any frontal, just the net all right, so i'm gon na go ahead to show you how i did it. I advice you watch this video from beginning to end. All right from the main, the main to the end, because guys i will drop like some very specific tips or technique that would help your process be a lot more easier when you're doing yours all right, i've done the struggle, so you don't have to this. Is my first time actually doing something like this all right? It'S my first first time, i'm not gon na lie to you, so i did struggle a bit, but i found my way around it. I'M going to share how i did that with you. I'M going to share everything i taught and did all right everything i thought was right. That'S you know, didn't come all right and what i did to make it better, so that your own process would be a lot more easier all right. So it's a gon na within week with beans. In case you don't know already, and so i'm also gon na be teaching you how to put the bead in all right. So if this sounds like something you're interested in then make sure to keep on watching guys, love you, okay, lovelies. First things: first, i'm going to tell you everything you need to make your own wig, i'm going to be using the mesh cap, my closure net, the beads i'm going to be using and also my attachment and then my crochet pin, which is like the very most Essential thing for this tutorial, the first thing you want to do is turn your cap, your mesh cap upside down, one turn to the back and place it on your mannequin head, and this is important if you're, using a closure, lace or a closure yard, because if You'Re just using a normal closure, you do not need to turn it to the back by turning it to the back, to help with the stitches not showing, and i will leave more smoothly. So i'm just going to go ahead to measure how many centimeter i needed to be out for certainty. I find out four inches rather or the measurements i find out is better when it's an odd number, so the medial will just be the middle. I don't know if that makes sense, because when it's five you have like five divided by two, which gives you 2.5. I don't know if that makes sense, but yeah. So i prefer an odd number in case you're doing yours too. So i'm just going ahead to pin that list yeah down i'm going to go ahead to pin the amount i need for where i've measured out already all right. So i measured how deep i want my parts to be and how wide i want it to be. Then i start pinning down it's very important for you to leave a lot more than i did at the front of the list like let it be more than it is right now as you're, seeing on the screen. That will help the world be a lot more easier. So i'm just going to go ahead to cut off the essence. Please, because you do not need the rest of the list. Actually, just the one you pinned down, or you want yours to be more smoother than mine. Okay, you don't want any creasing anything on the wig. You just want it to leave very flat. You want the closureness to be very flat and very important, like i said, make sure make sure some closure net comes to the front like you want to leave more than two inches nets on the front and not just that. Like fewer left, i don't think what i left is more than an inch all right. So take note, so i'm just gon na go ahead and sew that down i'm sorry for my voice. I have actually actually have like a cracked voice right now, but i just really had to put this video off. So i'm really sorry if it sounds bad, so i'm just gon na go ahead to turn the the match cap. I'M gon na go ahead to turn it back, but before turning it, i'm gon na cut off the excess nets. We have because it's no longer useful, so i'm just going to cut that off before i start the week. So this is your match. Preparation, if you're not using the closure, you do not have to do this part like if you're not using the closure. Yet you don't have to do this all right. So i'm just going to go ahead and place this on the mannequin head and then start our weak tutorial properly so from cutting it. I discovered that, like i had a bit of like lose and i really don't like taking any chances of my week. If you know me already so i just went ahead to sew that down all right. I don't want it to ever lose in the future, because i really hate going back to something i've done. So i'm very very like very what was the case. I don't know, but i'm very very like i just want my knots very tight, so i don't have any mistake, so i'm gon na go ahead to use the two finger method. If you watch my videos, you've seen me use this before, but i don't really think this works as much for this style of week. I don't think so. I i found it wasn't really necessary actually for what i would tell you is put more at the back and less at the side. That really helped a lot, because the back is going to need more coverage, because you have a lot of the front going to the side, so if the back will feel empty, so just pull more at the back and less at the side. If that makes any sense, so i'm just going to go ahead and cut my attachment. Actually, i had three attachment that i got one small one and two bigger ones, but the small one i cut it into four, which i use for and from bigger one. I cut them into two and i just went ahead to stretch the one i cut into two so guys i'm just going to do the back like. I really didn't want to do much of this on camera, because the main focus here is actually our front right and i've actually done this on my previous video. So if there's any confusion on this step, you can actually check out my previous braided videos and if you have any confusion, you can ask me in the comment section down below and i'll: shall we get back to you all right. So the only thing i do is cut out the attachment i'm going to be using put it into the net and then tie it up and then braid as normal. That'S the only thing i do for this fact. Actually so guys. I want to quickly speak on the weight of the week. You have to be considerate of the weight of the week when you're putting in beads. You don't want it to be heavy, you don't want it to be too heavy and drag you back. I'M not saying you can't make it, but just be careful, just be careful, whatever you're doing make sure you're doing it right in moderate proportion. So it doesn't drag you back. If you understand what i mean all right, so actually i'm braiding this now and i do not braid to the end. Why? Because i'm going to be putting my bead in so i don't need to break to the end, so just bring it to where you think you want your length to be. That'S all, and just let it be until at much later, when you're putting on the beads. So getting into the creature part of this video all right, so i'm going to be ventilating that net to fix thing, i'm just going to take my time for the middle part. You already saw me measure this middle part out and when i'm taking my time to do this, one after the other on like when i'm making it for the line, i don't know if that makes sense, but taking your time to do this will help you with How accurate the line is going to be like how accurate your center part is going to be so advice you do it before, and it gives it a more natural feeling. Actually, it is a very natural feel that when you just have a big lump and you're just breathing it, i don't know if that makes any sense. But yes, so i advise you do this before you start your braiding all right, so you're going to see how it looks like because i did it this way, you're going to see how the middle part of the week looks like. I actually made a mistake in the center part, but it's not actually a very noticeable mistake, but i didn't make the mistake, because i was doubting myself, so i think you should do a center part. Just have it in mind that when you start weaving it almost looks like you are not correct. I i don't know if you try it out, you figure out. You figure out what i'm saying, but it almost looks like you're not correct, because braiding it down will drag it. So it looks as if the line you've crocheted before is wrong, but just keep on going actually. So i just go ahead to do this same thing. On the other side, you can see i've braided the other side, i'm just going to go ahead to do that same thing. On the other side before i actually now start braiding one by one so very important. I actually always use a measurement. So my thing like my hair, is like symmetrical or like in place after i'm done so what i did was i used my tip. I measured one inch of one inch in if you can see what i'm doing i do it one inch off and one inch in so that's the spacing i actually used in creating that the braids, so they look natural and they follow the same line. If you get what i mean, you don't have to do it my way you can draw it freehandedly, but it's actually a lot more neater like this and a lot more, you know arranged if i can say that, so i'm just going to go ahead and just Draw that line and make sure what i'm ventilating follows that line very important guys. So now i'm going to start making the first line for you to see all right. So what i start with actually starts like really small at the front and at the front i actually like do like three on the same line. I don't know if that makes any sense, but you can see i'm actually taking my time, i'm making. I need it to be small, but i still needed to have volume, so i kind of crochet the same place like so many times like so close to each other, so it gives that volume. So it's not like really slim, because that's not the vibe i'm going for, but that's the vibe you're going for you can actually do that all right. So i'm just going to go ahead to ventilate it or rather crochet in and just take your time guys really just take your time. This is actually on speed like i'm slow on his own speed. Actually, because if i had not put the video on speed like this, video will be so long and i really did not want it to be longer than it is all right. So i am actually taking my time. I take your time. You don't be in a rush when you're making your week take your time, and the thing is that the more you do it, the more you get used to it. Actually, so with that, i'm just gon na go from smaller to bigger and then to the biggest kind of you get the vibe you have to start, you have to start smaller and then progress to it being bigger and, like i said before, i did not stretch My ventilating hair, so for the bigger part i actually found this was more helpful when you cut it first before coaching it in it's just more helpful because, like you get to control the size, you actually want. If you understand what i mean you get to get to control the size you want, you know: that's um. We have the m from when we sold the the lace to the um match cap we're going to cover that up to with the braids. So, if you're measuring it for you're measuring the space, you want the least to take put that in mind that you're actually also going to be braiding on the match cap itself, because that will help cover the black and let the match copy like it won't show. And the stitches won't show all right, so i'm just going to keep on doing that all right, it's time consuming actually, but it's what it's at the end. I assure you it's actually very. What'S it at the end, when you see like like at the point i was like, should i stop i was like, should i stop, but when i saw the progress and how it was coming out, i was actually really impressed by it. So what i'm going to do now, i'm just going to braid it as i would normally do like, as i would normally weave like normal or back, but like some people want to do it. The other way, which is like the kind of weaving way that you feed in your braid, you can do that. Also, if you like that method, but i just feel this method is actually more beginner friendly and it works well too right, it looks cute. It works. Well, like what else like you could go ahead to feed in but like this is more literal and sometimes you may be feeding in and just won't be working all right. So if you can look closely the ones i didn't actually tie, i pick them one after the other from side to side i fit in, like i pick from one side put it on there and then twist like i will break normally and pick up the other One like that's the secret seeds and then you're good to go and you just keep on breathing. So i just really want you to get the concept because i could only put in one clip of me doing it because of the time of this video all right. So i really want you to actually get the concept of braiding it all right, so you crocheted once in front, you tie them, but the ones at the back. You don't tie them because, like with bigger knots, it's going with bigger hair, it's going to form a knot and that will not look pretty you'll make your your braids, your braid, you know make it look raised and you want it flat. So that's why we don't the one at it down and we'll just feed it in if that makes any sense all right, so i'm just gon na go ahead to finish up the rest of the week all right, so you saw that i used the shorter one For it all right, so i've already done the other side. So i'm just going to go ahead to feed in the longer braids the one we put into two i'm going to go in and feed it in into the ones from that. We'Re ventilated right, because if you have used a longer hair to ventilate, it would have been a lot more stressful. It works it's possible but battling with long hair and trying to weave it trying to get it in place. It would have tangled a lot if you want to do that. It'S fine! If you want to go through that, it's really really fine. It works too, but this is just more easier and you know i'm here to make your work easier for you all right. So it's better this way, but if you want to go the other route right, you have to do it the long way. It'S fine too. So i'm just going to weave the hair like i would normally do and then the place you know you want to fit in is when you find the hair starting to tin out before you actually want it to tin out, like maybe the and ventilation here is Finishing off it becomes a bit too thin. Then you go ahead to add more and just feed it in to the desired weights. You want all right, so that's how you fit in basically, so i've gone ahead to create every one of them. I'M gon na have to finish up every one of them. So now i'm going to go ahead to put in the beads i've put in the beads on every one of them just remaining the last one i left for doing on camera. So i'm just going to go ahead and take that hair, i'm going to fold it to i'm going to fold this in the part i braided that's more easier than folding this in the parts you did not braid. So i'm going to fold this in that part, then i'm just going to go ahead and put in my bead. You can actually do this with a crochet pin. You could do this with a beeping car. All right, but using the hand, also works all right. So you might want to go ahead to do any one that works well with you all right. So i just push that off, but then i do i put all the beads in every one of them. First of all, push it up and then come back down, bring one of them down measure the length i want it to be all right. You can see what i'm doing and then i'm just going to put my rubber and tie it until it is very, very secure, like you want it very, very tight. All right, you don't want it to lose. I make sure you get original rubbers guys they are fake rubber out there in the market, so make sure you get original rubbers that will not cut because they are fake ones that do cut all right. So i'm just going ahead to cut off the excess hair. I have and then that's it guys. That'S it fixing in my beads all right, pretty simple, pretty easy! Okay, so i'm just going to trim off anything that shouldn't be there and because, like we didn't actually stretch the hair, it might have a lot of a lot of like poking out air, but that's fine. You can actually require to trim it. Just take your time to trim it so right here now i'm sewing down my hair. Why? Because i don't know if you do when you do your braids, if they sew it, because it's very important to sew it so like it doesn't move all right. It doesn't move it stays as it should stay all right. So, no matter how you shake your head, it doesn't move an alternative to sewing it like this is actually just breaking it down to the recap that place you're saying it's, that's a very good alternative, but i didn't want to. I didn't want to braid it out far down, so anyone you do works. Well, it works perfectly well, so you want to sew it all round, like you want to go all around, make sure they're in place as you're sewing. Take your time just make sure they're all in place and sitting well and flat. You can see the other side is raised and this side is more flatter. Now, all right. So now i'm just going to go ahead to show you how flat this is showing it back. I made some arrows with the back, but that's because i didn't measure right and that's totally fine happens all right. So this is. This is how the wig is looking like, so i'm just gon na go ahead and put it in hot water, all right, so yeah guys, hey lovelies, we're done making the wig right now and guys. I have actually put it on like just for a couple of seconds and kind of to see how it looks, and i think it actually looks amazing, actually, all right, so my hair is not like um. What'S it called my hair is not braided like it's like loosened, also because i've been on my hair for like a while. I don't want to weave all back for some reason. All right, so i just would just wake up so the week might not be as late as we wanted to, but that's, okay, all right! That'S it! I just thought strip that in alright. So this is how the wig is looking like with the beads, the shenanigans and all so i'm just gon na go ahead right now and try it on. As always, you know if you want to try it on. You should put powder on it, i'm not going to do that now, but normally you should put your color foundation or powder on it all right. I just filled this with cap with surface if he doesn't, i might put on it. So i'm just going to go ahead to put it on, so i'm going to start from the back to the front. Okay, i think i have to put foundation on this. It'S too light i'm going to put foundation and be right back. The love is i've gone ahead to put my foundation on the wig. All right, you can see it's no longer as bright as it was before all right. So if you i didn't do that on camera, because i've done that on camera. On my other videos, my other week tutorials, so in case you don't know how i did that you could check out my other week. Tutorials i have a playlist. You could check that out as well all right, so i'm just gon na get right into wearing this again. This guy's, this weak cap that i used is like the best wreath cap ever, i'm just going to say that, so this is how it's looking guys. I'M still going to show you the full length, but let me go ahead and cut yeah this is it guys, obviously, i'm going to stand and show you with the bead, like, obviously all right, so this is with the bead all right. It'S like yay all right. So i did my best to kind of make sure that the beads were equal. All right, you could, i don't know if that's the style, i don't like his. The beads are not equal, but that's what works for you. Then that's fine. Whatever works for, you works for you all right, so this is the week guys this is the week. I think we can go ahead to you know style it. However, we want to - and just you know have fun if there's one thing i wish i did better was to actually like put like fuller ones at the back, while leaving the side a bit more scantier all right. So i should have done the back to be more fuller, so lovely. Thank you so much for watching this video and, if you're, watching the end of this video, you already know you're the what you already know: you're the real mvp. Thank you. So much and i'll see you in my next tutorial guys, love you bye,


Comments
Ezenwome Chisom: You make this look so simple I follow your videos and I made a frontal wig for myself from scratch, now someone paid me today to make hers. Thanks so much for this lecture, will try it out as well
Princess Bravo: I love it❤️ this is so beautiful
AYO ADEOLA: This is soo beautiful and well detailed.. thank you mercy!!
Esther Martins: Wow!..Thanks for the details..I really learnt a lot..I’ll practice it
Proud bts Armies: I just love this
Chiamaka Momegha: U are just the best always finding a way to make it easy and beautiful thanks alot dear
Odafe Martha: Your videos are always very helpful… God bless you. Please I will like to know how many packets of attachment I’ll need to make this Thanks
Waltia Williams: Can you tell us the brand and name of the cap you used or provide a link please??
Sunshine Bella: This hair is so beautiful
J square: This is really beautiful
Great Succeeder: Well done girly
chinedu obuekwe: Finally a wig for me
Blessing Olet: So nice can’t help but subscribe
Rebecca Abbey: Woooow Beautiful Thank you I love you
Lucy Schäuble: Wow...beautiful
Faiyetole: How much is this your crochet hook you use and how can I get one
Augusta Orobosa: Simply the best
memunatu Bangura: Wow Beautiful
Omolola Jeradine: Nice and beautiful
Angel Itawansa: This is awesome!!!. Pls where can I get the same crocheting needle and the lace? The needle I got was tearing up the lace. And the lace I have is not very strong either.
LG C: Beaauutiful!!
Kingsholz 👑: Keep up the good work dear
Kingsholz 👑:
Phyllis Ashley: How can we order your wigs
Anum Maryann: What if your cap has a net
Peaches Charleston: Where do you get the net from pls
mercy James: I don't no how to do the closure part
Crystal Thompson: Wow nice and neat
Seun Shey: Mine mine mine
Martha Ossai: Tnx dear
darlia yuo: Plss for thé pic of the smallest size crochet niddle
juliet obiaga: Wow I will try dis
Lily brago: Please are you from Ghana, can someone come and learn it
favour kids: Please what size is the wig cap
eunice Kamara: Cute
Ami Fall: ❤️❤️❤️❤️
Aminata Ansumana: I will like to buy, how much
Ronda Lomax: Okay now hunti
Fidèle ADZIVON: Je veu faire une formation, comment faire?
kolawole oyindamola: This is call 2 steps