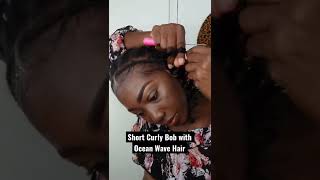
Installing Ocean Wave Crochet Hair On Thin 4C Hair! Toyotress
- Posted on 13 July, 2022
- Closure Wig
- By Anonymous
Shop on Amazon
Toyotress Ocean Wave Crochet Hair - 16" | P1B/30 |
Link: https://amzn.to/3RwHEp8
Use "MelissaD" for 20% off on the web ➤https://www.toyotress.com/collections/...
Length: 16 inch
Color: P1B/30
Pack: 8
Material: Synthetic
▬▬▬ FREE HAIR GIVEAWAY ▬▬▬
Join our FB group: Toyotress everyday benefits
Inbox "Difunee Toyotress Hair" page for the free hair information
Group Link: https://www.facebook.com/groups/toyotr...
▬▬▬ MORE SALES FOUND HERE ▬▬▬
Shop all: https://www.toyotress.com/collections/...
$22.99 hairstyles: https://www.toyotress.com/collections/...
Bestsellers: https://www.toyotress.com/collections/...
▬▬▬ HOT SALES ON AMAZON ▬▬▬
Tiana passion twist: https://amzn.to/3AxrvXv
Butterfly Locs: https://amzn.to/3sPc2yf
Toceana wavy locs: https://amzn.to/3xExmIp
♥Connect with us
♥Instagram: https://www.instagram.com/toyotresshai...
♥Facebook : https://www.facebook.com/toyotresshair...
♥Tiktok: @toyotress_hair
♥Business email: [email protected]
Hey bills, i want to show you this new hair i received from twiliotress.com. This is their ocean wave hair. It is crochet hair. I have the color p1b slash 30. um. I received eight packs of hair. It also came with this crochet needle. The hair is almost like highlighted with the 30 color. It'S really pretty. It is a yaki texture as well. So it's going to blend well with natural hair. There is a sheen to the hair, but if it's too shiny for you, you can just use some dry. Shampoo to get rid of the shine, i also, if you plan on brushing it out um. It also helps dull down that luster, my local beauty supply store. I purchased this crochet cap, i'm gon na secure it to the wig cap with some t-pins. Now it comes with like a fake lace, part to me, the part is really wide. I'M gon na show you a way to sort of camouflage that. Also, if you want to you, can cut the lace out, you don't have to wear the lace. You can wear this like a u-part or a v-part wig uh anyway, so i'm showing you how to crochet the hair. I normally go through about two different holes on my wig cap, so i can get as much cap as possible. Then i pull the hair through and then loop it twice before, tightening the knot. So i'm going to show you guys a couple different times, so you can sort of get the idea. So i'm going to pull the hair through the loop twist the loop and then pull the hair through again, and this is sort of like double knotting, the hair, so that that way, it's more secure on the wig cap and you ain't got to worry about the Hair falling out it's locked in now with this hair. You guys, because i have eight bundles in this video. I'M sort of putting the knots close together try to stagger them space them out, because it's so much hair you don't have to have um hair all over the cap. I don't think i'm saying that correctly, but i'm just trying to say this space, the hair out. Don'T overlap them, don't put them right on top of each other, just like sort of stagger the hair so, like i said, i pull the hair through the loop and i'm double knotting it to secure it to the wig cap. It'S really easy. I was watching tv while doing it it's actually sort of fun and relaxing, which is weird and bells. Please forgive my nails. I was in the process of taking my nails off, so i can do a new set. Then i realized i got ta. Do my hair and i ain't gon na - do my hair with my new nails and damage my new nails, so let's just ignore the elephant in the room. When you see me in my next video they'll be done so i'm showing you right here. This is just one bundle of hair, just one bundle you can see how much it covers, so you can definitely space this hair out now, i'm doing this on the cap, but you can definitely cornrow your hair and crochet it to your hair. I just have really thin hair, especially in my crown so crocheting. My natural hair is just not an option for me. That'S why i'm so grateful that somebody invented this cap. I have seen um a cornrow braided cap before, but i'm just like. I don't know if i can do that. I don't know i don't know anyways um. I stopped filling the hair in because i want to work on the parting space, because i want to be able to see how much more hair i'm going to need on top. After i filled in the space, so the technique up here is a little bit different than what i was doing on the rest of the wig. So i just pull the hair through the um cap per usual. Now, what i'm going to do, instead of pulling all the hair through the loop, i'm only going to grab half of the hair and pull it through the loop and then securely knot, the the hair, it's sort of hard to verbalize what i'm doing, but hopefully you Guys can see it, but i'm just pulling half of that hair through the loop and i'm going to pull it tight and you can see it creates a smaller knot and it makes it look more natural like this is more like an invisible part for your crochet Hair so anyways i'm going through two holes, two or three holes. However, however many you want to i'm going to pull that hair through i'm going to open up the the loop. So i can slide my fingers in and i'm going to grab only half of the hair, that's on the other side here and pull it through and then we're going to tighten it so that it creates a knot. Okay, i got a little bit too enthusiastic about that one, but anyways i'm going to do this all the way around the closure. So that way, like i said it - creates almost like an invisible part. It'S going to help hide the fish neck cap and look a whole lot more natural, especially especially, if you have any leave out like i said you can wear this like a v part wig, and if you just have a little bit of leave out. It'S going to be easier to blend it in, but if you are like me and you don't want to have any leave out when it comes to your parting space, then this is going to help you out a lot. So now that i'm done filling in the closure area, i'm going to go back through the wig and find any sparse areas that need more hair and add more hair to it. And this is what the wig is looking like completed. So next you're going to see how i install the wig and make it look its absolute best, so i've washed my hair and conditioned it, and now i got this little fro, so i'm just going to put like some twisting it to like. Lay it down flatter. So i was gon na do a wig cap, but i decided i didn't want that peeking through because, like it's like a fishnet cap, but it might show through a little bit more um. I felt more comfortable doing that too, because it's a fishnet cap right in like a stocking cap or one of those hard caps. That'S going to take your hair out anyways, i'm just putting some contour powder onto the lace to make it darker and blend better. With my skin color, this cap has combs in the front and combed in the back, so he has two on the front and one in the back. I was gon na do a middle part, but i know you guys love side parts. So i said, let me just change it up for the girls um, it actually came out really cute. So i'm sort of glad i did do a side part, but you know you know anyways, i'm just adjusting it. So it fits my head and i'm like. Oh, my god, this hair is so pretty um. I was gon na do all like a one color one, but i was like it's summertime. Let'S do some color and i'm glad i did because the highlights are so pretty in this unit. Anyways, i'm going to do some face framing layers guys i just grabbed whatever scissors i had in front of me trying to get some hair cutting scissors or like some industrial scissors, because this is um crochet hairs a little bit more, i'm sturdy here! It'S like get some stairs that are meant to cut hair baby anyways, i'm just cutting um random pieces of hair that i feel are too long um and i'm just cutting some face framing layers in the front so that it looks a little bit more. I don't say natural, but you know so it looks better more flattering for my face, and so what i'm gon na do next is just tease the hair. That'S around this parting space to try and make the parting space look a little bit more narrow and, as i told you guys, the lace on this cap is really wide for some reason: um. So i'm just going to backcomb the hair to hide it. If you have a teasing comb, that'll work a whole lot better than the brush just to give you guys a tip, but i don't have a teasing comb, so i'm just using what i have on hand. Next, i'm going to blend my a little bit of leave out here with the hair, just to give it a little bit more of a natural look as well. My hair is 4c and i'm natural, so i'm going to be using some edge control to help blend the hair and better. This is the kiss edge fixer like when i first tried this product. I did not care for it like now. I am in love with it. I don't know, don't ask me you guys um, so i'm going to do a little bit of baby hair just a little bit on the perimeter here. I think it just looks a lot better with this hair texture, because this hair texture is just giving me wavy mermaid curls and i love it. So this is how the hair looks straight out. The pack just a little bit combed out with my fingers. Just a little bit and i think it looks so beautiful ocean wave, hair baby, it is absolutely gorgeous. I feel like i'm like a mermaid or something you know. I was planning on leaving it like this, but i know somebody was going to ask me melissa. How does the hair look when it's brushed out, so i was like, oh god, so i decided to go back in i'm going to brush out one side to show you what it looks like um to me. It'S gorgeous brushed out, but when you brush it out, it does get a lot bushier because there's so much hair on there. I think, if you're going to brush it out, i would go in with some thinning shears to thin it out. So that way, um! It'S more controllable, but it's giving me like old hollywood, glam, slash, um, houston, texas, bama hair. You know i mean like it's really really pretty brushed out so um you'll see that here on the one, the right side, yeah the right side, you can see it brushed out. I wasn't feeling it because i know it's gon na be a lot more work. So i'm gon na show you, on the other side how it looks when you finger detangle the hair, so i'm just separating the ringlets with my fingers and coming through with my fingers to try to show you the difference in the hair like to me. I prefer it finger detangle because the curls are still defined and they're still loose and separated, and you still get that volume you still get that that more natural loose curl, but it's just more controllable to me. So that's my preference, but hopefully this was helpful. I will have this hair linked down below in the description bar. If i have any discount codes, i would put those down below in the description bar as well, so i will catch you in the next video. Thank you so much for watching you guys. I love you so much until next time stay fair, stay, fabulous, melissa, danielle, bye,
Comments
Moniez Table: Yessss! I love it! Definitely will be trying this cap technique!
sweety pie: Yeess, you look beautiful Melissa. Congrats on your weight loss too and I love your vlogs. TFS
Brianna Marie: This is bomb!! You look amazing! Great job!
Mayah L: So pretty it reminds me of a flexirod set. You are looking great lady!
Yolande Spencer: That's a pretty hair Melissa I prefer the natural curls instead of combining it out,it's georgious3
Phenomenal_Purseonality: The hair is beautiful. I prefer finger detangling as well. For less volume, try to split each strand into 3 or 4. You wear it well. TFS
Jennifer Harris: Looks great
Frida: Gorgeous queen much luv from New York City!
Lana Lathan: pretty like the color combo great job
anna lewis: hair looks nice i want you to model? pretty