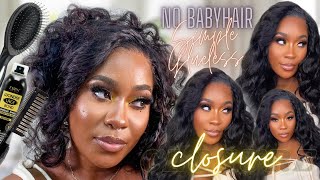
*Must Have* Curly Wig + Detailed Braids On Closure Wig Tutorial | Ft. West Kiss Hair
- Posted on 02 May, 2022
- Closure Wig
- By Anonymous
Hi loves,
Hope y'all enjoyed this wig install. If you enjoyed this video please make sure you Like and Subscribe ❤️
HAIR DETAILS:
▬▬▬▬▬▬▬▬▬♛#westkiss♛▬▬▬▬▬▬▬▬
Hair details: 180% density curly wave 5*5 lace frontal wig 22inch
Video Hair Direct Link➤https://bit.ly/3Km4kVe
Hot selling HD lace wigs➤https://bit.ly/37vD0VV
★westkiss official hair store➤https://bit.ly/3KpIj7Y
Up to 43% off Lace Wigs➤https://bit.ly/3JtqKTu
Hot curly lace wigs➤https://bit.ly/3jgxPvE
#westkisshdlacewig #westkisswig #westkisslacewig
#WestKissHair Official Site Huge sale Big Discount
Join Our VIP FB Group Now (Free Giveaway )➤https://bit.ly/3lzmAA8
❤Follow West Kiss hair on social media :
Instagram @westkiss_hair_store: https://bit.ly/2OlKstu
YouTube @West Kiss Hair: https://bit.ly/2Ol5U1m
Wholesale WhatsApp: +86 13323741050
_____________________________________________
♡ G E T T O K N O W M E ♡
◦ Instagram: https://www.instagram.com/itslouxoxo/
◦ TikTok: Itslouxoxo
◦ Serious Business Inquires: [email protected]
Support My Business:
◦ Website: https://roguecollection.net
◦ Instagram: https://www.instagram.com/theroguecoll...
◦ Email: [email protected]
________________________________________________
♡ P O P U L A R V I D E O S ♡
◦ Story Time: https://bit.ly/3a4R6fr
◦ Nude Lipgloss Combos: https://bit.ly/3s93rFL
◦ Entrepreneur Life: https://bit.ly/2RrfsK2
________________________________________________
♡ P R O D U C T L I N K S ♡
My Amazon Favorites: https://amzn.to/3uHQHYd
◦ Filming Products:
◦ Camera: https://amzn.to/33ZHRJg
◦ Tripod: https://amzn.to/2wSqUV3
◦ Ringlight: https://amzn.to/2URVC8L
But you don't even know nothing about me. It'S all right. You guys, so i kind of already did everything that i needed to do. Um i plucked it already and i took some baby hairs out so right now, i'm going to be showing you guys how i do the braids and i believe this is a 5x5 closure. So um you can do this with 4x4, but just keep in mind. There'S not going to be that much space but, as you guys can see, i kind of separated some hair from from the actual closure and then just um hot comb it down. So basically so the braid after you read it. You won't see any tracks so make sure you just leave some hair out and just you know how comb it down and right now, i'm going to prep this section of the hair for the braid. I am going to be using the um a wax stick. It doesn't matter which one um, but i'm using the sheets balm one and i'm gon na go ahead, and what this is gon na do is just gon na make it a little make the braids turn out a little bit more cleaner. So i'm just gon na go ahead and use that i'm gon na put that a good amount and i'm gon na take it up just a tad bit and then i'm gon na go back in with the hot comb, and this is just basically. This is me molding how, where i want and how i want the braid to turn out like so all right. So after we've done that now what i am going to be doing, i hope you guys can see okay, so i kind of just learned how to stitch braids. So i can't really i'm not good at explaining, but i'm gon na try my hardest to try to explain, but what i am gon na be doing. But you are gon na be using your pinky. So the first thing that i'm gon na do i'm gon na start from the front, not the side, because i don't want it to go back. I actually want them each to set be separated from the side. So i'm going to start from this little section right here and make sure you're already part out your baby hairs if you are doing baby hairs, so i'm going to take off a small section first and if you don't know how to braid, i i don't know How to explain, i just learned from youtube: i'm pretty sure, there's videos on there, but i'm just going to show you guys how to do like a quick stitch, somewhat stitch braid, because i'm still learning myself but um hold on. Let me fix this. Nothing be one mess up, okay, so i'm starting with a really really small section. First and then i want to do a good one or two braid, and then, when i, after i do that, i'm gon na go ahead, as you guys can see, i'm taking my little pinky and i'm gon na separate the hair. I'M gon na separate the hair with my pinky and go and as i go from the other side, i don't know if you guys can see i'm going to do the exact same thing. Take my little pinky and add the hair to the um to the braid, and that's literally what i'm gon na keep doing as i braid i'm gon na keep coming in and taking a little braid now i have seen other people before they actually braid. They just go in and do little section by section and just um: they just braid the hair first and then they do one big braid but um i don't mind doing it this way. So if you want to, if you want it to be more, like you know, professionally professional looking then yeah do it that way like prep it first and actually, you know, do the little sections first and then do the braids. So you won't have to do this method by you know, adding in doing the low sections with your thumb, but not your thumb with your pinky, but this way is actually a little bit more easier for me. So that's how i'm going to do it and i'm not sure if you guys can see you're getting that line, that that stitch braid line and as you guys can see by adding in that um by adding that um wax thick. The hair is actually laying in the braids or turning out much more neater, rather than not adding that and the hair not being sleek. So i'm going to go ahead and just finish this, you can slow this down just to have a better look is okay. So this is how the stitch braid turned out like. Let me zoom in a little bit as you guys can see, you can see the little lines in between that's what makes it have that stitched effect, but um yeah. That'S how i do it. Hopefully it was a little bit easy for you guys to follow along. You can slow it down. Just to you know see, and if you don't know how to do cornrows exactly, you can actually just go ahead and you know find a video somewhere on youtube. I'M pretty sure there's a video out there to show you guys, but i'm gon na quickly do this side and then we're gon na go into the install installation um section of the video all right you guys, so i like i, i think i already showed you Guys me braiding the um doing the braiding session of the hair. So now i'm gon na go ahead and install it. Y'All. Don'T laugh at me because my hair looks a mess um! It'S been in this dirty bun. My hair is dirty as but um yeah. This is gon na be pretty fast. I mean i really like closure wigs, because i really don't have to do much with them, but i really don't want to wear a cap, but i'm just gon na just put it on anyways and that's mainly because when i do put the cap it shows in The middle - and i don't like that, but we're just gon na put this in the middle, and it's mainly this really thick part that really shows, but i'm gon na show you guys how i like conceal that, because all you need is a good um little concealer And it's gon na be good. Okay, i'm also gon na go in y'all. These braids looks so freaking cute, but um i'm gon na go ahead and do the exact same thing. You guys already know the drill. I'M gon na put the um ruby kisses foundation underneath the lace just so it could blend a little bit better yeah. It is hot, it is all the hot as heck in here and the sun just went down it's great. I try to like record during the day, but whatever all right, so we did that i'm gon na go ahead and connect the back together. All right, she's, looking cute, like i said like this, is gon na be pretty quick and um, mainly because y'all know i like to um, i like to do like all my stuff off the wig like the customization off the thing but um as the snc. I am gon na try to start um like getting like video content of me. Actually, you know i'm doing like styles like this. If i do start doing them like that, just so you guys can actually see behind the scenes. If you are interested in that um, because i know like you guys, don't just want to see me - you know install it that you guys would actually want to see how everything goes down so, and it makes it so much more um faster. For me to do. Like these braids look fire, i'm gon na fix my parts. So don't even like look at it, so i'm gon na go ahead and cut the. Where is this? I'M gon na go ahead and cut the lace and, of course, make sure you're going to zigzag motion. All right, you guys know how i do like. I really don't even need to spray this because yeah it is blending in perfectly and that's mainly because the lace was already pretty um. The lace is pretty thin. So that's perfect. I'M gon na go and cut this up. I'M gon na cut the baby hairs off. Oh, these are never sharp. This is perfect, is all right and i'm going to get my um little pencil curler, i'm telling y'all to be careful, and i need to be careful with that. Just burp myself, okay, and i think i'm going to get my gods to be too so i'm going to go ahead and use my guts to be. I don't really like doing my um. I don't really like doing my all right, so i kind of could have made this baby hair just a tad bit more bigger, but that's fine. So now i'm gon na go ahead and spray her. I feel so close. I'M gon na go ahead and spray a little bit. I'M gon na put a towel on just so i don't. Why is this so bright, like this camera, be making me so bright, like i'm um light skinned like i'm very much brown skin, i'm just gon na quickly, just spray her all right. I don't want it to be too too wet. I mean i'm gon na like it when it's a tad bit more dry, because i actually do like the really puffy puppy, puffy hair. Look, but let's do this. Okay, and also remember you guys when i do use um the spray. All i do is add water, but sometimes, if i wanted to keep have that, like you know, water type look to it, i will go um. I will add some um, either leave-in, conditioner or i'll. You know put in some um mousse just so it can stay. Have that um look to it, so this is how we're looking like pretty cute, and i really love this um curl pattern, also um and then the final thing that i am gon na do is i'm gon na go ahead and fix my part? I don't know if you guys can tell, but it is a little bit wide. I'M gon na go ahead, go in with the high beams color thickener. This is how it looks like i really like this one and make sure that you hold the um hold this. Pretty tight because you can like mess up your part, but you can fix it if you do mess it up, but just try to hold it really still. Okay, i don't know if you guys can tell, but the part is a tad bit more smaller, which is perfect all right, so this is how we are looking like. This is honestly, the finished look like when i tell you guys this is so quick. This is why i really like closure wigs and who said that you couldn't do like different. Like you know, styles and stuff with you know your closure, because clearly you really can do like different styles with closure and stuff like that, which is what i honestly really like, and all the information about this unit will be linked in the description bar down below. If you guys are interested, let me know what you guys think about this look right here, like i really really like this style um. So let me know what you guys think in the comments down below make sure you like comment subscribe. I hope you guys enjoyed this video and i'll see you loves in the next one. Bye stand up again, you

Comments
West Kiss Hair: This style is soo cute!!! Thank you for sharing West Kiss Hair~
Jeska: Wow this is amazing! I can’t believe it’s a wig !
Jolanta Kuchniak: Love your work
Dee Luther: Lovely Video as always Super Stunning thumbnail tho Sooo Damn Gorgeous U are Ur Makeup always on Point Nice Cheeks Structure Happy Fantastic Week Too Stay Bless N Be safe Always
Sammy Da Goat: Third Comment Lovely Hair Outstanding Thumbnail
Марк Харди: A legenda di KISSSSSS.Uno snowquen hè u mo idolu. Hè a persona chì aspiru à essew, hè a mo luce di ghjornu