Closure Sew In W/ Frontal Illusion || Detailed Tutorial (Updated 2021)
- Posted on 16 December, 2021
- Closure Wig
- By Anonymous
I hope you all enjoyed the video! If you want more content please follow my social media’s listed below!
I will have 1 on 1 classes coming January 2022! stay tuned and Happy New Year! ✨
|| Social Media ||
TikTok: Nayareine✨
https://vm.tiktok.com/ZMRV6hPqx/
Instagram: stylesbynaya✨
https://www.instagram.com/invites/cont...
Facebook: Naya Reine✨
https://www.facebook.com/lenaya.tyler
Snapchat: qveen.naya ✨
https://www.snapchat.com/add/qveen.nay...
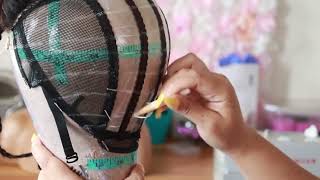
Hello, everyone welcome back to my youtube channel. I am naya ray and in this video you see me styling my client as she is getting serviced by me. Getting the labella rain experience. So in this video, as stated by the title, i will be doing a closure sewing with a frontal illusion. Now, ladies, this is just simply just a closure sew in, but i call it a frontal illusion because it does give the scalp effect and you know, with frontals people get frontal, so it can look like it's coming out of their scalp, so i will show you All my techniques in this video what i do like to do in order to get a flat and flawless install so right now i am doing her braid down, so this particular braid down i like to do eight braids in the middle of her head, going straight Back and on the sides of her hair, the braids will go straight down. You will see it when i flip to the next video. You will see the finished product and you will see exactly what i'm talking about. This has been working wonders for me ever since i've started this method. It literally is the flattest install ever of course, you still have to have your techniques as far as sewing down the wheels, but this right here this the top braid there. So after doing a braid down, i'm gon na go with some type of edge, control and slick her at this back, just so that it gives a hold. When i put the cap on her hair and start applying the glue, i do not want any of her hair from her hairline straggling along and getting in the way of this gluing and a bald cap method, and everything like that. If you cannot see the berry pattern clearly, you can go onto my social medias and see it because i do post it on my tech talk and my instagram. My instagram is styles by naya and my tic toc is naya rain, the same as my youtube name. So just make sure you have your clients, i just look back. You see i am going in thoroughly with an edge brush and i'm making sure everything is pushed back. This will make a difference. Ladies now, i am tired of a lot of my clients sitting in my chair, telling me that their previous stylist did not order their scalp. Ladies, we need to do better. Please oil, your client's scalp. You do not want to be braiding your hair down and then pulling thread through it and allow them to have a successful, install please oil, their scalp for one to help reduce the chances of breakage, and these people are wearing their hair in installs. For about months and weeks and everything they don't want to have no itchy scalp and it's hard to already get in there just make sure keeping their scalp for you. No one wants to walk around like that. I know you, don't i don't they don't so, please, please be considerate of your clients and stop rushing now. This is the bottle cap method. I do not put it all over their eyeballs. I don't think it's necessary for me. I don't feel the need to do that. I honestly feel like this helps. I mean this is good enough, because it's still gives that barrier between the scalp and the lace you get. What i'm saying so, if you are making it too thin, i feel like it's harder to try to give that scalp effect, because, when you're, applying the makeup, you're gon na literally see right through that cap, so you're literally trying to cover the makeup over the real. The person's real hair, which is black, you get what i'm saying now here with this cap, it's easier to just apply that makeup and get it to blend. Now, when i put the cap on, i put that glue. As you see, i put the lace glue right. There to melt the cap down this helps give a flawless melt down for your ball cap method, i'm telling you and when it does, that you um could go in afterward and so the cap down your preference. I don't keep the whole cap under my client's hair. I only sew where the closure ideally would be. After that i cut off the excess cap like, like, i said, clients like to scratch their scalps. You don't want that berry right there, but i know a lot of stylists do keep it on. So that's your preference. It'S not mine, but i'm showing you what i do do so after i had that process going. I was dealing with her closure as far as plucking drying it and straighten it out once i did that after about five to ten minutes, i go on to apply the makeup to my client's cap, because by that point the glue has dry enough to a point Where i can successfully cut the cap - and there will be no lifting - i use this. I think that is a foundation. Applier thing i was using, it has a little handle. I don't like using the makeup brush that, like i would use if i was sprinkling powder or something on the face. It'S the one like a brush like you could brush down in class here, i feel like it gives a better application. I use the la pro concealer as you can see, because it was a creamy base and it's easier for a perfect melt and it takes the chances of your client having a ashy scalp because think about it. When people wear makeup and the concealer foundation, whatever it's not applied correctly well, it's too lightweight it's too powdery they give ghost. So when you do that with your clients - and you do the powder on their lace and you do not apply it right or whatever the case may be, and they take a picture with the flash on, you will give them ghosts. So this really helps prevent that. The creamy base, so i just highly recommend it once again: people have their preference. So if you don't do it? That'S fine, but this is what i like to do and it's what works for me now after that i went back and was dealing with the closure again. So i like to do a multi-tasking thing. So you'll probably see me doing that a lot out the video, but first i take the big scissors and i cut the cap. Then after i do that i go in with these little tiny baby scissors. I think people use this to trim their eyebrows. I don't know, but get those, ladies, if you get that you could get all up on that cap, because once you do that you can cut closer to the cap in the hairline that way like after you get what i'm saying like it's all. That makeup will stay right there. A lot of people use those big scissors and it doesn't get as clean or close to the cap or the scalp. I should rather say, and then it still has the white pieces of the cap that doesn't have any makeup on it. You know what i'm saying so the scissors helped give a closer clean cut, and that way it looked like that, like i shaved the middle of her head, that looks like it's coming off of her scalp, but anyways before you put the glue on make sure you're Cleaning their head off with alcohol of any dirt and oils and makeup that you just put in there. If you do not do that, the glue will not stick. Don'T ask me why just know it won't stick because clearly, the whatever chemical is inside of the glue does not work well with oil, so make sure you're doing it and make sure your client isn't hot. While doing this, if they're, hot and sweaty your glue will not dry correctly and it will cause us to turn white while drying so make sure your clients are cool and at a decent temperature, i'm telling you all, because i've experienced this okay and i've noticed it. A little bit so that is tip number one with the glue. So i do this about three times. You know you get three layers out the way and while i get my three layers out of the way you see, i'm actually start sewing in bundles. So you usually will typically let the allow the glue to dry when i dry all the way, just make sure it's clear right now. I don't know if you can tell on camera, but it is still a little white in some areas. So i just want to make sure it's clear you could sometimes go a little over, but usually when i sew in about that first full bundle, i'm ready to go on to my second layer or usually when i'm halfway through it usually just depends on the length Of that first bundle and how long i'm sewing it onto their hair, but nonetheless, just ideally wait until that first layer is clear once that layer is clear, you can go in with the second layer. Make sure that layer is clear. Go in with the third layer make sure that's clear, and once you do that you can glue the closure on. So i got a pro tip for y'all pay close attention. You see right there, while i'm flat ironing the bundle. I do this to make sure it is flat when i fold the tracks over now. Sometimes a lot of clients can come in with really thick wefts, which makes it harder for us to fold that flap over and get it flat. So what you do either, whether it's too thick or just thick - i just do it with every bundle unless it is completely thin. But i do do this, so i can melt that weft and it can get more melted and thin so that i can easily do it and it's more bendable because once you're doing it it's melted and soft. So you can easily fold it over and get it flat. Voila just touch out some magic. Didn'T i so after all three of your layers have dried. You will put the closure on just like that. Easy peasy make sure you uh have some good lighting. You can see where you are placing the closure, on top of the glue, make sure that hairline is like right there on the glue. I cut the thick sides off because i feel like it's irrelevant. Y'All know that somebody on the sides of the clothes are the real thick pieces. Only in the front, though, i don't do it around the whole clothes, i don't do it in that front while i'll be gluing it down, because i feel like it's unnecessary, but after i do that, i lay my client's lace down with my melt band, which is Six dollars bonus are ten dollars. Fifteen dollars, if you get it together, anyways after you, do that you're going to sew the closure down to make sure it is secure, and then you are able to move on to the next step as far as continuing sewing in all the other bundles. Well, i don't know what steps you do, but, as you can see, i didn't sew in all her boundaries, so i'm about to go in and finish installing the rest of her bundles. So i went off camera and basically parted out the edges and parted her hair down the middle and plugged her apart because i was in the camera. So you really couldn't see anything sorry about that, but i also cut the edges with a razor. I go in and die angle direction because it gives a natural flow and it looks more natural as like a baby here, i take some spray. I spray it at the comb part of the edge brush and i just go in and i just get to swoop in the edges. I don't use any gel or anything because i don't know what i'd be doing wrong, but it seems to wave up when i use it. So i use i like to use something stronger as far as a spray, because it gives a better hold. I can just blow dry it and that way i really know what's in place, most don't even work for me, i'm not gon na say don't work for me. I just don't know what i'm doing with the light. I'Ve tried it many times. It'S not for me. So this was for me but yeah i like to um. I'M really not consistent with this, like sometimes i will do the edges at the very end once everything is laid. Sometimes i will do it at this point, but nonetheless it's going to be labeled regardless because, like i said i did it with the spray. So once i put that blow dryer on it, the edges are done and they're laid, but i'm doing this before i um finish her closure part as far as laying it down because might as well might as well just give it a little milk. Well, okay, everyone! It'S time for the reveal and what is it giving scalp? But yes, if you follow all these steps correctly, you will get it everyone if you're living in chicago, i do have classes coming up soon after the new year, so get into with that. Thank you all. For watching, please like comment and subscribe and tune in to all my social medias, because that's what i'll be at, especially my tech talking instagram. Thank you for watching

Comments
Swankgoddesss: This is literally the best & most detailed tutorial ever
Lauren Rutledge: So helpful!! Thank you
Sydd. Amonii: You killed that! Keep going with it!
Miya Searles: In order to maintain the illusion of this melted look would you recommend following these steps when your closure starts lifting ?
LifeAs Ny’AjaCheri: this is so cute , im hall I seen your video first because I wanna try this style on myself .
Diamond Hall: Love this !!! What glue do you recommend?
Celestia Eagleeye: Hey hi , Did you pluck the closure? And did the closure go on after you sew the hair in ?
Jonae Darrel: What flatiron do you use?
Billionhair Beauty Hair, bath and body: THANK YOU!
Ley Monroe: hi love, can you show a complete 360 of your braiding pattern for this? I’m looking everywhere i can’t find it
Marie Cineus: Hey Naya, your website doesn’t show your next opening for clients? When do you take clients?
Darkskinn Q: can you still get the frontal look without glue ?
AloeLike Vera: Did you double the wefts through out the whole sew in?? Or did you stop when you got to the ear??
Tamirra R: What products did you use? Specifically for the edges...
Kayla Marie: How many bundles was used? And what we’re the inches?
dynasty love:
LifeAs Ny’AjaCheri:
Jinaiyah Moore: what type of glue do you use?
Kmallei: you’re so prettyyyyyy
Tamiah J: Before you even said Chicago I’m like I love her voiceeeee lol you from my cityyy thank you for this breakdown !!!
Angel Lowe: Can you do a video on how to braid the hair down
Shpwan Watson: Very nice
Walti Beauti: Great vid btw
alifaa: was the frontal bleached ?
Naomi Mcintosh: how many packs of hair?
ro ma: How long does this last
CASSIDY ROSE:
riahoic riahoic: what hair did she use
Karmah Taylor: Do you travel at the moment??
Brenda Nebe: do you know what hair she use?
Walti Beauti: I went up & down your page I can’t find your braid tutorial
ariana tai’es: booking info?
Ashay Williams: Can you do my hair?
Cindy Mattox: Where are you located ?
Nina Williams: To far away