Super Realistic 1-Min Install V-Part Wig! No Leave Out + 3 Different Styles| Beautyforever Hair
- Posted on 09 July, 2022
- Closure Wig
- By Anonymous
Watch me install this Kinky Curly V-Part wig + I'm showing you3 different ways to style it!
●▬▬▬▬▬ #BeautyForeverHair ▬▬▬▬▬●
☛Get $20 Off Use Special Code: beautyytb
☛Buy Now, Pay Later, 4 or 6 Interest-Free payments
Video Hair Info: Curly Afro V part wig 24inch
Direct link ➤https://bit.ly/3ymYMoN
Best Realistic HD lace wig ➤https://bit.ly/3uxU8mK
https://www.beautyforever.com/ ➤ Easiest Install V Part wig: https://bit.ly/3alAvay
Affordable Wear & Go HeadbandWigs ➤https://bit.ly/3as00qY
Full Bundles Deal➤https://bit.ly/3nPliSu
Affordable Fashion Lace part Wigs➤https://bit.ly/3nNKlFy
Super Brand Day Huge Sale ➤https://bit.ly/3bYWKDQ
#Beautyforeverwig #Beautyforevervpartwig
Aliexpress Beauty Forever Website: https://bit.ly/3epWyuk
Amazon Beauty Forever Hair: https://amzn.to/3p4FYHL
Instagram@beautyforeverhair: http://bit.ly/IGBeautyForever
Beauty Forever YouTube Channel: https://bit.ly/38akLUg
Customer Service WhatsApp:+8613783534924
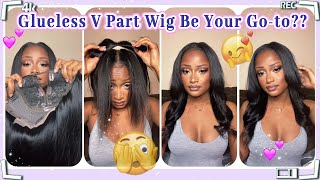
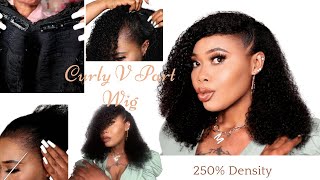
Hey: what's up you guys welcome back to my channel or welcome to my channel. This is your first time here. My name is diana in this video, i'm showing you how i install this wig that i'm wearing on my head, that i got from beauty forever: hair um. They sent me a 4c kinky, curly v, part wig and i believe it's 22 inches, but i'll have the correct specifications um. All the information for this week will be in the description box below um. So in this video, i'm showing you how i install this hair and just showing you a couple of different hairstyles that i did with this hair. This is like one of the final hairstyles that i did. I just thought it would be like cute and fun for summer, but i did a couple of other styles as you can see in this thumbnail, but if you're interested and seeing how i installed this hair and seeing the different styles that you can do, then keep On watching so jumping right into the video, the first thing that i'm doing right now is parting out the hair that i thought was going to be my leave out, but i actually decided not to do leave out with this style um. So i wound up braiding that up, but i'm going to show you that a little bit later and after i go ahead and section out this leave out, i'm going to go ahead and separate my edges and i'm going to go ahead and create the braids that I'M going to use as my anchor braids, i highly recommend using anchor braids when you're doing this kind of style only because it helps the wig from sliding all over the place, and it really helps hold it in place in the front. If you don't know how to do braids, you can just do twists um, because it's a lot simpler. You can do like flat twists and maybe like braid the ends of the twist, which is like the lazy way. But honestly, i think i've done it like that. Plenty of time, so it's fine. So for the back part of my hair, i decided to do two french braids or two like big cornrows um one on each side. I wasn't really concerned about the back of my hair laying too too flat, which wasn't bulky, but i just wasn't concerned about it laying too too flat because of how thick the wig was. I knew he wasn't going to be able to see my braids or anything. So i'm just combing out my hair right now and i'm just going to go through and braid my hair um and then braid it like down all the way to the end. So this is what the finished product looks like. I have my two anchor braids on the sides. I have my edges left out in the front and then i have the two big braids um going down in the back, and this is what it looks like back here. So the next thing i'm going to do is just take a couple of bobby pins and pin up the ends of my braids, just so that they lay flat against my head and, like i said earlier after i do, that i decided that i actually want to Braid down my leave out because, with the v part wigs, you actually don't have to use leave out, so i'm going to do the no leave out method for this style. Now. What i like about this wig is that it actually comes with adjustable straps in the back, so i'm just going to go ahead and hook them into the place onto the setting. That i feel like is going to be most comfortable for my head, and now i'm going to go ahead and start applying the wig. The first thing that i do is, i always apply the clips first at the top, even though this is not exactly where they're going to be placed. I just like to clip them here to give myself some leverage so that when i go ahead and put the hair up and apply the elastic band in the back, it doesn't slip off. And now i'm going to go ahead and pull the wig down and then adjust the clips on the side like slide them into my anchor braids and as you can see, they slide in super easily and then i'm going to go ahead and adjust the rest of The wig so that it feels comfortable on my head, so this is what it looks like when i take it down. As you can see, this curl pattern is super pretty and the curls are super defined like it really looks like my natural hair um. So now i'm just going to go ahead and get ready to do my edges do so now. I'M just letting my edges wrap for a little bit and when i took this down, i realized the hair was a lot bigger than i thought. So i decided that i'm just going to take my scissors and just cut a few pieces around where my part is just to kind of frame my face. I didn't cut any of the length or anything, but i kind of just wanted to just i don't know. Just like i said frame my face a little bit just so it looks a little bit better in the front, and now i'm gon na go through and hide the track um. What i'm gon na do is take a rat tail comb and where the track meets the hair. I'M gon na push the hair forward to kind of cover the track, and then i'm gon na take some of my got to be free spray and spray. It um. In place, you can then take like a blow dryer if you want to to kind of like seal it in place, um, which i did off camera. But if you don't want to do that, you don't have to because it'll stay either way. You just have to. Let it sit for a little while now to me. The hair was looking kind of cute like this, like, if you just play with it a little bit like you, can totally rock it like this. If you want to, but i was looking at the ends - and they looked a little dry to me, so i took some water and conditioner mixture and mixed it with some mousse and i'm just rubbing it on the ends just to define the ends of the curls. A little bit because it looked a little frizzy and i just wanted that more defined look. You can completely see the difference between one side and the other, like that. Definitely made a difference. It like hangs a little bit longer on one side, so i'm just going to go ahead and do the same thing to the other. So i'm just going to spray it with my water and conditioner mix to get it drenched and then i'm going to go through with the mousse and i'm just going to take my fingers and come through it. And then i actually wound up taking a wide tooth. Comb to comb through the ends as well, and i kind of just like alternated between the comb and my fingers. I feel like using my fingers, worked a little bit better than the comb. The comb kind of made it a little frizzy to me um, but yeah. So now i'm just gon na go back through with more water, more conditioner and just repeat the same thing until this is completely drenched and voila. We are done that looks super cute. I just decided that i wanted to add a fix, my edges in the front, because it just wasn't looking right because of how wide that part is. So i don't know i just felt like this made. It look a little bit better, but besides that, we are basically done with installing this wig there's really nothing much to it like you can wear it like this. You can wear it down with the middle part, which is super cute. You can also alternate it over to the side and do all different kinds of styles, which is what i did so i'm just going to go through and show you just a few of the different styles that i did with this hair. So the first thing that i wanted to try was the the kind of like the flip over method um and leave out like a cute little bang piece in the front which i thought was super cute. But really i was just trying to cover up the part, because the part was super wide to me, so i was just kind of thinking of ways to cover that up. So i didn't look so obnoxious, but i actually wound up really liking this style. Next, i decided i wanted to give a little half up half down moment, which is actually my go-to when it comes to curly hair. Now i think because, like there's just a lot of hair in my face with curly hair, so i love pulling half of it up. So it's like out like up out of my face and then i left down two little bang pieces on each side just to give it some characters, feeling real two thousands little nineties um. So i was really feeling this look. And lastly, i had to give myself a little spice girls moment. I was feeling a little scary spice in this with the two space buns at the top. I absolutely love this style, it's so 2 000's, especially with the curly hair. It'S one of my favorites and it's so simple. You honestly just like take two little chunks of hair at the top and wrap it around into a little ball bobby, pin it down and keep it moving, and it's so so simple and cute for summer and yeah. No, i was definitely loving this style, but anyways you guys. Thank you so much for watching this video, like i said all the information for this hair will be in the description box below adios until next time.
Comments
Dee Luther: Great Video As Always Super Stunning thumbnail tho Keep Them Coming You Looking Hella Pretty Have a Amazing Weekend Be Bless n Stay safe always
Alexandra: Hai anna iam Nagendar Anna na age 42 vos.Monster qualification m.l.t medical lab technicianl ,Srpt lo jobs unte cheppagalaru anna.with govt Jobs
feras dali: LP reacted d ryt way, she is vyz.Monster need of over drama, or over consider ations. She don't deserve *considerationse. Lp പറഞ്ഞ പോലെ,, ജീവിതം തുടങ്ങിയല്ലേ ഉള്ളു, പഠിക്കട്ടെ.