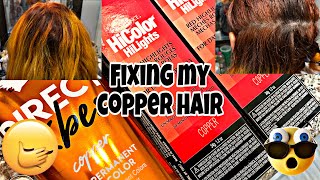
Loreal Hicolor Highlights Red Magenta Tutorial On 32" Wig | No Bleach Needed!
- Posted on 10 March, 2021
- Color Lace Wig
- By Anonymous
Hey guys! Todays video is all about how I got this beautiful red ombre on my 32" wig! I hope you guys enjoy! Remember to LIKE, COMMENT & SUBSCRIBE! Byeeeeeeee
You can find this product at your local beauty supply, sallys, amazon, walmart, etc.
My Social Media
@lifeaslaurenash
Hair Info
@lafluxe
#lorealhicolor #tutorial #lorealhicolorred #lorealhicolormagenta
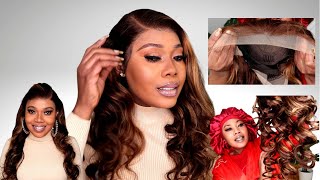
His life is okay, guys so never mind how crazy i look. It is like 2 23 in the morning, but yes, so i've been working on orders for my actual business all day, so i have to squeeze in time for myself at night. Okay, my mom would kill me if she would. I was like this way, but this is how the hair is. I have the closure at the top because i'm gon na dye that last, but this is um my premium raw indian hair in 30 to 30 inch bundles and a into 28 inch bundles and guys it is so big, oh my! So what are you about to see me do? Is i'm going to dye this hair red? Well, i'm going to dye this hair like the magenta, deep red, color and then we're going to put a couple bright red highlights in it um, but first things. First, we're going to go ahead on and dye this red now. What i am going to do is i'm going to mix two boxes of magenta and one box of wig, so i really hope this is enough dye, because i was going to do two boxes of magenta and two boxes of red. But since i decided i want to do the highlights, i'm going to need a box for that, so i want to see just how much of this hair i can dye with those three boxes and um. Hopefully i could die down, because this is a lot of hair, but it's okay. Let'S get started, okay, guys. So here's all the supplies you're going to need here. You can see my two boxes of red and two boxes of magenta dye. Some black latex gloves a big bottle of 30 volume developer. We have some 40 volume developer. This black tub is what i'm going to be mixing it up in, and i also have another smaller coloring bowl with the brush. I have two clips to hold the hair. A rat tail comb and i believe, that's about it, so first things: first, i'm going to start by opening all these boxes of dye and i'm just going to apply uh two magentas and one red tube. Instead of squeezing the die to that little, you know nozzle. In the top i like to just cut the bottom off, it makes it a whole lot easier to get as much dye out of this little tube as possible. So once again, i'm going to put in two full bottles of magenta and one full bottle of red. Do so now that we've squeezed all of the dye in the bowl, i'm just going to take my 30 volume developer and i'm going to mix it in now. There'S no specific amount i'm going to mix in, but i'm just going to mix it in until it gets to a consistency that isn't too watery, but isn't too thick somewhere in the middle okay. Ladies and gentlemen, so this is our final consistency. As you can see, it's perfect so now i'm just going to go ahead on and section the hair, because i don't want to leave all this hair down like i said it is a lot of hair, so we want to make sure that the dye gets through To every little piece, so i want to make sure to do this in sections before applying any dye make sure to comb out the section first. Having no tangles just also ensures that the dye is going to get all the way through the hair and won't leave any patches that don't have any color. Okay guys. So now, i'm about to start the process of actually applying the dye to the hair. And here i'm going to tell you step by step how to get your hair fully saturated to make sure you don't leave any you know black spots or spots without color and how to use your products wisely so that you don't have to use like 10 boxes To finish, okay guys, so, as you can see, i grab a section and i like to start a couple inches down from the top of the track, and then i slowly just start working that die in. So i put the die on and then i stop applying product a couple inches above the end, because then i'll just take my hands and i'll use all of the dye that we've already used to saturate the hair and just pull it down and oftentimes. This is enough product to saturate the ends as well. So after i make sure the color is fully massaged through the section of hair, i take a little bit of product and i carry it up because once again i started a couple inches below the track. So i'm just going to go ahead on and massage that in making sure to catch the top and the sides and as you can see, i've turned my brush sideways. That way, i don't leave any thick harsh lines on the hair. It just looks more like brush strokes and everything is going to blend in perfectly so now, i'm just going to repeat that process on the rest of the hair until everything is fully saturated. So, as i finish my last piece on this section, i'm just going to go wash my hands and dry, my gloves so that i can separate the next section now. This is not something that you have to do, but i like to do it just to make sure i don't make a mistake and get any dye anywhere. I don't want it. I like to use clean gloves when i'm working with the part of the hair that i have not yet touched with dye, i'm just going to go ahead on and twist up the rest of the hair and use my alligator clips to clip it away, and now, Just like we did before the section that i pulled out, i'm going to comb it with a wide tooth comb and knock all those tangles out and begin the process of applying the dye all over again. So so, okay, so i just want the cutting, because the part that i think that's super important that a lot of people forget is, after you finish with all of this bottom part. I like to get a little bit of dye and go over right underneath here. So you see where they don't have any dye now, if you want it like that, that's cool! But if you want, you know the color to go up a little more and just make sure you go back in and just catch right underneath just so when you um i've, seen a lot of people and their color looks fine, but then, when they like flip Their hair or something you can just see where the color cut off on the inside because they didn't check. So just if you um want your hair to look like that, then i suggest just going back and just catching these little small inside parts. It'S these small things that will make you know your color job go from good to great, so yeah, it's going back in and catching like, underneath, like looks like right there. So after i finish putting the dye everywhere, i just like to massage it through all of the hair. So if you did happen to miss a spot, you know any section above it with color on it, we'll go ahead on and apply some product for you just to make sure everything is evenly distributed. Now, like i said, i only use three boxes and this is how much i have left over to go ahead and do my closure. Yes, so a lot of times, um people be like. I use six boxes or i use this much and you really don't need that many boxes. But what i have noticed from watching other people's youtube videos is that um they don't put enough developers. So you'll put a certain amount of developer for one box and once you put both tubes in there they'll put about the same amount of developer, maybe a little bit more go ahead on and be generous with the developer. You don't want it like water, but at the same time um, if you're, using like three four boxes, you have a little lead way to make it. You know more product, there's no way you should be using. You know if you normally use on, like short hair, like one box or something or two boxes, which i only use one um there's no way you should be using three or four boxes and getting just a little bit. You know more product like it's a lot more color in there than you think guys, but yes, oh, i think this is gon na. Come out really good now see i'm just going through, like you see like this spot right here, i take my brush and just add a little color now, like i said. Sometimes i don't do this because i like the halo effect of like the darker root. You know leading to the um for color, but, like i said, if you don't want that, just make sure to go back and catch little sections like this. It'S really easy to miss little sections like this when you do when you dye the hair, when it's already sewn into a wig instead of like doing it beforehand. So yeah, like i said, better safe than sorry, so i'm not even picking up any new product at this point, i'm using the product, that's already on my brush and just kind of just redistributing. What'S already there because, like i said all the product i have left, i want to um use for the closure but like if you have a whole lot of products left go ahead on and you know just dip and put some fresh product on there. But if not this residue, i promise you, after it sits on there for hours is going to color the hair now. The reason why i'm okay, with just using residue is, is that what's going to happen, is that it's just not going to be as bright as the rest of the hair and that's okay, because it's the roots. So it's going to create like a shadow effect without even trying, so now, i'm just going to finish applying the product to the rest of this and to the closure, and i'm going to let this sit on the hair overnight. Okay guys. So this is how my hair looks once i have fully saturated. As you can see, i've went ahead on and i have colored the closure as well. If you'd like to see in more detail how to color a closure or front or just any lace product, you have without the color bleeding through and just get the perfectly colored frontal then make sure to check out my next video and i'll definitely go into more Detail so after i colored the closure, i went ahead on and bleached my knots as you can see, and also, if you want to see how i bleach these knots they'll, be included into the perfect frontal video, where um i'll show how i colored it and how. I bleached the knots and why i have it sitting out like this. So here is the final product after i have bleached the knots as you can see, none of our color red bled through to our beautiful lace, and we have these perfectly evenly bleached knots and it's going to look like a scalp honey. You guys twigs coming out. So perfect, okay, guys so here's the hair blow dried after everything. Now one thing i didn't show that i did was that last box of uh red dye that we had. I went ahead on and mixed a entire bottle of magenta and half a bottle of red, and then i just went over all of the ends of the hair using 40 volume developer. And what this allowed to happen is it allowed the top of the hair to stay? You know that darker red, while, as you can see the bottom gradually gets brighter so same color, just more pigmented at the bottom. All together, we ended up using four and a half boxes of dye, so here are some videos of my final look. I hope you guys like to enjoy this video remember to give me a big thumbs up and remember, to tell your friends to watch my videos, so we could be friends and yes, y'all see me. I was really feeling this red hair for my birthday and i hope you guys get great results just like i did see you guys next time. Bye,


Comments
Qiana J.: I followed this video step by step. My lace front wig came out I can’t wait to wear it.
Asia Lacey: just the video I needed!! literally right on time
Jewel: What’s the difference between the two dyes?
cindy valencia: The L’Oréal color killed my beautiful long hair but it does work to make dark hair into red that’s not virgin
Chelsey Ann: How many hours did you leave the dye in?
Keni O: if it was a 200% curly wig should you use 4 still depending on how vibrant you want it ?
All_natural: So I called myself doing highlights on a wig for my Mother in law. Used 40 Vol & Magenta but it didn't take too well. Not bright enough. But I used one color tube w/40 Vol at a time vs dumping it all together at once could that have been the issue? The wig was black not lifted at all prior to.
Knappy Locs: How did u stop the color from bleeding through?
Phatheka Adams: Thank you sis
Faye: How long u left it on there
The Holy Superior: life as Lauren ashelyyyyyyy