How To Pluck Your Frontal | Chocolate Lace Wig | Ft Alipearl Hair
- Posted on 23 July, 2020
- Color Lace Wig
- By Anonymous
Like, Comment & Subscribe! ✨
Instagram | @zoenahabwe
TikTok | @zoenahabwe
●▬▬▬▬▬▬▬▬▬♛#AlipearlHair♛▬▬▬▬▬▬▬▬●
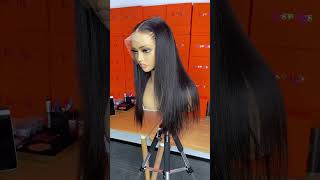
Hair details:180% density color#4 body wave lace frontal wig 26 inch
Video Hair Direct Link ➤https://bit.ly/2D0EI2j
★ Alipearl official hair store ➤https://bit.ly/3fL2Qoh
#Highlight straight lace frontal wig ➤https://bit.ly/3fL2WMF
Hot 33 color deep wave lace frontal wig➤https://bit.ly/2ZP45gE
Hot selling #99J lace frontal wig ➤https://bit.ly/2OL2d27
Follow @"alipearl_hair" on Instagram:http://bit.ly/2TXCQfw
►Use code:“alipearlyoutb”to save $10
Get to know our latest promotion ? http://bit.ly/2H0Gmmc
Follow @"Ali Pearl Hair" on FaceBook:https://goo.gl/GFnwNk
E-mail: [email protected] (Provide Wholesale)
WhatsApp: +8617719937661
Ali Pearl Amazon Official Store➤ https://www.amazon.com/alipearl
#alipearldeepwavewig #alipearlclosurewigs #alipearlhairbodywavewig #besthair #alipearlhairaffordablewigs
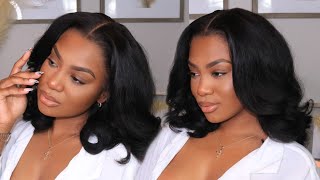
Hey guys, it's Zoe and welcome back to my channel, so I'm finally, finally doing a blocking tutorial. I know you guys have been requesting it a lot and I really wanted to have a sit-down and just talk you guys through essentially why we pop wigs and the difference it really makes in your install plucking tends to be where you can either make or break How your wig ends up looking, and this is where you can often tell whether your hair has been done by yourself or by professionals. So it's really important to get this step and the beaching process correct. So, as you just saw from that clip, this is how the wig came. This is an alle pol unit, it's the 24 inch chocolate unit and, as you can see, the hair line originally is quite thick. You can sort of see the denseness and how and how thick it almost looks like there's a lot of hair at the front and on the other side, which I had already plucked off camera, you can see how natural it already looks. You can see. There'S sort of a gradient as to how thick the hair goes from the front of the hair line moving backwards, and this is how you can really make a difference in how natural your unit looks. Now, I always always tuck my wigs wet. I use a spray bottle and just soak the front of the hair line or the section that I pluck the hair and use a small comb to just make sure everything is lying flat and I can really see where I'm plucking the hairs out of now. I start by plugging the front a little bit and essentially, what we're doing is moving backwards as we pluck. You really want to take your time with this guy. They took me about what an hour two hours to pluck the entire wig, so you really want to make sure you don't rush this process, as you can see, I'm taking small sections with my rat tail comb and plucking behind the section that we just hired off This is where the gradient will start, and you just want to make sure that there is no line of demarcation for myapi in the hair. Now, like I said in the beginning, the reason we pluck our wigs is because no one's natural hair line is completely fully dense. I mean unless you're very blessed, usually a more natural hairline has varying depths and density all the way around same way, with the way you cut your lace, you never want to cut your legs completely straight, because no one's hair line is completely. You know straight, and even so, this is just what makes the wig look a hundred times more realistic, and you really want to make sure you take your time with it, as you can see, I'm just sectioning off bits of the hair and making my way back. The sections I'd say are about half a millimeter movin that probably smaller than that, but yeah just sit down what you feel I had my Netflix on. I was watching humans, ten out of ten show by the way you guys should watch sure but yeah. I did actually bleach this off-camera. I do have my benching process in my previous videos. This is also a really important step. I didn't have to bleach this unit as long as the hair is naturally already a brownish color. So I used a forty developer, bleach and necess it one for about. I want to say there in minutes twenty-five to thirty minutes and just wash that off, make sure you're not lazy about this, and you really take your time to teach the unit properly again. This makes the difference. I mean it gets rid of the little black dots that you often see in wigs, which just makes it look like a grid. It just makes your wig look at a grid which is not cute, the, as you can see, I'm going in and I'm changing directions of the way I'm talking as well. You want to make sure you always keep your tweezers moving as this prevents any bald spots from happening. I did end up keeping mine and one spot for a bit too long. It didn't look terrible, but yeah. You just want to keep the tweezers moving and ensure that you're not plucking too much from one section - keep wetting the hair cuz. This really allows you to see. You know the areas that you have covered and areas you need to go over a little bit more once I have done the initial plucking I'll go in and do some more blend doing at the front of the hair. As you can see, it wasn't completely flat and smooth, so I made sure that line of demarcation was completely cleared and yeah you just want to keep plucking and plucking and clocking. This is about how much hair I got out of that one section. Quite a lot. I really recommend investing in a mannequin head, as you can really see where you're plucking and how it's going to look like on your head. I always do the styling of my head as well again, just because it makes it into 100 times easier and you can see where you need to go in a little bit more in terms of parking so for the actual install I'm just gon na sort of Speed for a bit because I feel, like you guys have seen me - do this so many times, but it's pretty much the same as always as you can see. I added some like curls to the wig before I applied it just to save some time. I'M gon na start off by taking my glamour: hair London, lace, 10 in the shade chocolate delight, and I just sprayed about two to three layers behind the lace and dry it between each layer with my hairdryer. So I just went ahead and put the wig on with my regular adjusting just to make sure that everything is aligning with my hairline and then I took my scissors and cut my lace in a jagged line. If you've been watching me, you already know about the jagged line technique. It'S just to make sure that the wig doesn't look like a snap back, so you really want to make sure you take your time in doing so and again, this is just gon na help blend everything seamlessly together I took my got to be blue gel and The blasting free spray and use a layer of the gel first and then I went over with a small amount of this spray over the top of it. Dried it and - and you do - I always work in really small sections, just to make sure that I really take time on every part, I'm gluing down and I'm sure that there's no excess glue on any areas that I don't actually want it to be. As you can see, I'm using the back of my comb to just press down onto the lace Oscar eyes glued it down just help everything to blend it and stick down perfectly. Some people have asked me why I don't used normal glues like old, hold and go spoon. I just don't really like it. I do prefer taking my wigs off at night when I'm going to sleep. I hate hate sleeping in my wigs, it's just so uncomfortable and unnecessary unless I'm coming from my like early in the morning, so I do actually prefer using my gut to be gel as it's just so much easier to take off whenever I want - and it's also Just so much better fuel edges, then I took my mousse and applied it to the hair line. As you can see, the lace was a tiny, tiny bit too dark. It was bending in with the hair, so the mousse really helped to get rid of that effect, and it really brought out the hairs from the lace. I also use this with a tiny bit of the got to be gel to form my baby hair. So I cut off a tiny section from the front on either side and suits my baby hairs at the tiny comb. This hair actually came with one of these combs, so that was really sick. After that, I tied my hair back and grabbed my hair tie. You can use anything for this. I always say just use a pair of tights guys. This is literally just a piece of fabric I had from an old jumpsuit. I then just flatten the top of the wig. You can use a hot comb for this. I just use my hair colors because it's easy and I made sure everything was looking nice and flat. Then I took some of my powder and I applied it to the pot. I should have tucked the part, if I'm honest with you, because it was quite narrow, but I feel, like the powder, really helps you bring out the part and make it look a bit more natural, so you can actually just do that. Instead, I went over the coals a little bit with my baby list. I don't actually know which colors they are there look. I think it's a two inch wand, but it literally gives you the nicest Victoria Secret polls. After about 10-15 minutes, I took off my head, wrap and yeah. This is what we got she's. Looking all types of sleek. I can't lie guys. This is my new favorite hair. I know I say this all the time I just feel like you can't go wrong with just a brown, a long wig yeah like I said it's about 24 inches. It comes down to my waist just past. My waist, I wan na say I'm about 5. 6. 5. 5, so it is actually really long on me so yeah. I hope you guys enjoyed this tutorial. Let me know what you guys want to see next make sure you follow my Instagram tik-tok and I'll see you in my next video bye, guys


Comments
Madeleine Tudor: do you have to bleach the wig or did it come pre bleached?
Mary-Karen E: Love thisss can you do a fave hair vendors video?
Xyra Anne: Ahhh ! So happy you posted this. Do you not believe in the power of just your foundation anymore for you to have the tint spray ? Random but just curious
Dorcas Amma: What did u use to make ur wig shine?
Aycha Sade: Subscribed after the Zoe 101 intro lol
Abigail Adeyemo: Pretty
H F: If Naomi Campbell had a daughter, you would look exactly like her. I wish Versace lived to see you.
Cajunn Blaze: lol i dont have a hot comb so i used my wand curler too
Vivian Tanaka: Where did you buy the lace tint spray?
posh princess: Not bashing the video but how can we actually see how ur plucking the wig when u had the video fast foward ??
Aaliyah Lemons: You’re so pretty
Tyra Kinga: Its the zoe 101 intro for me
Truly Haja:
Curiouslifeofsam: I love your accent !
Ashley W: I suck at plucking
Trust No one: Lol love the accent ❤️❤️❤️❤️❤️❤️❤️❤️where you from UK
Shard'onay: Before you tinted the lace, what colour was the lace please ?
Kiara Rodriguez: Y’all really do be trying hard and doing extra time consuming things for beauty. Btw you look like you wanna be light skin or a white girl in your profile pic. Bazaar