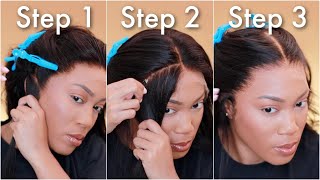
(Updated) Wig Hacks! How To Apply A Lace Wig!
- Posted on 24 March, 2019
- Color Lace Wig
- By Anonymous
A few hacks and tips for how to apply your lace wig and make it look natural!
The wig I'm wearing: https://www.myfirstwig.com/raven-ombre...
Ghost Bond XL Wig Glue: https://rstyle.me/+LyJHTs8LCsgVCgKD6mL...
Got 2B Spray: https://rstyle.me/+ODMaEBD3lA0Sx9BFVA5...
Got 2B Gel: https://rstyle.me/+GsbGLjumL4qqSwIzo45...
Nude Stocking Caps: https://rstyle.me/+KSIgDxycpoInmAIkD_1...
Airbrush Legs Makeup: https://rstyle.me/+aGovzZKuElfkcnRdsU8...
WANNA KNOW WHERE I GOT SOMETHING?
Shop My Closet - https://www.ravenelysetv.com/shop-me/
Shop Ziya’s Closet - https://www.ravenelysetv.com/shop-ziya...
Shop My Home - https://www.ravenelysetv.com/shop-my-h...
NEW VIDEOS EVERY WEEK!
***Click the notification bell so you don't miss any!***
SUBSCRIBE IF YOU’RE NEW! https://bit.ly/2tgEdJg
---FOLLOW ME EVERYWHERE!---
• MY INSTAGRAM → @RavenElyse
• ZIYA'S INSTAGRAM → @Ziya.Papaya
• TWITTER → @RavenElyseTV
• SNAPCHAT → @RavenElyseTV
• FACEBOOK → @RavenElyseTV
• PINTEREST → http://www.pinterest.com/RavenElyseTV
--BUSINESS INQUIRIES— [email protected]
——POPULAR VIDEOS----
MOMMY ROUTINES → https://bit.ly/2GmHhsn
MOM VLOGS → https://bit.ly/2t8lxuQ
DREAM HOME SERIES → https://bit.ly/2tcLyt9
CRAVEN SERIES → https://bit.ly/2EVq9Mk
---PO BOX MAIL---
Raven Elyse
P. O. Box 2454
Cedar Park, TX 78630
----FREQUENTLY ASKED QUESTIONS----
LOCATION: Texas
BIRTHDAY: September 1993
ETHNICITY: African American
HEIGHT: 5'11
DAUGHTER: Named Ziya, born April 2016
- MY CAMERAS:
Canon Camera (for vlogging): https://amzn.to/2Rpc297
Canon Camera (for photography): https://amzn.to/2BHEE3g
- EDITING SOFTWARE:
Final Cut Pro: https://www.apple.com/final-cut-pro/ (video editing)
Adobe Photoshop: https://amzn.to/2Rnx9bS (photo editing and thumbnails)
SUBSCRIBE LINK: https://www.youtube.com/user/RavenElys...
Okay, ( gasps ). I think this might work. Oh my god, ( gasps ), You guys, I'm a genius! I'M a genius ( electronic music, ) RavenElyseTV., Hey guys! What'S up it's Raven. Today, I'm here for a wig tutorial video. I haven't done anything with wigs on my channel. In a little bit, it's been awhile.. I still have been occasionally wearing lace. Wigs in my real life getting dressed to go out, I might throw on a blonde wig switch up my style., So I do still wear wigs, even though my hair is growing. It'S just something that I like to do to switch up my hair length, my hair color and my hair texture without having to touch my natural hair. And it's actually technically a protective style to let my natural hair keep growing.. I'Ve switched up a couple of things. I kind of tried to watch other people's tutorials watch professional hair stylists. I love Tokyo Stylez on Instagram. I love Alonzo Arnold on Instagram, so I'm constantly trying to incorporate new techniques to make my wig. Basically look like it's coming out of my scalp.. My main goal is to make my wig look as natural as humanly possible., The wig I'm going to be putting on today. Is this baby right here it is a brown curly wig, as you can see - and this is my personal Raven Elyse wig design wig. My First Wig. I've talked about it before, but I've worked with My First Wig for a long time. I'Ve worked with them for years. They are the sister company of RPGSHOW, which I've also worked with for years. So it's just a trusted. Wig company that I have been designing, wigs for., I tell them how I want the wig to look. We go back and forth, we perfect it and then they create these wigs that you guys can buy and get the same. Look that I'm wearing So the idea behind this wig at the time that I created it was to basically make it kinda look like my natural hair or as close to it as we could with a wig. At the time. My natural hair was a bit darker because I had dark brown dye on it.. You can see that it kinda still matches you see how it goes from. This is my natural color, and this is what we did with the wig and then it kinda fades into more of a chestnut brown kinda color. So that's what we tried to do with the wig.. My hair has faded and lightened up a bit. So it's not exactly the same color anymore, so this is a little bit darker and also my natural hair has grown quite a bit since we created this wig. So this wig is a little bit shorter than my natural hair, but it's still a pretty close match to what my naturally curly hair would look like.. So this is a lace wig, meaning that the hairline is very natural. It'S gon na give you that seamless, look in the front of your wig and these wigs do come pre-plucked.. That is a big question that people wan na know and yes, they do come pre-plucked.. So, essentially, you should be able to take this wig out the box and put it on and have it look pretty pretty natural without having to take any tweezers to it or really do anything to it, except put it on.. So I really really like that about these wigs they're, very user-friendly. That'S why the company is called My First Wig., I'm a bit of a perfectionist and, like I said, I've been watching these celebrity stylists and stuff like that. So I do like to go in and pluck the wig a little bit more and just customize the hairline to make it look perfect for my hairline. If that makes sense, which is different for everyone., So you can still go in and pluck it a little bit more if you want to, but it's totally optional. I've already done that, because I have already worn this wig before., So the hairline everything is already prepped And plucked and ready to go. This is 100 % human hair. It has this curly texture to it, meaning that when you wet the hair, it curls up., Very nice texture, as you can see just by looking at it.. But anyway, all the info and the link for this wig will be down below so definitely check out. Myfirstwig.Com check out this wig., So basically I like to do the stocking cap method and, like I said it's basically a combination of a bunch of different tutorials that I've seen from different people and I kinda combined it into my own way that works for me.. So I start by putting my hair in two really really slick, slick, slick pigtails.. I do it when my hair is damp so that I can slick it down as much as possible and braid it down really tight and really skinny, because I'm basically trying to compact my hair as much as possible and have it be as flat as possible. On the top., I do not know how to cornrow, unfortunately, otherwise I would just do little straight back cornrows and that would probably be a lot better, but this works because I don't know how to cornrow and basically the idea is that I'm going to put all These braids kinda ball them up in the back and that's gon na give me my base and it's gon na give me a really flat base on top.. These are the wig caps that I use. They are stocking caps and I like this kind of light, beige color, because it's the closest color to my scalp, but they do come in different colors.. You can order these on Amazon.. So, like I said, I prepped my hair and I also sprayed it down with this Got2b hairspray.. This is an extreme hold. Hairspray like like hello. My hair is hard as rock I slicked it I sprayed it. I made sure all my baby hairs are pulled back. I want everything flat and sprayed down. And also from that same Got2b Glued line. I also used the gel. You probably see everybody use this. This is the spiking glue, it's a very, very, very powerful, hair gel that is basically like glue.. I have the normal size right here and then I found a little baby size at Walgreens. So if I'm wearing a wig and I'm traveling or I'm going out for some reason - and I feel like my wig - might come unglued - I can bring this with me to do little touch-ups and put this in my travel case or my purse. So I thought this was really cute., So what I'm gon na do is I'm going to take the Got2b Glued gel and I'm going to take a small amount.. When I used to do this, I used to use a much larger amount because I felt like I needed a lot to make it stick, but it just takes forever to dry when you use a thick layer of this stuff, so I'm using actually a very thin Layer and I'm just applying it to my skin - that's right in front of my hairline. - I'm not really even trying to get it on my hair if a little bit gets on my hair, it's okay, but I really just wan na put it right in front of My hair just a little thin layer.. Then I'm going to take one of my stocking caps and I'm going to put it on and I'm going to put it on low on my forehead literally on my eyebrows. Stretch it back. These things are tight on my big old head, I'm gon na just basically there's really no rhyme or reason, especially now that these braids are getting so long., I'm kinda, just tucking them in criss-crossing them around snaking them around and just tucking these braids into the back. Lower nape of my neck. I wan na keep'em low'cause. I don't want a lump right here on my head. I wan na keep the bulk of it low to my neck, because that's where the majority of the wig is gon na be right there. So it's gon na help hide any lump that I do have.. If I have a lump way up here, then I'm gon na be looking like a egg head., So I'm just making sure that it's about as flat as it's going to get and as low as I can get it to sit on the back of my head.. Now lately, because my hair is getting longer - and I have more bulk and more that I'm just trying to hold into place, especially if I'm trying to wear the wig for multiple days on days on days, I wan na make sure everything is secure. So lately I've been taking another stocking cap and putting it on top of this one, but just putting this one further back.. Now I look real crazy. I look like some sort of weird alien Handmaid's Tale. Amish. 1800S. I don't know what I look like right now. So this one is kind of wrapping around the back, even more and helping to squish it down even more.. If you have really thick really just dense hair, putting on two stocking caps might help you squish it down and give you an even flatter base. But the thing is, you don't want this line showing anywhere near your hairline, because the whole point of doing the stocking cap method is to not have that line showing because you will still see that line underneath your wig and you pull your hair back you're gon Na have this big, weird line showing and it's not gon na, look like your scalp and it's not gon na look natural.. So that's why I push it back.. So then, I like to take the Got2b hairspray and first of all, I like to spray some over the top of this one to kinda help. Stick it down and keep it from sliding back.. So that'll help keep that in place.. Then I like to spray it all along my hairline. And the hairspray is now soaking through the stocking cap and it's going to adhere it onto my hairline.. You can see all where it soaked through.. Now some people use a lot of this gel to glue it. Down. They'll put a lot of gel underneath: stick it down, maybe even put some more gel on top, but this stuff takes forever to dry. When you do that - and I used to do that - but now I mostly just use hairspray. - Don't really use too much of the gel.. I put a little bit, as you saw in the beginning, just to give me something underneath to stick it to, but mostly I'm relying on this hairspray.. So now I'm just going to take a hairdryer and I'm going to use this on a cool setting mostly.. I kinda alternate between cool and warm cool and warm to kind blast it and really dry it, but also freeze it in place. If that makes sense - and I just want to dry this hairspray completely to where all of this is just frozen in place - and this stocking cap literally cannot move., My hairdryer is smoking. I think it's about to blow. Up. Can y'all see that what is happening It just like ( mimics sound of hairdryer turning off ) went off by itself. Is it on fire bro I've never seen that in my life. I think it's lighting on fire on the inside bro, I'm about to die. Trying to use this hairdryer, Let me go get my other blow dryer and throw this one away., What the hell this thing about to catch on fire. Okay, this legitimately only took me three minutes to blow dry it completely dry. I timed it myself., Whereas if you use a lot of this glue to glue this down, it's going to take you like 30 minutes to dry it.. So this is so much faster. I'M even going to go over it with another light. Spritz kind of over this whole section right here. This is glued down now. Can you see that The hairspray stuck it down? So it's not gon na slide back, but I'm just gon na do a light. Spritz over this whole entire space. Make sure the edge right here in front of my hairline make sure that's really good.. Okay. Now this is completely dry to the touch. This is all glued down. It'S not going anywhere! It'S not gon na slide back at all., But this is where some experimentation is coming into play in this video, because I had an idea.. What I like to do at this point is, you know, I'm gon na cut this off, but I like to put makeup over this section, because you see how sheer these stocking caps are. Literally my whole entire hair is showing through, like it's black. It'S not even scalp color or skin color., But I need this to be scalp color. I need to look like I'm bald so that it gives me a scalp base that I can put my wig over.. Let me demonstrate real quick, just so y'all know why I do this and why you might see celebrity hair stylists. Do this ,'cause. I know a lot of times when it comes to lace, wigs, it's like. Why are they doing all that There's so many steps involved? These days, Like we used to just slap a wig on call it a day, we barely even glued it down. Remember back in the day how people used to put wigs on Okay see how my dark hair is showing through. If I just put my wig over it now, it pretty much looks like I have a gray scalp or like a black scalp.. It doesn't look natural and then you try to go over and you're trying to put concealer right here. But what about right here in the edges? It literally would look like. I have a gray scalp and it just looks weird and it doesn't look natural. That'S why you want the underneath part to be skin color or scalp color.. So that's why I would take makeup like my foundation and paint this whole area and try to make it look skin color., But the issue with that is that I tried it with liquid foundation. I tried it with powder foundation.. The liquid foundation seems to really just soak into my hair and just soak through, and it doesn't really give good coverage and then I feel, like my actual hair, has makeup all in it. When I take it off and then the powder foundation is just too powdery. It doesn't really give good coverage. It doesn't really give me that color that I want., But I was watching a special effects, video, where they were doing a special effects. Bald cap they were making the person look bald and they were using an airbrush to airbrush on the paint color, the foundation color over the bald cap, and they would just airbrush the color on and it just sprayed on all evenly looked great.. I was like ,'I wish. I had an airbrush machine, so I could just airbrush this my skin color' And then I was like ,'what. If I use this product ?'. This is the Sally Hansen Airbrush Legs spray., It's basically a spray on foundation for your legs. You guys have probably seen this before.. It'S meant to give you a bronze-y glow and make your legs. Look. It'S basically like spray-on foundation for your legs. What I just said. And it's supposed to be water resistant, it's supposed to be really good coverage and you just spray on the color And it comes in three different colors light, medium and dark. I got it in light because I want it to be that light. Color - and I just thought to myself - ,'what if I just spray this on ?', It should in theory cover all this up, really easy.. But I don't know you see, I'm opening it for the first time. ( laughs ). I don't know what possessed me to really wan na do this. I have no idea if it's gon na work, this might be a disaster.. Let me demonstrate on this piece of paper what this does. Literally it's like spray paint. Here goes nothing I'm gon na go ahead and do it before I cut the excess off just because this excess stocking cap is going to protect my forehead for me., Okay, ( Gasps ). I think this might work. Oh my god, ( gasps ), You guys, I'm a genius, I'm a genius, I'm literally a genius wow. Look at me! Thriving.! I don't wan na put too much I'm trying to do a really thin layer.. Okay, it's a little wet. I feel, like I put a little bit too much because I'm not used to how much this sprays out, but I feel like once I get used to it I'll be able to just go ( mimics spraying noise, ) and just be done. It'Ll take two seconds., Which normally I'm sitting here with a foundation and a brush, and I'm like trying to keep packing it on keep packing it on keep packing it on to get the color and the color never really shows up. Since I sprayed so much of This hairspray, underneath it should create a barrier between my real hair and all this makeup. So I don't know.. This is an experiment. We'Ll have to see what happens when I try to take this off.. Okay, so it's dry. Now it's not transferring off onto my hand or anything because the thing about this is that it's water resistant because it's meant to go on your legs and they don't want it to transfer onto your clothes or anything like that. So once it's dry, it's dry.! It'S not going to transfer it's not going to be all greasy or anything. That'S another reason why I thought that this might be a good idea.. Now I'm going to go ahead and cut off this excess band right here, it's completely glued down to my head. So it's gon na stay down., I'm just gon na take these little scissors to start cutting away and I'm just gon na cut this., And I just want this stocking cap to be completely covering my own hair.. I'M bald girl, I'm looking nice and bald, Definitely be very careful with this part, not to cut yourself or anything. Free. My little ear make sure my sideburns are still covered though.. Look how bald I look. I mean, I know you can still see it's not a very smooth, bald head and that's fine, but for the most part this is what's gon na give you the most natural result.. You want to start off bald and then put your hair on top, because it's literally gon na look like scalp and hair. That'S what makes it look so natural. Alright. So this is basically our base. Now we're gon na move on to actually gluing the wig itself. Down to our base and down to our hairline. First, I'm gon na prep by using some rubbing alcohol and a cotton pad and just clean off that area right in front of that line that we created, because if you have any oils or makeup or any of This excess airbrush makeup anything that might have gotten on there. It'S going to get in the way of the wig sticking down., So you just want a really clean base.. I had already had makeup on too so I just kind of need to wipe that off. Now in terms of gluing, this down, making sure that this edge is seamless and making sure that the front of our wig here is glued down nice and secure. I basically have two options depending on how I'm feeling and what I need.. The first option is the Got2b Glued gel that I talked about earlier that we used earlier.. The second option is this Ghost Bond actual wig glue., So yeah? This is called Ghost Bond XC. I ordered it off of Amazon, it's specially formulated for oily scalps, high humidity and heavy perspiration, meaning that it is very, very waterproof, and even if you start sweating, even if your skin gets oily, even if you spray water on it honestly, even if low key, you Could go to there water park with this., It's very, very waterproof. It is still going to stick.. This is actual wig glue, actual made for people who wear toupees and stuff like that., So I basically go in with this baby when I wan na wear my wig for a long time when I want to literally keep it on for like five days up to Five days, I think I've worn a wig with this stuff. And it just like if I'm traveling, if I'm going on a trip and I'm gon na, be wearing a wig, and I just wan na make sure that it's not gon na be lifting or anything. I will use this., But the one downside to this is that, because it is so waterproof and it is such a strong hold it's harder to remove it from your freakin' head and it's harder to remove the excess glue off of your wig.'Cause. You know your wig gets kinda dirty around the edges where the glue was applied and you have to clean that off. When you take your wig off and it's actually kinda hard to remove this stuff., You have to use a lot of rubbing alcohol and it's just like it's hard to remove. And I'd rather go in with the Got2b Glued, because this basically washes off with warm water.. So it's kinda bad because if you start sweating really bad or if your hair gets wet or you wash your face and you get water right here, your wig's gon na start lifting it's not gon na last, as long. I would say maybe two to three days With this stuff - and it's just not so much of a strong hold., But it is really easy to remove it's really easy to wash out it's easy to wash out of your wig lace itself and it's just easier. Either way. It'S the same process of how I apply it and how I glue it., So the only difference is which product I'm using. Today, I'm just gon na go ahead and use the Got2b. Because of the fact like I said, I just don't feel like messing with the removal process of the other stuff.. So all I'm gon na do is take small amounts of this at a time and start applying it to the very edge of where we've got all this bald cap going on. And what this is gon na do is first off it's gon na make sure that The edge of this cap is really really glued down and meshed in with my skin, but it's also going to serve as the actual wig glue to glue down the front of my wig.. You don't need a whole lot, even though this isn't an actual wig glue and it's just a hair gel. It is very sticky and when it dries down, it has a very strong hold, so it still works really well, it's just the fact that it's not really waterproof., I'm always a little bit more generous right here on the sideburns, because again, that's where everything always tries To start lifting up., It's kinda like how the inner corner of your false lash always starts lifting up. First, it's like that with wigs on the sideburns.. Now, what I'm gon na do is just take a rat tail comb just so I have something small to work with and I'm just going to smooth this out.. So basically, what I'm doing is I'm smoothing the edge of the stocking cap into my skin and just kinda slicking that down blending it in melting it in as they say. And then now by the time I get done, smoothing it and I kinda let it sit And I reached for my wig and I get that ready to go off my mannequin head. This is gon na start drying a little bit and it's gon na start getting tacky kind of like lash glue. And obviously what I'm gon na do now that this has gotten tacky is just get my wig ready and get that front lace glued down.. So I'm putting my wig on from the back first and bringing it forward. I'm gon na stop and make sure that it's on straight check the ear flaps. Are we equal? Are we good It kinda helps to maybe clip some of the main hair back out of the way too. Pull this forward. An I'm gon na lay that edge of the lace right on the edge where we put the glue gel whatever you wan na call it. Make sure I pull this forward glue that down.. You can see how instantly as soon as I lay it down it just melts in it's like you can't even see the line. You don't see anything crazy, going on underneath. Start sticking that down a little bit just with my fingers, then I'm gon na come over to this side. Make sure this is stuck down. Again just using my comb as a tool to stick everything down and making sure. I'M pulling the hair back'cause. I just want the lace to be glued down. I don't want all the hairs to be glued down all crazy around the front.. Sometimes I'll even take some tweezers if some of the hairs did get glued down in a weird way and just grab the hair, lift it up and unglue it. And honestly, this stuff dries really fast. So I actually didn't even need to use my blow dryer or anything to dry it. It actually just dried on its own, which is cool.. You can take a little bit of extra rubbing alcohol to clean up any excess glue or whatever that you might have around the edges.. I have a little spot here that has a little extra glue. Make sure the back of the wig is situated and there's actually a comb in the back of the wig that you can stick up inside your real hair just to secure it. So I'm just gon na stick that in make sure the back is secure. Alright, so everything is glued down. It'S really really secure. I can literally yank on the hair and it's not going anywhere. It'S all secure. Now with the actual hair itself, because right now it's just kind of sitting there. It'S just I mean you know you could definitely wear it like this. If you like that big poofy look., Even if you have curly hair, but your hair might be a little bit thin or something or it's not quite this long. Yet you can get this look with this wig., So yeah. This is just like I'm trying to show you how big and thick this wig can be. If you want it like that. Or you can take some water and you can wet it down, put some sort of products on it to kind of tame it down a little bit.. If I had used the Ghost Bond glue, I could literally probably get in the shower and wet this wig down and it would probably still stay on.. I'M gon na adjust my part a little bit. I think I don't want such a deep side part. I think I want slightly less deep. And I'm just gon na brush it with a Denman brush.. It'S super easy to brush through., So you can see that this texture of this wig is really easy to brush easy to de-tangle, just a really nice manageable texture. It'S not gon na require a lot of work or a lot of products or anything., I'm getting my shirt all wet. Okay. Now that I wet the hair down - and I kind of brushed it out a little bit to help define the curls, I'm just gon na put some of this Kinky Curly Not Today, leave in conditioner in it. Just because this is a nice lightweight leave in conditioner, and this wig really does not need much, it does not need any type of heavy products or gels or conditioners or anything.. It really barely needs any products at all.. So I'm just gon na put this in just a little bit. And then from here. I would either just let it air dry or use a diffuser. So to save time, I'm gon na go ahead and use the diffuser on my blow. Dryer. ( upbeat, music, ) And voila. This is about 80 percent dry. It'S mostly dry it'll air dry, the rest of the way., But you can see the curls are really nice shiny, healthy, looking natural curls., So yeah. I think it's a pretty curl powdered. If you guys are looking for, like I said, just a easy get up and go type curly hair. And my hairline is secure. Like I said this, wig is not going anywhere. Everything is glued down. Everything is pretty seamless on the edges, so I can pull my hair back or do whatever I wan na do and not have to worry about the perimeter. Looking unnatural or just looking big and bulky or whatever., But yeah. That'S pretty much it.. If you guys are interested in this wig, I will have it linked down below.. I'M excited that I got to experiment with my weird idea about this airbrush legs. Stuff.. I'M gon na continue to experiment with this and just trying to continue to perfect my technique.. If I come up with anything new or different, I will make up an updated video., But this is pretty much everything that I do with my wigs right now and everything that I can share with you guys from my knowledge. Again, I'm not a professional. My technique is not perfect yet, but maybe you can take something from this video and it can help you the next time you're trying to apply a lace wig.. So if you did find this video helpful or at least entertaining go ahead and give me a thumbs up, it actually helps me out a lot when you guys actually thumbs up my videos. So don't forget to do that. And also don't forget to subscribe to my channel. If you haven't already - and I will see you guys in my next video bye

Comments
Simply Me Tay: I have a big head and a lot of hair, and I have never worn a wig...but this is making me want to start!!!
Kaila K.: When Raven said “ my main goal is to make it look like its growing from my scalp”, I thought she was going to say “My main goal is to blow up then act like I don't know nobody”. Good to know my knowledge of vines is still top notch
Alexandria McBeth: When ur a mother u get smarter. Genius woman.
SilentlyOutspokenShayla: This came right on time! I just purchased my very first closure wig, although not from this company or their sister i got one nonetheless. The goal is to get one or two from one of these companies and try this method, practice makes perfect. Thank you, Raven!
Jamecia Reed: Now my daughter (2 yo) is running around yelling “I’m a genius let me get my wig”
Breann LaFaye: This is awesome Raven! I can't wait to try this and get my springtime look together.
yeauxfaith: literally just bought a wig and you come thru with the gems! ✨
Key Brown: I just love this video. I never wore a wig period. And now I’m definitely ready to try my first one because of you☺️ Thanks for the confidence boost
Shirley Fretty: Such a great tutorial Raven!! It looks so natural!
Jasmine Henderson: I’ve been using the sally Hansen leg spray for years on my lace frontal. Amazing. If you have mineralize skinfinish in your skin tone, top of off with that. Looks amazing! ❤️
Sequoyahhm: I love this--I've never worn a wig before, but your video is so detailed and easy to follow it makes me feel like I could successfully try it one day (especially with this updated video). Would you consider doing a tutorial on applying lashes (affordable lash brands and dependable lash glues) and how to choose a lash style based on different eye shapes? I know you can only demonstrate with your eyes, but I feel like you always keep it real and are enjoyable to watch! Also I always geek when I hear you catch yourself before you fully curse lol-- it's so relatable bc sometimes you just get so into what you're talking about.
Ashley Pottinger: Yass! Love when you do these videos too along with everything else. I'm wearing a lace wig too part of my growth journey with my natural hair!
Shenelle Taylor: Please do a follow up video when you’re taking this off. If this wig stays in place & that tan spray didn’t affect your hair in anyway then you just might be on to something ! #ravenratchetwigs
Willa Morton: I’m a synthetic wig plus baseball hat kinda chick, but this was definitely informational. ❤️
Marjorie Coleman: You laid that wig soo well. I love when you wear this wig, it looks very natural!
rosa fermin: I’ve never worn a wig but this is like the perfect tutorial and I’m kind of hype to save for a nice little wig
Monae's Empire: Love this video I learned some stuff. I’ve been wanting to try the cap method Definitely going to copy everything in this video lol
MomandWifeLife: ORDERED!!!! Thanks for the Fire tips. I’ll be sure to update you once I get my hands on the wig! Cannot waaaait! ♥️♥️♥️
Lzheadfull ofhaircare: Girl! My 1st time feeling confident I can put on a lace front out of all these videos
Girl Gone Good: All I have to say is Woooow, you’re a genius! Thank you so much and I will be trying it myself. I’m so impressed.
Alizé Valencia: This wig looks so natural!
LovelyTia: Great video Raven. I just looked at one of your old videos for tips with frontals. This is perfect timing.
Asia Hernaiz: Buying a new wig on pay day needed this ❤️❤️❤️❤️ Sis Ray always coming through
HeyItsShadei: This wig looks so natural on you !!
patrice murray: Wow that was a great educational wig video! I use concealer, it is thicker than makeup and sticks better than powder. I just spray over it with the got2b spray so it doesn't rub off. But that airbrush spray is a winner and water proof, so I don't need to spray it. I'm getting that today! Thanks chica!
Savannah LaDell: This was super helpful! I always epically fail at wigs
LadyBossKCarter: I love that stuff !!! YALL IT GIVES THE BEST LOOK EVER !!! Perfect install
Yvette Arnold: Thanks for sharing this tip I’ll definitely share this with family and friends that wear wigs
Shelly Slavutin: You have SOOO many wigs I just can't keep up, you should do a tour of all your wigs.
Veronica Nicole: Genius for real. Never tried this but ima try it now. this is the only tutorial I’ve watched that doesn’t look so messy with all that glue ❤️
Jelisa Smith: Literally can't even tell it's a wig. My wig was snatched while watching this
Lauren: i ordered one of your wig designs and it just came in the mail lol so thank you for this perfectly scheduled video
Kristin Rodriguez REALTOR, DMV: This looks amazing! I have been eyeballing this wig for some time now. I believe it’s time to purchase! I know you have a straight wig as well, but can you do a video of you blowing out this wig?
Carine C: I have the exact same spray!! I don’t use it cuz it’s not my exact color thanks for showing me how to put it to use
Whitney Hall: MsNaturallyMary uses the Sally Hanson under her wigs as well. Such a smart hack!
Amelia Thompson: Thank you for this bc gel is canceled. I ruined my wig . But I salvaged it. I wear it like a closure wig. Anyway, thank you for this! It is needed
Nakea Smith: I thought I was the only one who thought small versions of products were cute. Like mini sodas and travel size=cute
Kaneesha: patiently waiting for the day I'm able to purchase one of your wigs!! I'll be wearing it so proudly lol
Melodi Bradshaw: I love your channel so much! Its been so helpful and made fall in love with wigs
Chasing Raynbows: Ms Naturally Mary turned me on to the Sally Hansen Air brush spray but the two stocking caps might be a game changer for me
Slim Shailyn: I’m scared to lay my own wig but you may have gave me some hope. It’s laiiiiid
Monique D’shay: So you basically created this video b/c you read my mind & know that I needed your help lol thanks so much
Shannon Griffin: From the thumb nail I thought you shaved your head and bleached your hair blonde!! . I was like "well she's lost it. She hit her quarter life crisis."
Mrs. W: Very good tutorial Raven, thanks a bunch
Latonya Dow: You did that! Looks very natural
Rayanae B.: *whispers* I’ve seen the Sally Hansen method prior to this video several times.. ♀️ But I have to agree that it was a smart move for the wig wearing community. Also, try the glamazontay ear hole cutting method. I’ve never tried it but I think I may soon. Keep the tips coming
Shayana Cruz: Yes that Ghost Bond is the truth ! I use it for my frontals and it doesn’t budge !! BUT the removal really is not 1-2-3. Takes some time lol
CHITARIA DUNN: I looovvveee this look, but for me I like to moisturize my scalp every two days or so so I don't know about going through all these steps to take it right back down oil my scalp then apply it again. Im one of those people that slap it on and go, and take it off as soon as I get into the door!
Marisol Wyatt: I have never worn a wig before in my life but you are making me reconsider
Albert Skipper: Brilliant idea. Thank you for making this video. Thumbs up.
ke ke: I've seen other people use that sally Hansen leg spray before. It works pretty well.
Tiffffffx6: Damn girl you did that! I’m going to try your method
400Lux.: Did it get on your hair? Was it easy to come off?
000 rose: Omg I'm a hairdresser your hairdryer is def on fire happened in salon before and sparks flew everywhere glad your okay and hair looks bomb
Jaylynn THEE Lively Waterfall: I'm definitely going to stock up on this airbrush stuff before they mark the price up double because I just KNOW that everybody is about to start using this
H Yeah: You will probably never see this but your vlogs are very very good and you are and a amazing mom and all around an amazing person ❤️
SyahirahJo: I love to watch your videos!! Actually, you are the one that makes me want to push my limit to create a YouTube channel. At first, I'm still not sure whether I need to start it or not but after I watch your videos about how you gained 50k subscribers in one month. I believe I can do it!. So, I jumped out of my comfort zone and started my YouTube channel. I also try to follow all your tips and advice (Still in progress) to post my videos regularly and consistently. "If I can do it, you can do it'. Thank you so much Raven!!
Shayana Cruz: It looks like it’s coming from your scalp ! *buys wig immediately *
Cadys Corner: Interesting! Never heard of a lace wig! So cool! Love your braids! ❤️
Shamese Kibby: Awesome hack thank you so much beautiful
Re’Mona Lavon: That thumbnail picture looked like that hair was coming out of your scalp
Abby Red: I use this airbrush spray for my wig lace instead of always using bleach.
Mimi Bella: Looks Amazing!
Kadi G: You did that !!This was so helpful no I can save on wig installa
Tia Bell: Gotta try this on my next wig!!
Life As Diana Danielle: ❤️ I was wondering when you were gonna grace my feed with a new video!!! And then with this!!! Been waiting to see your new method!!
RAVEN ELYSE: Before anybody else gets ready to type a comment insinuating that I'm not giving credit where credit is due...please note that I stated in the beginning of this video- that I watch several hairstylists and I learn and take things from them, I even named specific stylists. I also explained WHERE I got my "new idea" from...an SFX artist. So I'm not claiming to have invented anything here. When it comes to this product,I have seen other people for at least a year now using this airbrush spray on the underside of lace wigs (directly onto the lace) as an alternative for bleaching knots. Never tried that myself, never needed it for that reason but I did need something to color my wig cap...regular spray foundation would've been the logical choice but this stuff is cheaper and easily available at the drugstore. I PERSONALLY haven't seen the spray being used for THIS EXACT reason so that's why I felt like I was experimenting with something new in this video. The fact that I even have to explain this is stupid, but people are very quick to pin creators against each other over the smallest thing and i've already received several comments about it. I am not trying to take credit away from anybody! Please keep in mind that my tutorials are geared toward beginners and are not meant to be groundbreaking professional tutorials. I'm just passing on quick tips that I've learned, whether they're new or not :)
Karen Ross: Raven your hairline looks perfect! Wowzers! I don’t wear wigs but now I’m considering them!
Katie Cullifer: Im digging the bald look on you Raven. If one day you go full Brittany Spears, I wont judge.
petitfleur: i am SHOOK def gotta try this, it looks sooooooo natural!
Devin Schekorra: can you use the hairspray for the “wig glue” part to put the wig on? or do you have to use the gel?
JustpamK: Yaaaassss this is gorgeous, love this method
Lekeisha: Raven looking like a nice potato with the cap & spray ❣️
Yonnie Renee: I’m so cheap it would have had to blow up in my hand before I throw my blow dryer away
Shannon McDonald: I am going to need a wig after this because raven just snatched my edges
Kameron Monet: Sis let me gone head and order some airbrush leg makeup lol that was a great idea!!
Jess Theboss: You are so awesome! Such an inspiration!
AllAboutBritt: Come thruuu w// the hacks sis
Brittany aubrey: I (and I cannot stress this enough) NEED THIS WIG ♥️
imjustkayy: I was just about to look up how to do this and boom here you go!
BlkBunni: Your the first I’ve seen actually apply it to the stocking cap I’ve seen some one apply it to the inside of the wig to avoid bleaching the knots
Nic love: Raven you’re late to the game, people been using the sally Hansen spray tan for years lol. I myself tried the method, but I don’t like it, because the spray tan has glittery stuff in it, and It looks too shiny for me lol but it looks great
Breann LaFaye: YALL! THIS WIG IS ONLY $235! This is gonna be my spring style!
Kadeja Ra’el: Using the spray has been around for a while !! Most use it instead of bleach the knots on the actual wig
Miranda Zenon: Raven: I’m a genius Me: YES! Yes you are
God Active: Nice hacks, really are great tips
Zahrain St . Jean: I ur channel SO MUCH I CAN'T EXPLAIN Raven! Also,Ziya is so cute
Ravin P.: I finally cut on your post notifications...and I don’t regret it at all. This video is also clutch, I’m thinking about buying a wig!
Abbie A: Okay let’s see this because I simply do not want to style my own hair and an easy wig is ideal
Kayla Singleton: Early gaaaannnggg love your videos Raven! I recently just started wearing wigs so I got super hype when I got the notification that you posted this!
Dejah Howell: What about the Dior Airflash foundation?? so you can get the airbrush look and be able to use it as normal foundation too? Food for thought. Hair looks bomb though I’m trynna get into the wig game
J. Lauren: Wooooowwwwwww! It looks so natural!
Yolanda Reyes: Love it
Ella Bazarnik: What do you do after you put this much hair spray in your hair ?? Whenever I put heaps of hairspray in it doesn’t come out and stays in my scalp !!
LezMBro Dn: If there is residue on the unit after you take it off...I literally just rub it firmlynand slowly on a mirror. I use a removable full length mirror and rub my unit on it to get the residue off. In addition, to clean the mirror i use scrubbing bubbles and then Windex. It is super easy and I dont have to worry about using more chemicals on my unit.
Jackie Hazel: Looks just like your hair! ❤
Lauren Jay: You’re now officially a genius
Kaylen Davis: Okaaaaay Raven you’re on to something I’m gonna try the spray foundation method but I’m gonna spray the wig cap first then do the bald cap method so I don’t risk the foundation getting on my real hair unless it didn’t transfer?
lauren skubish: Girl I been spraying my hair to match wigs. You can let your real baby hairs be free! Looks more real. Next time use root touch up spray instead of makeup spray.
Anne Chiazor: Clicked on it before the notification even dropped love you Raven ❤️