Lace Frontal Wig Install + Pastel/Baby Blue Hair Tutorial | Ali Grace Hair
- Posted on 15 June, 2019
- Color Lace Wig
- By Anonymous
Hey guys in this video I show you how to get this #babyblue hair color + how I #installed this #wig!! Hope you guys like this video and find it helpful :)
The same hair I'm wearing in the video: https://bit.ly/2ZsLqV1
ALI GRACE 613 blonde Straight 22inch *4 + 18inch free part frontal
$10 Coupon code: arnellarmon10
ALI GRACE official website: https://bit.ly/2EYcdkg
Aliexpress ALI GRACE hair store: https://bit.ly/2WAl3KN
TOP SELLING Brazilian Straight 3 Bundles With Closure: https://bit.ly/2KNlAXG
NEW ARRIVAL Bob Wig: https://bit.ly/2IenIpN
NEW ARRIVAL straight WIG: https://bit.ly/2Zm9uIX
NEW ARRIVAL curly wig: https://bit.ly/2KhHUZM
Brazilian Loose Wave 3 Bundles With Closure: https://bit.ly/2XIXu3W
Brazilian Straight 3 Bundles with frontal : https://bit.ly/2IfnCOv
Brazilian Body Wave 3 Bundles With Closure: https://bit.ly/2Ieh56w
Brazilian Deep Wave 3 Bundles With Closure: https://bit.ly/2WDVfxt
Contact Us
For More Hair Information Or Wholesale Inquiries Contact Us At: [email protected]
If You Want To Be Promoters Contact Us At: [email protected]
Follow Ali Grace On Social Media
Facebook @aligracehair
Instagram @aligracehair_1
Brands interested in Collaborating please email
-----------------------------------------------------------------------------
Follow Me on my other socials!
Instagram @arnell.armon
Twitter @arnellarmon
I don't have a snapchat
-----------------------------------------------------------------------------
--Frequently Asked Questions--
Camera I Use: Canon 5D Mark IV
Editing Software I Use: Final Cut Pro X
Age: 24 years old
Location: Los Angeles, CA
Ethnicity: Black & Mexican
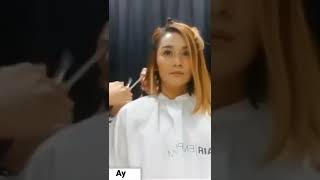
[ Applause ], what's going on, I'm in a really really great move, because this hair, just everything, came out really great, but it just like the universe does not want me to film this intro. But in this video, I'm just gon na simply show you guys how I got this hair color as well as how I install this way, because I felt like you guys were probably want to see me install this I've. Let installing bolder colors like this is typically a little more difficult to make it look as natural as possible, so I showed that process as well quickly to me noted, though, when I filmed this video, which is like within his last hour, I had given backdrop. However, I change the backdrop because the batch of I had, which you'd have to see in a second now it kind of matched the hair color load too much. So while I want to change, you can see the contrast, so the blue can really pop. So, if you're wondering why the backdrops changed, that's why I film this all within the same day, within like an hour, it's nine different days. I just changed, so you guys see the color and, like you know, let the colors shine and get a little or pop. So yeah, that's about it, Alex watch this video now by the innovate. If you enjoyed it, be sure to give this video a thumbs up and subscribe comment down below a blue heart. If you make to the end of this video wait, I hope in the last video there's a blue Moochie. There was a blue heart, huh comet, a whale and, if you you're on a computer, I don't I don't know come the word whale. I don't know, get creative with it, but I'll see you guys in this video. I hope you enjoyed it. Yoyoyo, okay, wait sub guys, so I decided to do my voice over a little different. I feel bad that wasn't talking during this portion, so I just want to talk to you and you can see my face. While I talk so I'll watch. The video explain why I'm doing so, I'm gon na take three dies. I'M gon na use two dies from a door and one from kiss the door guys. One is sky blue, which is the main color one is periwinkle and then the 10r means the kiss diet ation. I want to say it's like cyan blue. It'S not super important, though the main two died. Unis are the ones from adore, so I was actually running out of sky blue like I lose and how much it also to add water or to make it spread. But I took the periwinkle color because periwinkle it's not really like a blue, it has more of a purple tint to it, but because the wig I was using was blonde those yellow blonde. I figured up the purple tents and the periwinkle would help tone the blonde. So I can get a true blue and it worked because if I didn't use the periwinkle, I just use straight blue because the hairs like a yellow blonde, it could've easily turned green. You know cuz, usually when you mix like yellow and blue, it can be green and I've had trouble in the past doing blue hair because I don't tone the hair first. So the periwinkle just works as a toner, and it just makes it easy because you could just mix them all together. So I mix all three of these together. I wicks it up. Wicks whisk it up, and then I did a test ran so with actual piece of hair. I you know tested it and the color was a little too light for me. So I ended up adding more dye into the bucket. Now I'm gon na actually dye the wig in a different Bowl. However, I want you guys to see what the color would look like when you at the dyes to the water, so I used a clear bucket instead, but later on, I'm gon na transfer it over into a blue bowl only because the bowl is bigger and I Have a wig, so I need more space, but this color is cool. I just it was. It was nice by for a little more pigment too, you don't really make sure the whole way got died. So I just add a little bit more of the periwinkle cuz. That'S all I had. I had no more sky-blue and then I added a little bit more of the kiss dye as well, and then I wicks that wicks I keep saying wicks whiss whiss mix, I mix it all up and I transfer those dyes into the next Bowl. Like I said, and I put a towel to the side, it makes I expected this to be messy. I feel like when you do watercolor die, it's always messy, so I was prepared. I had a towel. I had napkins just to make sure I mean, like it's easy to get the stains off my counter, because for some reason, whenever I bleach it comes right off, but I mean you just want to like you know not risk it. I don't like messes. So I just dip the whole wig into the water. Now I make this wig using two and a half bundles, which is why it's laying so flat I'm wearing this wig right now and I used to have bundles and one frontal from Ally grace there blonde hair. So I you know submerged the wig into the water. The water is hot by the way it's not like flaming hot, but it's hot, but it's just hot. It'S not warm it's hot, so I you know, allow the hair to pick up as much pigment as possible. However, I didn't Auggie died, which was annoying because I was already running low on dye as it was, but this hair absorbed every ounce of dye. Now I'm gon na take the clear bucket and I pick up some of the water just so you guys can see that once the hair absorbs the dye, I don't know what is going on chemically that's kind of cool, but once it absorbs, I like the water Goes back to being clear: I'm gon na show you that in like one second, because I thought it was pretty darn cool. It'S like science - I don't know, but, as you can see, I'm gon na pick up some of the water and it's like clear because all the diet like was absorbed into the hair. So I don't know. I thought it was pretty cool. That'S what happens when you do water color, unless I think, unless you use a car like orange or red one of those colors, those closely really really strong, so the water typically would state tinted. But for these colors at least, I think, maybe because these colors are water-based - I don't know, but I add a more dye. I only had to use the kiss dye and the periwinkle cuz. I was completely out of the sky blue, so I just made this work, but the base color of the wig was already set. So you know, I wasn't too stressed about it, but I knew that, like I had to make it work, because this is all don't worry, I had so add a more pigment and I dip the wig back into the bowl, and I want to say I did This to one more time after this, because the dye just kept soaking up into the hair. So I know how to add more dye and I just finished the bottle of the temptation and the periwinkle, and I have to dip the wig again. But somehow. Luckily the color all took now I mean if you look right here I mean you can't see it looks good, but if person it's a little streaky, but I don't think it's a bad thing. I thought could add a little more damage to the hair. So I wasn't upset about it, I feel like I mean it, wouldn't look pretty, but it also would've looked a little boring if the hair was just one solid, color and note to mention no streaks or anything. So it's like the fact that I was run out of dye and not every single strand picked up died, it's sucked at the moment, but after the hair dried, my styled it, it actually like worked out perfectly fine, because you honestly can't tell so like I said I add the rest of the bottles into the bowl. You know I just went crazy and then I put the wig in and again because if you look in the back, you can see that there's still some launch streaks in the wig. I feel like when you do watercolor depend on the color. You do it's just it's hard to get all the strands at once, especially like in the middle section of the wig. That'S where I notice it's hard to get the pigment on, because when you dip it like the outer section of the wig is getting touched immediately, so it soaks up all the color and you have to make sure you get the middle so yeah. I like wicks mixed that up and I dumped the wig one more time and yeah. I shampoo this wig once and conditioning and cold water to make sure the color state and then I let it air dry. Actually I do not blow dry it. It'S a little blonde hair you're, already like working with damaged hair to begin with, because I've been processed and it's like you do the water color method, the water is hot. I thought that as a form of heat damage, so I didn't want to put even more heat on it, so I just let it air dry that came back to it like two days later and it's flattering it, and then we got this so active portion. The video I'm gon na show you guys me installing the wing, because I late this week flat as hell, and I thought you guys might want to see that. But I won't explain to you guys talk about this color and hopefully you guys hope believe. Hopefully you guys like this method, i voiceover we get to see my face and like real time. You know I mean I just I don't know because I know personally, I hate voiceover videos, but look it's a little different. You can see my face and I'm talking to you so give me a thumbs up. If you enjoyed this little thing. I just did, but I'm just I'm talking now and you got to see me one second, oh my god, but the rest of video is voice over I'm. So sorry, but it's only because it's a very time-consuming process and yeah, maybe I'll like do this. For the rest of the video we'll see, I have to edit this to make sure it looks good first, so I decided to let you guys see my face the rest of the video okay, so I had already dude a bald cap. However, I'm like you know what I'm not gon na, do them like that. I'M gon na show them how I did it, so I took it off to start all over right, so I'm just grabbing this gel and I'm pushing my hair back. You know no baby hairs, don't nothing I'll, just brush my hair, all the way back, but that little line you see on my forehead is because I had our had a dog cap on I just didn't want to. Like I don't know, I thought it would be lame if I didn't show you guys this part. So I put my stocking cap on and I put it over my ears and over everything I almost messed my brow doing this and I cut little holes in the ear part. I learned from glamazon Tay and I am going to mold this down now I used to do these with the got to be glue like the gel. However, it's much quicker with the spray. I only use a gel around the ear tab, part or the little ear part, because I feel like that. It'S hard it's hard to get this to staff, to stay you down um, but the spray everywhere else. It dries so much faster. I promise you like you, like you and me, using the got to be glue before I like discover that the spray drive just way faster, so I used spray all over the hairline or whatever that you want to call it. I hate the word hairline amaizing, this guy, that like lacks one eye anyways, I'm gon na blow dry, the hair now or the stocking cap Jesus Christ, as you can see the little ear parts it lifts up for some reason. I don't know why it shouldn't be doing that. So that's why I decide to add some of the gel just because I felt like you know what helped mold to down which it did. But in me it did dry slowing the rest of the part, but at least it didn't take forever. You know if I were to use gel on the whole entire thing. We would been sitting here forever, so I wasn't too mad at it. So I let this dry for about 15 minutes. I was on my phone, you know just do something to kill time and then I cut it off and I start in the middle and then I cut each side by side. But what I do is, I usually just drag the scissors along. Oh no, I lied. That'S the lace, part oops. I lied it'll make sense later, but yeah I cut this all off and I cut as close as possible. I always bring it up a little too for it, but that's because I haven't these 9 of baby hair. Is this just extra hair that just grow a little forward that are super annoying I shade them. They come back so yeah doing the ball. Kappa thing works. Obviously, but it could be a little noise and times depending on your hairline, and you know how far your hair goes up, so i'm just cutting off as much as i can and i'm gon na even like get close to the mirror a little bit. That'S in front of me and just get as much as I can off just locally as flat as possible, and then I'm gon na end up taking a powder foundation by Mac and I'm going to press that all into the stocking cap. So it looks like my skin tone. This is important to do when you're, working with transparent lace or like use it when you get blonde hair, the lace it comes on is like freaking yellow. So, if I didn't do this, it would not look that good trust. Me so this works when you're working with transparent lace or like lace that comes with blonde hair cuz. I always comes yellow and I mean I don't like that. But then I do because if look it's easy to make, it look natural, because regular Swiss place is a little too dark for my scalp. But as you see, I'm just taking this powder using this very, very dense brush to really pack that powder on you could a sponge and let this Bunny's a little easier, but I used a brush and now we're bald. Alright, it looks pretty cool. I don't know why this excites me just very satisfying here. You can see my big eyes head off in the screen. You know just make sure I cut off any of the lace or not the least the stump cap, it's peeling and I'm just taking a little bit of the spread. You know make sure it's all laying flat before I put the wig on. I don't know why, but like doing voiceover like this makes me nervous, and you can see me and I feel like I'm gon na mess up more but anyways. I put some of the powder foundation on the lace on the wig as well because, like I said, this lace is like a pale yellow, color, I'm gon na add more powder later so this wig fit perfect. I don't know what I did, but I beat this way perfectly like I don't know what I did differently, but this week fits so just nice. It was perfect. To be honest, this is a really nice wig. So I put it on and I just did you know around the stocking cap and I'm you know just like you know, but to get you pop it all right. It looks really good, though, like just before I even do anything. I don't know what I did but like this week fits so perfect. I didn't need an elastic band or anything it fits so snug, but it's not too tight like it doesn't hurt my head. I could sleep in this. I slept in this wig last night, so that should tell you something so I clip away the hair at the front to the back, and now I'm gon na start cutting the lace. Now I actually hate this part scythe-like. Wigs always look great when the lace is still on when you cut the lace. That'S when you see everything you got ta fix. I hate it when I, when it comes to cutting the lace around my ears, though it's always easy for me to do my left ear, so I'm right-handed when it comes to doing this ear. I hate it because I always mess up, but you just got. Do the best you can and hope for the best you know, so I start with the ears part or the ear part. First, you know to make sure that's laying flat and then I'm gon na cut the rest of lace. Now I've seen some people like glue it or you know like mold down before it cut out the lace, and I mean I could have picked that. However, I don't know I just felt like it would have been did I did that. Maybe I did do that. I did do that. Jesus Christ, that's what I did. I agreed on first before I cut the lease Jesus Christ, but here I am putting some more powder on and uh yeah I'm gon na spray. Some got to be, and I'm gon na put a very, very, very light coat of the gel very, very light coat, because you don't need much, it's got to be spray, it holds man I just want to be. You know really really hold. So I put a super light coat like to the point where it doesn't look white. It looks like clear that's how light you want to put it just for action hold if you plan on keeping this on, we know for some time I will say I need like the more you disturb the stocking cap, the higher chances of it moving. So, as you can see, it starts to budge a little bit, so I want let me hurry up and put this wig on before I have messed up my whole bought cap, so I was kind of annoying, so just be mindful of that. I feel like if I would take more time to you know let it dry mold. I probably would have had this problem by man. You still end up looking good, so I mean I got lucky but yeah just be mindful of that. The more you touch it. The more you know just irritated it gets and they can move or budge. You know so, I'm using my blow dryer, I'm using the it's not on high heat, it's on cool heat, cool heat bit, sound cool, and let me see drying this before. I pull the lace down and start to mold that onto my head, so you want to like let the glue or spray dry until it gets tacky, but right before it gets tacky just so you have more time to work with it. I feel like, if you like, wait to the very last second and do it it's like it gives you less room for mistakes, whereas, if you're new at this, it's okay to press it down when it's like tacky, but not like not dry. If that makes any sense at all, it just gives you more time to work with it, and on top of that, I sprayed more spray. You know just make sure it's really in there and that took my blow-dryer again and you know just really dried that and mold it down. I think I'm talking so much only cuz I like, since you TV, I don't. I don't really know when to stop using what I do voiceovers. I have my microphone, so I could just press pause play pause play, but this is a little different, I'm just gon na just watch. I can't watch my makeup off man. It'S hot. I determine a see off in order to do this, because I don't want you guys food, no with the sound. So here I'm clean off the lace and how, once I wet, as you can see, I'm dragging the scissors like I'm cutting lightly but for the most part dragging the scissors just so the cut isn't too blunt if they make st. ends so this side it came Out cool, but there was like a light cast because the lace like I said it's a light yellow. I guess I didn't put enough powder on that section, but the other part came up fine. So when I do my wigs, I always have one part tucked. So whatever part looks, the best is the part, that's gon na be shown and whatever part does not look the best. That'S the part where I'm gon na put the hair over it. You know what I mean so when I saw that one part didn't look the best. I don't really care, because I knew I was gon na cover it with hair anyways. You can't see it unless you plan on going somewhere, hello Wendy. I wouldn't don't don't stress too much over that when I try and do right all right so before I like move on, I'm just putting a little more spray just to make sure that lace is melted into my forehead. I took my time on this only because, usually, if I do something and I mess up, I get super discouraged and I just like, oh my god, I'm a flop. So when I do it the first time I just take my time. You know like sometimes when I'm filming I like rush myself, because I could see the timer on my screen. Oh my god is gon na be super long, video and after I remind myself that I can literally turn an hour video into 20 minutes. You know with editing, so it's like, I don't know, I get anxiety. What, while filming, I'm like. Oh my god like this is too long, but I'm like you could literally edit this out. So I just I run to my time this video, although able to like edit it to be 20 minutes 21 minutes. This was like 47 minutes long before a in the footage. So I took my time because I mean like ain't no rush to me, so do this when you have some time, so you don't rush it. So it looks good. You know so that wig that lace, it's really melted, she's, looking good she's performing very, very well, and it's still on it looks really really good. I actually really love us with a lock like I don't know how it got so lucky because believe it or not. I'M usually able to make my wigs a good, but, like this looks extra good by the way, this hair the quality, it's nice. However, it does lightly tangle and I dig its sheddy when it was long. Since I cut it, the shade he's gone, but when it was long like how it is in this video yeah she was shedding. You saw me pull hair in that brush twice and it was annoying. It was annoying type of shedding, but it was like this hair is damaged type shedding. You know I mean like, and you can expect that from blonde hair. So, although it was annoying, it wasn't like a chakra like, oh my god, Campbell used to happen in my life that comes with uni blonde hair. Unless you spend a lot of money on super duper good quality, blonde hair, when you buy blonde from Aliexpress there's like a 97 % chance you're going some shedding so don't say, I didn't tell you anyways umm Here. I am just getting like this little Flyway. Stick! Just to make sure you know, like the Flyway state flax, I did have flyaways on like the top of my friend tool and I'm pretty much done now, I'm going to change. My backdrop looks like by, like my backdrop, matched my hair color little too much, and I want you guys to see the true blue. I may be tough to see it now, but I ain't obtained my backdrop in the video, so you guys can lead to the contrast and how nice and how blue this is. You can see the streaks the hair, by the way that I was referring to earlier, but it doesn't look bad. It looks like it's intentional, so I wasn't mad at it, so uh yeah behind the scenes of youtuber. You could see what I really do. I use fabric for my back jobs, but um yeah, that's in this video, so I hope you guys enjoy this video. I hope that you guys learn something from it. If you did be sure this video a thumbs up, please subscribe and leave a blue emoji down to little me to the end of this video and I'll, see you guys later.

Comments
Faiithie G: "i hate the word hairline it reminds me of this guy that lacks one" IM SO UPSET
Aminata Fofana: This blue on your skin is everything!
Takia Trenton: I really just learned how to put on my first wig just from this video , thanks girl ❤️
Crystal Hunter: I love this approach!! Feels like I'm FaceTimimg you it's pretty lit
HipstaShakur: Love this voiceover style... you should use this type of voiceover more often now!
arnellarmon: I was supposed to post my #askarnell video today but I need to be drunk for it lmao that’ll be up Monday!
SynsaFire: This was very soothing to watch. Your aura is stronger yet peaceful.
Sunny Divine TV: This wig is the prettiest color ever! So pretty summer ocean vibes
Nai'yana Perez: Yaaasssss I’ve been waiting for this! Obsessed with your wig tutorials, you make me feel like I can actually do it❤️
JerikaSyncere: I’m so glad you showed the mess ups with the caps and using the got2b. Everyone else be making it seem like it’s easy peasy and GUH it’s not!!! It takes forever and it’s a lot of trial and error! Glad I’m not alone lol
Nadirah I M A N: I love this type of voice over!!!
Lizanne: I love this format for doing a voice over. Its really cool.
DosesofRaye: Thank you! Lmfaoo I was really sitting these last 2 days shocked that you left us without a color installation. Lol I knew you wouldn’t do us like that. Thank you Arnell
onaaliciaa: I’m so sad bc i kind of wish i could just buy this wig lol. You did such an amazing job ! But there’s no way i could recreate this lol
Moni J: Love the way you did your voiceover The hair color is beautiful
Niqkee Trunese: This color is sooo bomb! I definitely have to try this. & I love this version of the voiceover. P.S whale emoiji lmao
Chloe Robinson: I just watched the GRWM with this hair and Arnell literally said she wouldn't cut this hair. I come here and it's cut. I'm dead lmao.
nonya bizness: You did very well. That wig is flat and the color is absolutely . Out of all of the wigs I've seen you with this one is my fav.
Nathalia: I loved seeing your face during the voiceover!
Foxy brown: And I do really like your style of voice over in this vid! ❤
WifeofTrap: She’s such good vibes too❗️wig looks bomb
Grabrielle L: Most detailed color and install video ever!!! Thank you!!!
Its Me Tory: I'm loving the little video box of you doing the voice over
Keakea T: love it !!! so when you have to take everything off how do you remove everything ? like including the stocking cap ☺️
Jwillscool *The Jamaican Gaijin*: THIS IS BEAUTIFUL ARNELL, I LOVEIT!!
Rainbow Cloud: Also yaaaass girl im here for your voice over method!! Youre more connected with your viewers that way! So cool
JasmineSkyy: Both sides came out really well. Thank you for the detailed video! I’m going to make this for a party next week!
Mathy Veyitondolo: Man you lay your wigs so good I;m kinda jealous lol but that blue looks so damn good on you girl!!! WHALE WHALE WHALE
Josiey Perez: loved it girl. Still waiting on that apartment tour
Jasx Aigner: This color is everythinggggg
Paint Me Pretty: Aayyy were twins I went periwinkle/sky blue not too long ago too! This wig looks so gorgeous on you!
Foxy brown: I love this color hair on you! ❤
TORRES: this is fantastic it looks so good on you
lisaarroyo30: that color is gorgeousssssssssssssssss you did an amazing job arnell
Brittaney Stewart: Your makeup and the blue wig looks amazing
Moriah J: i was dead af when the video box disappeared and popped back up . it’s like you’re a genie
sheknitsthings: This wig came out such a beautiful color! I'm going to try your method on cutting etc. because I use another method I saw from a few other people and it doesn't work for me but I thought that was like... the only way so lol lat's laugh is on me!
claudiarcade: i loved everything about this video <3
Mrshon: Loved be able to see you while you were actually doing it
Robyn Stewart: Great job all around!
April Shorty: I really loved this style of video instead of the voice over, love you girl! #notifications #whales
Yazzy Jazzy: Please do a video on how lighten a dark extensions/wigs without ruining them !?
alexisanyway: This is sooo pretty. I love how you look with long hair.
Alannis Cordero: This is great’ you look good!
Rianna Facey: love this style of voice over!
Carlee Fernandez: love this color on you
Shanique Hyde: This pastel colour looks AMAZING on you!!!
chrys juliet: You nailed it girl
Miss Empress: Love it
ahmya: I love this voice over method!
Dana Althea: I really love this color
Colipopkola: This came out so good on you!
Tamara L.: Beautiful
Jessica Alexus: Definitely was waiting for this video lol
Yazzy Jazzy: I've always wanted to do this color!!! But too bad my hair Is already color damaged!! I'm obsessed!!
Gabee Cele: Love all the way from SA
kelley kellss: It looks stunning
J Dizzllee: Fresh off work and arnells uploading ? My day keeps getting better
Nilin Hobson: I LIVE FOR YOUR VIDEOS
Danhl: I love the color and it looks great on you.
Ice & Liquorice: Your makeup is gorge as usual ❤️❤️❤️ your making the hair look good boo
Shanice Baker-Johnson: I AM SO MAD THAT YOU CUT IT! Damnit Arnell!
Anon: Love this color on you
Llehia’s Vanity:
Andrea Bell: loveeeee this color
Erin Brewster: i love it got me thinking about dyeing my hair again lol
Ashley V: I love your tutorials
Acupoftee: How many times a week do you redo this process?
Jennifer Eleanor: That hair color is everything!!!!
PlanetHer: I’m happy u changed the background cause it was making my eyes trip lol Love this color on u
MAYAH MAYAH: Love you arnell❤️❤️‼️‼️
Foxy brown: I wish you could do a wig for me!
Kamika Vital: luv it
Natalie M2324: Woooow so pretty
M. HUNNYBEE: I loveeee this color on you lol. What is this “fly away stick” you speak of?? neeeed for my wigs lol
Kisha Williams: Loved the video.
To Be Continued: Nice! Did you film the cut too? Just curious. #bluewhale :)
Eryion Williams: I’m here for this new way of a voiceover
Jack L: I reallllly like seeing your face while you do the voice over
Diamond Janay: I loveee this hair on you
Kristian Nicole: Love the pic in pic voiceover and this colorrrrrrr
Rainbow Cloud: This hawwwiggg essss givinn moiii lyyuuuf ( *_Dorys whale voice_* )
Staceyanne: looking all cute like periwinkle or whatever x
Debora Kabwika: "I hate the word hairline cause it reminds of this guy that lacks one and I fuckin hate him" LMAO I can't
e.: loved it !!
Andele Lara: whale! I love this color on you !!
DaQuane Cherry: Fireeee
Tamika Coleman: Great job
JustJo'Von:
Erica Bonnee': Love it.
Monique Lassiter: Oooolala!! Super cute!!
Ashleyonthenet: *insert blue/whale emoji here* I like the little Arnell in the bottom corner. Arn-ception. Also I caught that lil Kid Cudi line!
D'Wana Banks: Love the color!!
Aja Janai: Love your hair videosss
Gatobekittenme: I LOVE this hair color! Might have to buy one and dye it like this to try it out <3 I'm on my computer so *blue heart emoji* lmao
Talia Corrine: I love this kind of voice over
Nadia Marie: love it
bahumbug: Why must it feel so wrong when I try to do right
Farah Mohamoud: Love
Tawanna Dennis: ♀️