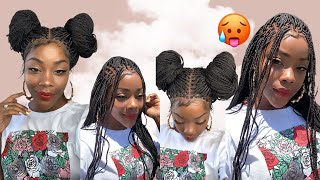
Best Fall Color Lace Front Wig | #4 Deep Wave Brazilian Hair 18 Inch | Glueless Install | Sowigs
- Posted on 12 November, 2021
- Color Lace Wig
- By Anonymous
#fallcolorwigdarkskin #lacefrontwiginstall #gluelesslacefrontwiginstall
$10 coupon code: C1103(Order $50,it works)
2. Hair detail: 130% Density Brazilian #4 Color Lace Front Wig Deep Wave Human Hair average size 18 inch
3. hair link: https://www.sowigs.com/130-density-4-c...
website link: https://www.sowigs.com/.
4.Contact SOWIGS:
Youtube: https://www.youtube.com/channel/UCBeqq...
Instagram : https://www.instagram.com/sowigs/
FB: https://www.facebook.com/SOWIGS/
Twitter: https://twitter.com/Sowigs_
Products Used:
Clairol Professional BW2 Bleach Hair Powder
Super Star Stabilized Cream Peroxide Hair Developer 30 Volume
Ebin Tinted Lace Aerosol Spray “Light Warm Brown” (Medium Dark Brown for Wig Cap)
Ebin New York Wonder Lace Bond Adhesive Spray Extra Mega Hold
She is Bomb Collection Hair Wax Stick
The Doux “Mousse Def”
Mac Studio Fix Pressed Powder Foundation ( NW45 )
STAY CONNECTED SIS!
*New Instagram: Sejayda_
Twitter: Iamjaydafierce
Snapchat: iamjaydafierce
***CONTACT ME***
Business Inquiries Only!
SEJAYDA FENNELL
PO BOX 666
GOSHEN, NY 10924
Common Questions:
Age: 28
Where I'm from: New York ( Hudson Valley area )
Ethnicity: Jamaican
Race: Black
Nationality: American
What do I use to edit my Youtube videos? iMovie on iMac
Camera ? iPhone 12 or Sony A5000
What does this channel include? Makeup tutorials for WOC, Reaction Videos, BGC reaction videos, and Vlogs
Hey mal welcome back to my channel, so, as you guys can see, we are back with another hair tutorial, so this hair is beautiful. I love the color. It'S number four by the way, but this wig is from so wigs. They will be sponsoring today's video. So if you want to see how i got this look just keep on watching. So, as you guys can see so wigs comes in this nice little silk bag here, and it also comes with a card that shows you how to care for the hair, which is very important, especially when you're dealing with curly hair. The wig will be in a separate bag and it's going to come with the tag that has all of the hair details, and this is the wig you guys, so this wig is 130 density. It is brazilian hair, like i said, the color is number four and it is a lace front. Deep wave 18 inch wig, okay, and i also believe it is a 13 by 4 by the way, so the frontal is pre-plucked. Just so you know, and also in the bag it comes with that cute pin. I just wanted to show you guys that so it's time to bleach the knots and the first thing i'm going to do is spray. The lace with some got to be glue spray because i just don't want any of the bleach getting on the hair, because the hair is already colored. So i don't want to be the one to mess it up girl. So i just do what i can to prevent that from happening after i wash out the bleach, and i also use a shimmering light shampoo to tone the lace down. Just so you know i'll have all the information in the description box, but it's time for me to pluck the lace front so, like i said, the lace front is already pre-plugged. So if you guys saw in the beginning, it is already plugged like a decent amount, but y'all know i'm a little bit extra. So i just like to go in and just make sure that the wig is exactly the way that i like it now later on. When i install it um, you guys are gon na see well you're, not gon na see because i cut it out, but i did have to take it off and reinstall the wig. I had to cut off a little bit more lace, um behind the hairline, because i ended up plucking just a little bit too much honestly. I could have left it the way that it was, but i i don't know i just wasn't really feeling it because after i finished plucking it i'm going to show you guys how it looked. It looked perfect. It looked beautiful, but when i was installing it i just didn't want to have my you know my wig too down on my face, like towards my eyebrows and stuff, like that, in order for it to look the way that i wanted it to look. So i ended up cutting off some more lace off of it, so it could lay the way that i wanted to lay but yeah i'm way ahead, but i just wanted to let y'all know that ahead of time, because it looks perfect, like i see the way It looks it looks great and that's all the hair that i had plucked out. It wasn't a lot at all, but when it came down to installing i just had to do a little bit. You know more finessing, that's all so um as usual, i'm just going to put on the wig make sure that it fits correctly. It'S pretty snug and i didn't have to um sew on the elastic band. By the way - and here you could tell that i was kind of looking to see like okay, like how much lace am i gon na - have to cut off, and i didn't think i was gon na - have to do too much. But i ended up having to cut off just a little bit more lace than i needed, which it's not too bad. It'S not terrible, but thank god i didn't you know, pluck even more hair, because that would have been an issue. So i'm using my even um adhesive spray. This is like a wig mega hold adhesive sprays, my second time using it. I actually really love this braid. It'S a lot better than got to be glue and it has the strength of glue okay. So i will have that link in the description box as well. So it's pretty simple. I either spray it on my forehead or i spray it on the lace as far as where i want it to lay blow dry it dry and um. I then go ahead and cut off the additional lace as close to the hairline as much as possible, so i'm gon na, let you guys watch that and then i'll come back in a few all right. So this is how my hair looked after. I had to take off the wig and re-install. It looks a lot better because when i pulled out the hairs as far as the baby hairs and where i want to cut the hairline looks a lot more natural before it just looked like. It was too much hair plucked out. You know what i mean, so that's why i had to cut off some additional lace and just reinstall it, so it could be fixed girl. It could be fixed. So this is how the lace looked after. I let it melt it looked perfect. So now i'm just gon na go ahead with my wax stick and my handy dandy, hot comb. This thing works wonders if you do not use a hot comb to install your wigs. I am judging you. I did it before and then, when i started using it, i realized how much of a difference it makes so definitely get you one. Okay and now i'm just doing my baby hairs, which again i cut a lot of this part out because it takes me forever to do my baby hairs. Baby hair is my least favorite part to do, but i did learn that i need to get in a habit of cutting them a little bit shorter. That way, i can have them look the way that i want them to look, because i like baby hairs and they're good. You know for covering up the lace and creating that illusion that it's scalp. However, you know sometimes it'll just be a little bit too much, and i don't like that, so i like it to look a particular way so yeah once i finally got it the way i wanted to get it. I went ahead with some makeup and i just applied that on the lace. This is from mac um. This is like the studio fix press foundation and i always use this color. I forgot which color this is, but if you're interested i'll put that in the description box as well, but this always has my lace looking perfect. So after i let my baby hairs, marinate and all that good stuff, i decided to go ahead and style, the hair. So i decided to do a side part because i feel like i just never do side parts, and i was just feeling the side part. This hair, like the color, was giving me rihanna, do y'all remember when rihanna had a color like this and she was wearing like the um. The side part like half of her head was shaved or she would just have a side part. You know with the wig or whatever, regularly that's kind of what it was given. So i thought about that. For some reason i just went with it so because this is a 13x4. I can't go back as far as i wanted to when it comes with the part without you seeing the track, so that's why it stops right there, but either way it looks good. So i use my wax stick and a hot comb to get it to lay in place, and then i go ahead and re-wet the hair and add some mousse um and the mousse is from ledoux. It'S called moose death. I will have that in the description box. As well, just in case you guys are interested but yeah. That was pretty much all i did for the styling process, so i'll. Let you guys watch and then i'll come back at the end. All right, you guys so that'll basically be the end of the tutorial. I think the hair came out really really cute and i'm actually happy that i did a side part because i feel like i never ever ever do side parts. I only do middle parts, but i actually really do like the way that it came out. I'M kind of thinking, maybe i should have cut some layers only because i really wanted this to like sit up kind of. If i could, like you know what i'm saying like, i don't know, but maybe i'll be able to get it that way once it fully dries, or i probably will tease it once it dries a little bit more and that way it could kind of give that Little voluminous, you know what i'm saying, but other than that, though the hair is really really really nice. The hair even out the package was super super super soft. I did not have any issues when it came to shedding. You guys know that i had bleached the knots so when i was washing the hair, and i also used my shimmering light shampoo. I realized that the hair did not bleed at all a lot of times when you have colored wigs or you buy pre-colored wigs. When you wash them, they still bleed out. This did not bleed out, not one bit at all, and literally it did not shed nada. It did take me a while to lay the wig down, but that is my fault only because, like how i explained earlier, i had plucked a little bit too much on the sides. So when i was trying to lay the wig down in place, it was given like bold lace front, and i didn't like that. I did not like that look, so i had to fix it. But again that was something that was on me as far as the hair itself. I have literally no issues no complaints whatsoever. Like i said, the hair was soft right out the package and you guys saw it revert right back to its natural curls. When i wet the hair, the mousse that i use is mousse def. I will have that listed in the description box. All the products that i use will be listed in the description box for you that way, if you want to check them out, but yeah, this hair came out really really cute. I love the way it looks on me. I love the color by the way. It'S a good fall color, so i want to thank so wigs again for sponsoring this video. If you guys are interested, i will have all the information listed in the description box down below per usual. If you didn't hit the subscribe button, please make sure you hit that big red subscribe button make sure you give me a very big thumbs up before you click all for this video that will be it for today. I love you guys and i will see you next time. Bye. You


Comments
Quinn Kennedy: Deserving ALL the sponsors. Looking STUNNING!!
MKDarkEmpress: You look so good with a side part ❤❤
Ebony Lemon: Love it!
Nathan Duaban: Can we talk about how you slayed that hair
dead g: Gorgeous and can you react to natalie being problematic for 4 minutes straight
SOWIGS: Love ,looks so beautiful
Linda Perotti: Ok so first you always look bomb but I love love love love the way the side part and the curly hair fits you!!!
Khayrun Rahman: react to mariahlynn's fight off camera with AXE or summin that's what it says on YouTube
Sammy Da Goat: First Comment Loving The Hair Color
Racquel G: Bihhhhhhhh. You look good af in that thumbnail okay I see u sis.
Duarte Blanco: Caribbean beauty........❤ .......also can you react to flavor of love hottie oh you will see
Kanyia Harris: Hey sejayda