Installing Lace Front Wig Bald Cap Method | Ecnuxza Hair | Honey Blonde Ombre Amazon Wig
- Posted on 06 November, 2022
- Color Lace Wig
- By Anonymous
#amazonwig #amazonfinds #wiginstall
Hi and welcome (or welcome back) to my channel!
In this video I demonstrate how I install a lace frontal wig using the bald cap method!
Honey Blonde Ombre Body Wave Wig: https://amzn.to/3fCyXvs
Remi Wax Stick: https://amzn.to/3FLMMlV
Tresemme Heat Protectant: https://amzn.to/3UqdHYI
Spritz Freeze Spray: https://amzn.to/3E4oGl5
EBIN Lace Adhesive Spray: https://amzn.to/3WzgpNm
Got2Be Gel (Glue): https://amzn.to/3E0diFZ
Wig Head with Clamp Stand: https://amzn.to/3T35Gs1
*As an Amazon Associate, I may earn a commission from qualifying purchases made through the above links.
Follow me on Instagram: https://instagram.com/tinaware
Visit my Amazon Storefront: https://www.amazon.com/shop/custom2fly...
For Business inquiries: [email protected]
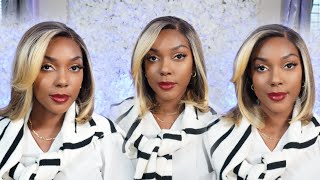
Hi and welcome, or welcome back to my channel, I'm reviewing and unboxing installing another wig before I begin, if you like that type of content be sure to subscribe to my channel, I post hair videos every Sunday evening so make sure you're subscribed and turn that notification Bell on success, the wig is an Amazon wig, another Amazon, wig and the brand is EK nuxa. I hope I'm saying that right, the Link's in the description below the wig comes in this cute pink bag and with it also comes well the wig and lashes and wig caps. So thank you for that. These are always a bonus and the wig itself is a honey blonde. Ombre body weight, okay, honey blonde - and this is 20 inches. Okay, oh okay! I thought it was gon na be a lot more black in there. This is, I don't think I've done this. One brown before I'm excited I'm excited, so this is how the wiggle looks and there's. Oh, okay yeah see it's a little bit darker on top, but the sides: okay yeah of the bag. Oh this is exciting. So, okay, let's take a look at the lace because already I'm excited it looks like it's a pretty thin lace and the knots are not like super super thick, so that should be very easy to clean up. So already I am liking this uh, the density. It feels good - I don't remember if this is 150 or 180 I'll put it in the description below, but I I'm liking the density and small wires, just not too much of a smell, but I am so excited. This is like wow. This is like beyond my comfort zone like I know I did a red one, but the red one. I love red to go like do this honey blonde is so I'm gon na bleach and pluck, and then I will install it and let's see the process. Let'S see what it looks like once, I'm done installing it all right. So this is how the wig looks prior to me: bleaching, plucking tinting, I'm going to link the video where I show you how I pluck bleach and tint, but this is how it looked prior to me doing anything to it all right. So this is the wig. After it's been bleached and tinted, I did forget to pluck prior to bleaching. I was just so excited to go ahead and bleach it that I forgot later on. I do pluck it, though, as you can see just from this angle, there wasn't much plucking that needed to be done. They actually did a very good job with how it looked you know, so a lot minimal work it needed to be done. I didn't pluck much at all cool and basically in this step of the video I'm just going to use a flat iron to flatten the front part of the wig. So here I'm just making my part, I'm just making sure it's in the middle, because I initially wanted a middle part, but I did end up changing it to a side part. But this step is crucial, especially if you are doing a middle part. Um, and especially especially if you're going to leave the entire wig or unit straight, you have to have to have to use a flat iron to flatten the hair and you're going to need a wax. Stick, I'm just going through with the heat, protectant and just spraying. It throughout the hair - because I just you know just to protect it from the heat, but the wax stick is what gets it to have that smooth laid finish so you're going to need a wax stick. I will link the one I used below and you're. Also going to need a flat iron and a heat protectant also help with frizz as well. So I will link the heat protectant that I use it's very inexpensive, and this is just how I go through and flatten it you're also going to want to flat iron. The hairline, especially if you're, going to be doing a style where the front of the wig will be showing if you're going to comb it, either back or do an updo you're, definitely definitely definitely going to use. I have to use the flat iron along the hairline as well. Oh foreign cap method, so you're just going to take a wig cap. I'Ve seen people pull it like super low, like even open their over their nose. I clearly could not do that, because I had to look on camera and demonstrate so I'm just gon na bring it to right under my brow bone, but you just basically pull it down as far as you can and you go through with some free spray. Some Spritz and you'll notice that my freeze spray, the nozzle, was clogged. I did not know that so I just had to go through and manually. Add it on afterwards, but you'll just go through with the freeze spray a little bit in front of your hairline. If something gets on your hairline, that's fine, but you want to avoid your hairline as much as possible, because then that's just product on your real hair. I then let the free spray dry a little and added some of this lace: spray, the laser heat adhesive. Just a little bit because you really want the front part of this cap to stay adhered to your head, because if it starts to lift, then your wig May potentially start to lift as well and the flatter. This is the flatter your wig will lay so you'll spray it on and let it dry and now that it's dry, you will cut the front part of the wig cap off. So you'll cut up to your where you sprayed the whether it's Brit, whether it's got to be spray, whether it's lace, spray, wherever it is, go ahead and cut. And if you are doing an updo or a style that will have the front hairline showing you're going to want it to go above in above your ear too. I didn't do a very good job here, because I know I wasn't going to be showing the front part but you're going to want to get up over around your ear as well and you'll notice that I went through after and pulled the the hairline back. Just a little bit more because I felt like it was too close: it didn't look very natural to my hairline, so I cut a little bit more excess and then just went back over it again with the lace spray just to make sure that the front was Super super laid there was nothing lifting foreign, and this is after I've. Let it all dry, so I'm just gon na go through and apply some makeup to the wig cap, and I don't know why I did like this. I should have squeezed the makeup out onto something, as you can see, there's a big blotch. I should just squeeze it out onto something so that it would have a more uniform application. So yeah, I don't know I wasn't thinking clearly. So that's just something to keep in mind, just squeeze it out onto something first and then apply it uniformly to just the front part of the hair. You don't have to do the whole wig cap and get it to blend in with your skin. I did go through after with some of the lace tint just to kind of make the front blend more with my skin, because I guess I didn't do the makeup application uniformly and it helped so sometimes you may need to mix some things just a little bit More just to help get it to match more closely to your skin complexion. I then went ahead and added some glue to the hairline, not glue. I used got to be got to be gel only because I did not want this hairstyle for too long. I just needed it for a day, so I just use got to be. Definitely you can go ahead and use some actual wig glue, lace glue, but I just use got to be and just went ahead and adhered it to the glue and tied it down with a melt band, a yeah, a melt band just to help it lay flat And actually have the glue adhere to the wig and in turn adhere to my head. So while I was letting the glue dry, I cut off a big chunk of the excess lace, and now I'm just going to go through with the eyebrow razor and get as close to the hairline as possible. And the point of using the eyebrow razor is just so: you can have a jagged line. You don't want a straight cut. I'M sure you've seen wigs that are cut straight along the lace it just it's very straight. It doesn't look very natural at all. Your hair lines, naturally, are not straight, so you want the to have a little bit of jaggedness jaggedness to it and yeah. So you're gon na go through and cut away cut a lot closer to where the actual hair on the wig or the closure front or whatever it is that you're installing starts and then you will go through. I go through with more of the lace spray. The adhesive spray and just really really spray the very, very the front of the hairline and tie it down again with the Melt band. Just to have it because you can see here that it it's lifting or it's lifted at the front. And that obviously, is not a good look, and this is the finished look. I also went across the hairline with just a little bit make more makeup just to have it blend in with my or make it look more natural and you'll see like it looks good. I did a good job it, it really looks good. It looks like I went to the salon. So what do you think? How did I do? Let me know in the comments - and here it is after my makeup application and Beyonce. Is that you no I'm kidding? I'M kidding, but the wig is definitely giving Beyonce color Vibes. They should have called the wig Beyonce. To be honest, because this is like it's really Beyonce, but thank you. Thank you. Thank you for watching, don't forget to like comment and subscribe. Let me know your thoughts in the comments and everything I used is in the description box below


Comments
Nicole The Pisces Queen: came out really pretty
Shekeyla Mandigo: This is really cute on you
Nicole The Pisces Queen: lol, heyyy B