Start To Finish | Pre-Colored Deep Wave 99J Wig Install (Beginner Friendly) | Ali Pearl Hair
- Posted on 17 August, 2021
- Color Lace Wig
- By Anonymous
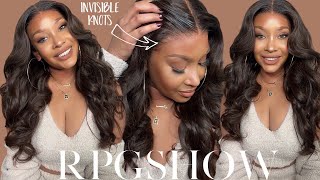
Hair I’m wearing: 24inches 99J deep wave 13*4 lace frontal wig, 180%density
Shop Now➤https://bit.ly/3ksXbby
Trending Ombre Color Hair:➤https://bit.ly/3iiPXnY
❤#AlipearlHair Official Store:➤https://bit.ly/3kqtHLB
❤Lace Front Wigs for Sale!➤https://bit.ly/3Ba2FxT
❤Invisible HD Swiss Lace Wigs:➤https://bit.ly/3ieJx9k
Use code “alipearlyoutb”to save $10!
#alipearlhairwig #alipearldeepwavehair #alipearlbodywavehair
Instagram @alipearl_hair: https://bit.ly/34I3Oyd
Youtube @Ali Pearl Hair: http://bit.ly/2H0Gmmc
Facebook @Ali Pearl Hair: https://bit.ly/3aKwxX3
WhatsApp: +86 15890076489 E-mail: [email protected]
My Socials let’s be friends! (literally) :)
IG: @kamanijeann
Twitter: @kamanijeann
TikTok: @manijean888
Snap: @manijean
Wig IG: @wigssoldbymani
Email me for business inquiries only [email protected]
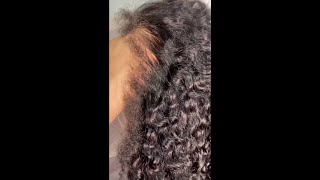
Hey guys welcome back to my channel welcome if you are a new viewer, hey girl, hey boy, whoever you are! You see that this week is late like from the baby hairs to the legs, to the part, to the slickness to the curls. Everything is popping - and this by far is one of my favorite wigs in installs that i have done so, if you're interested in seeing how i got this in these results, keep on watching. Okay, also, we are starting off with braids they're old, but not extremely old, and i went ahead and slicked back my edges. I'M switching out my cap here and i'm going to apply that and start to cut off the ear tabs with these scissors. These hair scissors here in the last video i didn't, have hair scissors, but we read up. We got some so um, just cutting those off. Now i'm going to be taking my ghostbump plastic blue and applying that right before my baby hairs begin and i'm being really precise with this, not using too much, because if you use too much for the ball cap it'll definitely not dry the way it you want. It to it'll yeah it just won't dry quickly and it'll, be very, very white. It'S still going to be have like a white shadow cast to it. That is okay, i'm blow drying that here on. I don't know what setting, because i switched up every time. It could be on cool or it could be on warm heat. Then i'm taking my scissors to cut directly in the middle, so i can evenly cut it on both sides and i'm apply. I'M cutting it right next to that glue like right next to it. The piece of the cap right in front of your ear can lift up a little bit, so you just want to press it down with your finger and that will fix that problem. I'M repeating the same steps on the next side and i'm also going to be cutting off that cap in the back, because it is unnecessary to make us look bald, i'm going to be taking my ruby, kisses cream foundation in the color rd15 and also a big Brush it doesn't have to be a big brush, it could be whatever size you prefer, but i prefer a big brush bigger brush because um, it's just easier for me that way, whatever works for you, but i'm just moving that product all around the cap and um After that, i'm taking my ghost bond again and applying that to some of the pieces that didn't quite really stick down. I do this step because i really like my bald cap to be really flat. I'M taking that same popsicle, stick from before and um yes, just dragging that down and making this cap super super seamless and super super seamless. End result. We are officially balls, so this is the week here: freshly not freshly out the pack. I did bleach the knots on this unit and i did pluck it. It came pretty plucked though the hairline did come nice, but i went ahead and plucked some more. This is the inside construction of the cap. As you can see, i did tint the lace as well with the same makeup that i used for my cap. So now i'm going to get into cutting off my ear tab. When doing this, you want to be sure to line it up with that cap and just simply cut it off before applying my wigs, i always be sure to take some rubbing alcohol this or not, rubbing alcohol. I can't afford alcohol, except for alcohol until we pretend and also a cotton, swab or cotton ball whatever and apply that to my skin, to clean it off with any makeup oils all that, because the glue will not stick i'm also taking my skin protected by. I am beautiful hustler and applying that as well around my skin. Also before i melt this face, i'm going to be taking my hot comb. I got it from my local beauty supply store, i'm sure you can find one at shores, but anyways, i'm just pressing through this hairline and um. I don't really know how to explain how this gets better results and why this is necessary, but just know that it is really pressing out that hairline before you apply it it just. I don't know it does something so make sure you do it now, i'm going to be taking my sam go spine glue. This is the classic version by the way, and i'm going to be applying that around my bald cap and as well as on my skin. So you really want to make sure to apply it on your bald cap as well as your hairline. I don't know it just not hairline, but your skin omg but yeah. It really just makes it. I don't know because, once you yeah once you smooth it out with your popsicle stick, it just makes it look like scalp and for me this honestly helps with it make it look like. I don't know really recreating my hairline, because the bald cap really starts to look like i'm bald, so yeah just taking multiple layers of this. I did about five layers and i'm also blow drying this on warm heat. I believe really doesn't matter whatever you prefer. Um yeah, i get the same results when i do it on cold cool or on warm heat, but yeah just smoothing that out each time and it's okay. If it looks like this, it can be a little bit white. That'S just how this glue is. So i'm going to apply this wig, i'm pressing it down, moving it down and pressing it in with my fingers and really making sure i pay attention to where that glue is and applying that lace in that hairline, exactly where that is i'm using a font comb And the teeth of the comb specifically to comb out that hairline and press it make sure it's really into that glue and seeping not seeping, but melting into that glue. I'M also blow drying it on warm heat. I know for sure it was that and i'm also going to be melting this with my melt belt from i am beautiful hustler. I let the belt sit on there for 10 to 12 minutes. Now i'm taking my scissors and i'm putting directly in the middle so that i can cut the lace off evenly on both sides, i'm using my razor and i'm going as as you can see in a very zigzag motion. Lace came off very smoothly, so yeah. That'S all i'm doing here, as you can see, yeah pretty self-explanatory, i'm cutting off the lace, the extra pieces - i am cutting off with my scissors, but i will explain that more in depth later, when i do the other side but yeah same thing here, cutting off The lace, so i'm lifting up with my finger the pieces of the lace that do not have any hair on them: okay and i'm cutting that off. This is probably what makes my wigs look like so much scalp. I really do not leave on any lace that does not need to be there, so i'm being precise that i'm cutting off piece by piece, those pieces that do not need to be there that have no business, because it's no hair on them. So it's just gon na be looking like lace literally attached to your skin, instead of a hairline, i'm taking a small brush in that same rd15, ruby, kisses cream foundation and just making this look more like skin matching my skin tone. Pressing out that hot i mean pressing out the hairline with my hot comb, one last time before i pull out my baby hairs. I don't know why i'm doing this, it's just because, honestly and i'm using that same fine tooth comb from earlier, using the teeth of it to pull out the baby hairs. This part is kind of self-explanatory. Like i said in all my videos, the preference of your baby hairs is up to you, but for me it's different every time. So today i wanted something dramatic, but still short, baby. It'S in cute, so yeah, i'm just pulling out those hairs here, i'm using my hot comb again to press out these hairs for the baby hairs, and i'm doing it very slowly and i also went through it about 10 times, not even like to you, because i Wanted to make sure that these are really straight because later on, we will be doing the baby hairs with the flat iron curling them, and what not. And since this is curly hair that wouldn't have worked out. The way we have wanted to you know being super flat and easy to manage and manipulate so yeah just really pressing out this hair, and i did it slowly as well. If i didn't say that already and i'm pressing out the hairline further. Just because you feel me, because we about to wrap this zone up again before applying my milk belt for the last time, i'm two strand twisting the baby hairs just to keep them out of our face and out of our way, while we continue to style this Hair, if you can't tell already middle parts, are my go-to for sure, but, as you can see, look at what i'm doing, i'm moving some hairs to the back to make sure that those tracks are covered one and two so that it can just look more natural. You feel, instead of just having all the hair going towards the front and towards the side if that makes sense, but i'm using this heat, protectant oil hold on. Let me go see what it's called okay. So this is the icy fantasia hair, polisher heat protector, straightening, serum and um yeah. I used that to press out this hair and let me tell y'all and make sure y'all press out the back too like for sure, but let me tell y'all i really really like this oil like it was super cheap too, like this cheapest thing, oil at the Hair store, i'm definitely not going to be using um a wax stick to press out my hair anymore, because yeah, the oil is just a lot better when it's not sticky and it doesn't leave the hair looking hard, which the wax it kind of does like this. Had the hair looking so silky so yeah, this is definitely my new method. Definitely definitely definitely, but i'm really pressing out that back so all around the way it can be super flat. But let's get into styling this hair, i'm using a wide tooth comb to comb out the ends of this hair, as well as the rest of it, and i'm also going to be using my water. This is strictly just water in this spray bottle. I do not know where i got this from. Please don't ask because i do not know but um yeah, i'm getting the hair super super damp. We wanted this hair to be wet okay, so i'm using this auntie jackie's curl maintenance, anti-proof defining pro bit and i'm only using my hands and my fingers to run this through the hair, especially to the ends, get them nice and popping. And this wig brush here to brush it out, but after i use the wig brush, i like to use that same way to comb from before, because i don't know just something to the curls. I don't like brushed out curls and how they look with the fresh install. I prefer the comb the wide tooth comb. I don't know it just i don't know it makes the curls look different foreign now for the baby hairs, i'm going to be taking this racer here and i'm shaving them off. As you can see, i'm doing it like in a jagged motion and i'm cutting it off piece by piece, as you can see here, just to give the baby hairs different lengths as that's how it would be naturally so um yeah, repeating that same step. All over now, i'm using the same heat protectant, this straightening serum and i'm applying it to baby hairs, not taking a whole bunch, but just the correct and bright amount. I don't know how much i took. It was a little bit really but um, i'm using this little flat iron. This flat iron is old, but i noticed they have little flat irons that are new. I don't know what brand it is, but i see i'll be seeing it at my hair store but anyways as you can see, i'm curling them and after i curled them wholly as one i separated them and curled it piece by piece, because i wanted the baby Hairs to have, i don't know y'all will see. I don't know how to explain this, but yeah repeating this to the sideburns as well. I'M using this eco styler gel for the baby hairs, i'm not applying it all over. Actually, i like, i am applying it all over the wrong wig, i'm applying it all over the baby hairs and i took a little little bit a little little amount like just enough for the hairs, like don't overdo this, because this gel can get flaky. I'Ve noticed - and we all know this though, but yeah you just want to use a little bit and, as you can see, i'm just scooping the hairs using my fingers and the edge brush okay and using both sides. I firstly go in with the like brush side, the bristle side, and then i do the comb side just to get them more defined and look seamless and just i don't know perfect. I really love baby hairs like and then this was like my first time doing. It in this way so um yeah - i really enjoy how this came out, but yeah y'all, just got ta, make sure y'all doing see, motions okay going towards your face and especially when you want them to be symmetrical, make sure you're looking at both sides and getting Them to be matched up, but, as you can see, i took my finger there and i pinched the hair to curl it up. You see to make it look, you know feathery and whatnot. I don't know how to explain it, but y'all, see y'all, know the vibes like y'all, see it foreign. So i really like how this hair looked tucked behind my ears, so i kept it that way. So yeah we're just going to be tucking that neatly behind our ears and applying that oil again girl to add that shine that slickness into the baby hairs as well. So they can look salon fresh and shiny on the vibes, yeah but um, and also to the hair just a little bit like whatever that was left over on my hands. I applied it to the hair to add that shine as well, and i'm using this um. The same the same concealer in a small tiny like skinny brush makeup brush to make the part look more defined and i'm using that hot comb just to go over everything and um yeah y'all. This is it. Thank you all for watching. I hope you guys enjoyed. I definitely enjoyed watching i mean making this video for you guys um, make sure to check the description box for all the information on this hair and to leave a like comment and subscribe and i'll see you guys on the next one. Bye
Comments
Ali Pearl Hair: Thank you so much for your sharing!!! So gorgeous! ❤️❤️❤️
blowwstaackss: hey can you pls make a list of every product you use on an install pls ? thank you
Daisha Holloway: Just ordered a 99j deep wave definitely watching while in install
jameshia Bowden: I’m sooo in lovewith how you do your installs
Alexis: Things you did : that it looks so good!
CynthiaMarie: 24k only?wow your so good at what you do
Sonèt: Killed it per usual
myekacouture: Here for the babyhairsssss ♀️
PaytheCapalot: Hey girl I love the wiggg . I have a question I wanted to start getting into wigs but I need help on the best wig company to purchase from what do you recommend ??
Lexis Capalot: You should’ve used got2b freeze spray after you pulled out your baby hairs & then used the elastic band but you killed it
Shania: Can you do an updated plucking tutorial?
Flight Lipid: Does it matter if you get 13x4 or 13x6
hailie zakira: killed this bae <3
Itss Mariya: How long was shipping?
sashaeunoia: All of the wig installs you do, do you get them sent too you? Or do you pay for them?
Terri Porter: So prettyy, I need your skills
Augusta Onwusuaka: What's the name of the heat protectant oil you used?
Niajah Davis:
Christen Holder: Are the straps in the back of the wigs enough to secure the wig fully to fig really snug
Only samoya😘: cute ❤️
Just Ioming: Where do you get your lashes from?
Nayanna Green: Can you do a how to pluck video
It’s_Naimah Stackhouse:
Faith Amour Carter: Makeup tutorial next pls ?
Natalie E: How tall are you (asking for wig length reference lol)
It’s_Naimah Stackhouse: Early ❤️
Christen Holder: Good morning, I have a quick question
Kieraa Kay: how tall are you