How To | Highlight Your Wig Easily Part 2 + Install
- Posted on 05 February, 2021
- Color Lace Wig
- By Anonymous
Hello everyone! I'm back with a part 2 to my most viewed video! If you haven't already please subscribe to my channel and thank you so much for watching!!!
Connect with Me
Instagram: @daraimua
Facebook: Darai Marie MUA
Snapchat: DaraiMarieee
Email me (Brands only): [email protected]
Intro Song: Pum Pum x Onna Deshae
Filmed With: Canon EOS Mark II M6
Edited With: iMovie
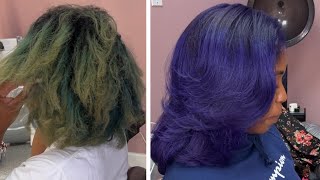
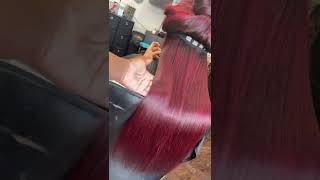
What'S up y'all welcome back to my channel, i'm back today with yet another video today we're doing how to highlight your wig easily part, two okay, so i'm showing y'all everything that i'm using today. I use the kaleidoscope, bleaching powder, basic white bleaching powder and 40 volume developer. I'M mixing that all together and i'm going to add in the sherman lights, purple shampoo to this mixture and yeah. So basically, i'm gon na be doing the same thing that i did in the first video just taking large chunks of hair and this time y'all, though we not being ghetto we're using a brush. So yeah, i'm just going to be sectioning off pieces about this size. Slapping the bleach on with the brush and then wrapping it up in foil, um and then i'm um i like to do this in rows of two. I make my wigs on the sewing machine y'all. So all my webs do get cut and i like to um. Take two rows at a time and then leave one row in between that section, so that um, you know it's still. Some of the other color left in there you're gon na see me leave that row out and then i'm just gon na repeat the same thing on the top two rows above this and then you can use like hair foil from the beauty supply but i'll be Using regular foil - because this is just it's - i can make it as long as i need to be, and it's thicker, and that hair foil from due to blood it should just it'd, be small as and it's more time consuming using the smaller pieces versus just going To buy a big thing of full and um, you know using it to bleach your stuff, so yeah, i'm just going to do those same steps and yeah. So so so all right y'all. So i'm gon na let this sit for about 20 minutes and then come back when that's done processing, and this is just what it looks like um when i took out the foil. So it's like a honey blonde color, i'm about to rinse it out right now. On this thing, so y'all could see what it looks like and um. I didn't want to leave it like this, because you know i'm trying to do something different um. I had did this color on a wig earlier in the week, so i'm like, oh and then one of my clients hit me up like she wanted a highlight wig, and i wanted to do the week that i had done previously in the week. I wanted to recreate it because i didn't take any pictures of it when i finished but yeah. So that's what we're doing so, i'm just taking that leftover bleach and putting some warm water in with it to make a bleach bath, and i'm putting that in this clear container, mixing that all together, um i'll, probably make a detailed video on how to do a Bleach bath for a wig for bundles, whatever it's just a quicker way to bleach, um hair way less time consuming and i feel, like you, get better results with the bleach bath because it like fully saturates, the hair and it's like no patchiness or nothing like that. Um, so i set my timer for about 40 minutes, but i ended up letting this sit, probably for about like an hour and a half because um after 40 minutes, it wasn't the color that i wanted it to be, which is probably because i didn't put as Much bleach in the um in the water, as i did when i did the other wig priestly in a week, but this one still came out really really good, so i'm just shampooing it to make sure it's like no bleach left over. I don't know who i was just talking to right there with that little finger, but i'm just trying to shampoo it really really good to make sure that all the bleach is out of it and y'all. We will be installing this wig today on my client and she actually made my day this day because she took me a hundred dollars like it's a good day when i begin tips like that. But she always always always to me because her install always free because she always getting here included or a wig like i with her and it's a funny story, because when she first bought a wig for me, she thought i was scamming her, because i had to Reschedule her install because my vendor had delayed my damn shipment and yeah, but it was so funny because i was like i'm not scamming you i'm like you could check my page like i don't have to scam you and she was like i'm sorry. I still want to get it done, so i end up still letting her come and she was cool as hell so and she's been a loyal client ever since then so shout out to her. I love when i can overcome stuff with my clients but yeah. She cool herself, so i'm just braiding her hair with a middle part, down the middle and then um. You know the braise down to the side: um, that's just the braiding product i like to use when i do close your wigs with a middle part. Just so, it's like completely flat, so so all right, y'all, so we're gon na mow her cap down using the boho liquid gold. If y'all want a detailed tutorial on this, i will probably make one and here's how the color came out on the wig. So so so so so pretty it's like um honey, blonde honey brown color like chestnut brown. I don't know how to describe it, but it came out really really cute and yeah um. Here, i'm just putting makeup on her cap. This is ruby, kisses cream foundation. I'M not sure what number it is, but i'm just picking one that matches her skin tone closely and then cutting the excess cap off and, as y'all can see. That'S a good meal, and this is the wig after it's all flat ironed and everything. It'S just gorgeous. Y'All gorgeous it came out really good, and that is the closure that i plucked and everything y'all. These closures from my vendor are so flimsy, like when you pluck it makes the holes in the lace get bigger. I guess because the lace is so thin like i love the lace because it melts really really good, but i hate it at the same time, because that should be getting holes in it, but um. I actually cut the lace off before i glued it down this time. I i didn't intend to do that, but we just don't go with the flow and i'm just pushing that back. I'M pinning it back out the way and then i'm gon na glue her wig down and, of course, today. We'Re using bold, hold active, we're going to do four layers like always, and i'm using the end of my rat tail comb to lay that glue y'all. I look ratchet as in this damn video with my bonnet on. I don't never go to work looking cute, i need to start too because, especially if i'm be filming videos, but i'm just doing for later four layers blow drying in between and yeah all right y'all. So this is what we're looking like so far, i'm just straightening out her park, so i feel like i have made it a little crooked glued it down. I do that sometimes that's why i like to pluck the part after i uh put it on their heads. I always end up making it crooked, but i'm just about to go in with lace tints and i'm using the wig gurus lace tint in the color caramel frappe and i'm using the olive oil super hole spray to spray that down and i'm gon na tie it Down with an elastic band, my dirty is extra glue on there and then i'm just gon na go in and hot comb, the top and stuff you know fix it up, make it look nice. Those highlights look so good y'all. This came out so good. I need to make myself a wig like this honestly. I have a wig that i'm supposed to be reviewing for a company and it's like the color that the wig was before i put in a bleach bath. So, honestly, i think i'ma throw that wig in a bleach bath and change it to this color, because i don't really like it with the blonde streaks and the like, really really dark hair. I think i'm gon na turn it brown, and so i could like it better yeah, just hot combine this getting it all sleek and stuff. So my heart um, i'm talking about my hot comb. My camera actually died when i was hot combing, so i didn't even get a video of me like cutting the baby hairs laying the baby hairs. Today we went with dramatic baby hairs and i'm just combing them out, so they can be soft positioning them. How i want them and then we're just going to go in with the hot comb and the um slick, stick again and then just flatter ironing out any lines that was left by the um wrap strip that i put on her head. So all right, y'all we're nearing the end of the video. I hope you guys like this final look um. I hope you guys liked the video, if you did give me a thumbs up y'all and hit that subscribe button and turn my notifications on so you're notified. The next time i post a video and y'all this hair is from me. This wig is from my wig line. If you want to purchase i'll leave the link down to my website in the description box below, and i will see y'all in the next video. Thank you for supporting me, love y'all, bye,

Comments
Atalaya Neely: Wow this looks great. Can you list all your products you use ?
ShallyCM: Your Bomb ❤️
Faith Akeiti: Can you use just the Basic white bleaching powder to achieve this look
Lakema Cowan:
just Miy’s luck: Do you sale hair? If so where’s the link!
Te J: Can you do the bleached bath with HD lace or transparent lace
Ms Monaii: Gurl u kinda look like Asian doll?