Start To Finish Bleaching, Plucking, & Install (Bald Cap Method) Curly Frontal Wig | Asteria Hair
- Posted on 21 November, 2022
- Color Lace Wig
- By Anonymous
*Watch Me In 1080P*
#frontalwiginstall
Hair Info: 24inch curly HD 13*4 lace front wig 180% density
Shop Now➤https://bit.ly/3Vfp3PK
❤#AsteriaHair Official Website➤https://bit.ly/3Vd4vqX
▬▬▬ Black Friday Crazy Sale ▬▬▬
Buy The Lowest Price 2022➤https://bit.ly/3EPfgug
Top1 #asteriawaterwave Lace Wig➤https://bit.ly/3EO3ekJ
Join our FB group: Asteria Hair Promo Codes & Freebies
Group Link➤https://bit.ly/3AKYVoN
#asteriahdlacewig #asteriaclosurewig
Wholesale or promotion? Contact Asteria Hair:
WhatsApp: +86 15238065852 Email: [email protected]
Instagram @Asteria__hair https://bit.ly/3Lobbxq
YouTube @Asteria Hair https://bit.ly/3m5EBoA
*
*
Connect With Me
INSTAGRAM - @omoolewaa https://www.instagram.com/omoolewaa/
TWITTER - @omoolewaa https://twitter.com/home
TIK TOK - @omoolewaa
*
My Intro Song
African Sugar - Tayc Ft Tiwa Savage
*
Feeling & looking beautiful has never been so simple with easy to follow makeup tutorials, hair tutorials and skin care tips for dark skin women to feel beautiful in their black skin.
Business & Collaboration
I film on a Cannon 80D & A Canon G7X Mark III
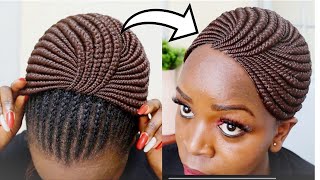
New month new hairstyle, I fell in love with this hairstyle when I saw it on the real Dior on Instagram and I just had to try it. So let's go get the money, that's my slogan. Everything the hair I'm wearing is from a stereo hair, and this is their 13x4 HD lace, frontal in 24, inches what you wan na do. The hair is super soft and so pretty it's HD lace. So, of course the lace looks amazing. As expected, the wig is well constructed with three clips and an adjustable band. They also sent me a wig cap, a lace, melting band lashes and an edge brush. This is everything you're gon na need to bleach your knots so screenshot this. If you need it, you're gon na need a mixing bowl and something to apply your bleach mixture. I use a butter knife specifically one from Chick-fil-A, because that's just what I like, but people also use brushes. I just have gotten used to using the knife. You'Ll also need bleach and developer and I'm using 40 volume developer because it lifts faster, and I like that, purple shampoo, regular, shampoo and conditioner. I'M bleaching a frontal, so I'm doing two scoops of bleach and for the developer you kind of have to just eyeball it. But the rule of thumb is to make a thick enough consistency so that when you apply the mixture to the lace, it doesn't bleed through and bleach the hair, we're going for a consistency similar to toothpaste and frosting, so add more developer. If you need to add more bleach, if you need to until you get a good consistency, because this is really important - I don't know what's wrong with me, so you could turn the wig inside out and bleach it that way, but every time I've done that I've Bleached the hair by accident, so I pretty much just stick to doing it this way. Instead, I always start applying the bleach in the middle making sure not to add too much pressure. So I don't accidentally get any bleach onto the hair. Then I move on to the sides, and I find that doing it. This way makes the sides look the most even the best way. For me to explain this is that if I were to bleach one side first, then the middle, then the other side, one side might end up more bleached than the other, because it would have sat longer, and I really don't want that. I want consistency on both sides. After I'm done, I leave the bleach on the lace for exactly 25 minutes, but this could change depending on how fast or how slow your knots bleach, because all hair is different. Once my 25 minutes are up, I'm gon na wash the bleach out of the hair. Then I get a big bowl. Add a small amount of water and add three pumps of purple shampoo and what we're trying to do here is tone down the brassiness of the knots now that they have been bleached blonde. I'M submerging the lace in the water and I let it sit in the water for exactly five minutes. I don't have any footage of me doing that because I forgot to film it, but I think you get the gist. I'M gon na shampoo and condition the hair like normal. Thank you, and since this is curly hair, I'm also going to detangle, while the conditioner is still in the hair and when I wash out the conditioner, I'm not going to wash it out completely, because I want to keep some moisture in the hair. I'Ve already tightened. The wig to fit the Dome head and now I'm placing it onto the Dome head and I'm pressing the hair back using my hot comb S. I do this to get a clean look at the hairline so that I know exactly where to pluck and how much to pluck once it's all pressed back, I'm parting out those first few rows of baby hairs, because those are already pretty small and separated, as you Can see from this hairline it doesn't start to get thick until about the fourth row. The first round of plucking is basically to thin out the hairline really fast. So I pretty much just rushed through that, and I always do the sides first and go back and forth between both sides to make both sides, as even or as close to, even as I can get them. You'Ll also see me how comb the hair back every once in a while, because it just keeps the hairline neat and gives me a better view of where to pluck, like I said earlier, just keep moving around, so you don't thin out any areas too much. My rule of thumb is never pluck one area more than twice now. Moving on to the middle section for the middle section, I don't like to pluck it too thin, because the middle section of your hair is naturally the thickest and your temples are usually thinner, which is why we have baby hairs on our temples move around when you Plug and just pay attention to the depth of the plucking by depth, I mean how far into the closure you're plucking. I don't like to pluck too deep into the frontal. This will also help to keep some Longevity. If you want your Wick to last, you longer, you never want to over pluck because hair sheds and you kind of want to leave room for the wig to shed. Naturally let it go away. Oh, I parted out the style I was going for, but for some reason I lost those clips. But after I finished I went in with my wax stick to make it all look clean and get rid of any flyaways. I might have - and I finished it all up by pressing the hair back with the hot comb to seal it all. In honestly, this looks so beautiful and so clean. I can't wait to install it. So let's do it. You guys know I shaved my hair a while back, but it's grown back now, so I have to Slick my edges back before putting on the ball cap. If you want to keep your edges, Sleek them back and do the bald cap method. I promise you it'll, save your edges. People like to say that oh, it doesn't make a difference. Trust me makes a difference. I do a part in the middle and Slick that very well so that my weight can lay as flat as possible. Now I'm putting on the ball cap - and I put the ball cap over my ears as far down as I can go, and then I cut ear holes into the cap. This is a very important step as well, because it makes the cap lay flat around your head so that you can melt it down. If you don't cut the ear hole, it's going to be like bumpy on the ear tap area and you won't be able to Like Glue it down. If that makes any sense. I hope that makes sense, but anyway, foreign, the yellow ebbing, all around my frontal making sure to cover all the parts where there's hair. Then I'm gon na blow dry it till it's completely dry, I'm taking a foundation that matches my skin and I'm rubbing it all over the cap, mainly in the front area. Once the cap is coated in Foundation, I cut the excess off. I like to cut a middle tab because it makes it easier for me to peel the cap back to my liking, and I peel till I reach the very front of my edges, making sure my edges are completely covered and that it looks even all around foreign. I can cut off the excess cap, then I tie the extra in the back using a paper towel and rubbing alcohol to clean off any glue or Foundation left on my skin and here's how it looks before I glued it down now. I'M just trying on the wig to make sure the cap matches up with the hairline of the wig bye. Once that looks good, I can go ahead and glue down the cap for glue. I'M using bold, hold active. This is like the sensitive skin kind and I'm gon na do small emphasis on small dots and spread them out very evenly, and I'm just doing this to glue down the cap. So it doesn't look so Jagged and weird in the front. You want to make sure everything is flat and neat when you apply your glue, foreign and here's. What the cap looks like after it's been glued down by the way I'm using popsicle sticks to spread the glue, and I usually use the thicker ones. But this was all I had because I ran out of thicker ones. But now I'm going to lay down the actual glue for the lace when laying the glue just make sure it's finely spread and there are no bumps or clumps. I am. I did about five layers of glue. Then I let it completely dry before I put the lace on it, picking up my lace and making sure to line it up very well with the glue, while also making sure it's even on both sides. Once I believe it's even I push the lace into the glue, don't push the lace into the glue until you think everything looks good, because if you push it in prematurely, you can't go back, you will either have to start all over or just have ugly lace And we don't want that, but anyway using the band that came in the package, I'm laying it right on top of the lace to melt it, and I keep it on for 10 minutes while that's happening. Let me show you guys how I detangle the hair, I'm feeling my continuous misting spray bottle with water spraying, the hair with the water and detangling it with my detangling brush. You can get all of these things from the Beauty Supply by the way. You really don't need to use any products on curly hair to define the curls. Water is just fine, the curls are still going to be defined and they're still going to look good. I find that using products actually weighs the hair down and it makes the curls and just like the look not last as long also I detangle in four sections foreign so cute now back to the install taking off my band and it's time to cut the lace Again, I'm cutting a middle tab to make it easier to cut in sections, I'm cutting the middle section first, and when I cut it, I cut in like a zigzag motion. You never want to cut lace in a straight line because it won't blend well that way, if you want to see a more detailed tutorial on how to properly cut your lace check out this video foreign, I was really hot. While I was filming this, which is why you can see my glue turning white, but I promise it's not going to look like that in the end to fix the white glue peeking through I'm patting the lace with the brush that has foundation on it and look At that, moving on to baby hairs, I always do sideburns and Tempo baby hairs when sectioning out the baby hairs. Do it in a triangle type shape fire foreign out the baby hairs I'm going to curl them using my half inch flat iron and I'll leave the link in the description, because this flat iron is bomb and very inexpensive foreign them to my desired length, and I Tried laying them down with the mousse first, it wasn't quite working out that way because they wouldn't lay down, but I tried my best and I just kept swooping and molding foreign. I went with Edge booster instead and was able to get them to lay the way. I wanted and because I'm going for the fluffy baby hair look, I only put the edge control at the roots of the hair and not on the ends. I finally got them to look somewhat decent and then I attempted to do the style I wanted, but that also wasn't quite working out the way I hoped plus, I was running late for a date, so I just decided to do a free part instead and leave The hair down to keep the baby hairs in place and melt the lace a bit more, I'm gon na spray, the Fantasia Mega, hold Spritz and then put the band back on to lay the lace and the baby hairs down one more time. Here'S a finished! Look right after I finished the install nobody else and here's two days later, the install came out so cute. Obviously I was feeling myself because the hair is so pretty. I didn't end up doing the style I originally wanted, but I still very much love this look. I started like one more time after this and it looked just as amazing. I really hope this video was helpful and enjoyable and if you have any questions, feel free to ask in the comment section. Thank you for watching and I'll see you guys in my next video or on Instagram. If you follow me, also make sure to like comment and subscribe, bye, guys,


Comments
Annmarieszn: I felt like this was pretty detailed bc I learned so many gems! Thank you babe! It was super engaging
FalineEmpress O: Third time watching this video I’m preparing months before to lay a wig for the first time. I love this YouTuber sooo muchhhh. Ore is ALWAYS HONEST, the style not coming out right she’ll let you know and I feel comfortable knowing that I can make mistakes laying a wig and it might not look 100% but it’s givinggg
Tyti Taught You: The second install looked even better than the first
WendyWise Beauty: Awesome job and it looks great❤
Zuzzie: it's always a pleasure to watch you! ALWAYS!
FalineEmpress O: always get details With ore even from the beginning. I love it here
Amara Uzo: Thank you you’re so talented
k: How long does 5 layer of glue last for your install?
Patrick Greene: I love your video
ItsKarryanne: Heyyyy let me get comfy
uniquelady1234: Talented babe
Monibun💵💵: luvvvvv!!!!!
Adebola Stephanie: ❤