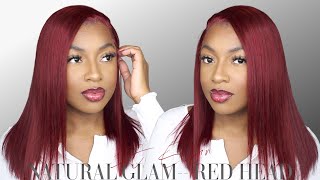
Skin Melt Hd Lace Wig + Dying Jet Black Ft: West Kiss Hair
- Posted on 12 March, 2021
- Color Lace Wig
- By Anonymous
Hey guys !! I hope you enjoyed this video! This is my first wig from WestKiss and I absolutely love this hair so definitely go purchase a unit from them! Also, let me know in the comments if you have any questions about the dying process or the overall install. All info in regards to the wig and products are listed below
••••••••••••••••••••••••••••••••••••
Wig Details
Wig in the video: Skin Melt HD Lace Wigs Body Wave 13*6 Lace Front Wigs Real Hair Transparent Wigs
Exact Link To Wig: https://www.westkiss.com/skin-melt-hd-...
Main website: https://www.westkiss.com/
Adhesive: KISS All Mighty Bond Lace Front Wig Glue
https://www.amazon.com/KISS-Mighty-Bon...
Wax Stick: Wig Dealer
https://shopwigdealer.com/collections/...
Hot Comb: Wig Dealer
https://shopwigdealer.com/collections/...
*** For Business Inquiries ***
Follow My Instagram
@A.ntasia
(( I DO NOT OWN RIGHTS TO THIS MUSIC ))
** AUDIO **
Thematic
Music by MDMN - Mimosas - https://thmatc.co/?l=F4057FD6
Music by Mayila - Bonnie & Clyde - https://thmatc.co/?l=324C8412
Music by Peter Lam - Angels - https://thmatc.co/?l=0D108623
Music by MDMN - Mimosas - https://thmatc.co/?l=F4057FD6
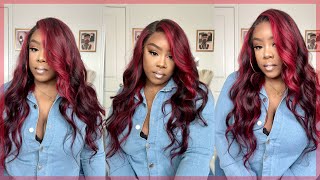
Hey guys welcome back to my channel in today's video i'm going to be showing you my birthday hair and how i installed it. However, that was on february 9th the day before my birthday and now it's march 2nd. I know i forgot to film an intro and that's why this video hasn't taken so long. I'Ve been so busy with school, and i didn't feel like doing my hair again, but today i just put on this love me, hair wig and i just did some. I used my wig dealer spray that i always use and just some mousse to lay the baby hairs, just something quick. So i can film this, but the way that i use in the video is from west kiss hair. It is their 24 inch hd lace unit. I actually have it right here. I haven't washed it out yet, but here's what the hair looks like it says: it's 24 inches but y'all see like it's giving 26 okay and i thought it was a 13 by four. But here's what it looks like like this is giving 13 by six and you can see my hand through it. So you can definitely do a deep middle part, which is exactly what i did in this video and inside you guys can see, don't mind the black dye. I did watercolor this and i bought some box dye and just dyed it myself with like a brush just because i've never done jet black hair and i'm just like turning 21. Let'S just give jet black so yeah, as i was saying it gives they give you two combs and there's a comb down here, but i don't like the comb back here, so i cut it out, but yeah. So you have lace like i said. I think this is six inches deep. You have the lace on the side and yeah, it's really thick. It'S a hundred eighty percent density and, like i said it is hd lace. However, it blend like it gave scalp, but i've used hd lace one time before and that lace was way thinner. If you guys watched my video on my long red wig, that was hd lace and i feel like that. Lace was way thinner, but that lace wasn't bad. I just it just it was. It says hd like i said it gives scalp, but it wasn't as thin as i thought it was going to be. Also. I did bleach the knots they came pretty thick. I bleached them like two or three times, and you can still see it. Let me show you guys again, like you, can still see the knots and, like i said, i tried to bleach it like two or three times and it wasn't working and i used 40 volume developer and it wasn't. It wasn't lifting to where i wanted it to. But besides all that y'all the wig turned out great, it's super thick, the lace blended, beautifully and sorry my hair's a mess. I hope you guys enjoyed this video sorry, i couldn't show you what it looked like on like after the final products, i got it curled. The next day, but i'm gon na insert pictures and videos at the end of this video, so you guys can see how it holds a curl, how it looks and yeah. I hope you guys enjoyed this video make sure you guys like comment and subscribe. I want to see your like. I want to hear your thoughts if you guys like this video, what videos you guys want to see next, i know i'm pretty late and behind on this but yeah. I hope you guys enjoyed this video, alright y'all, so jumping right into it. I told you in the previous clip that i did use box dye after i, water colored it so i'm using a revlon box dye. I think it was in just jet black and right here, i'm just showing you. I use two bottles and this is kind of self-explanatory, but you just pour in the liquid into the white bottle. You shake it up and you just start applying the dye to the hair. So in these next few clips, that's what i'm doing and i'll talk back to you guys when i start doing the actual frontal part of the wig, so okay y'all! So i'm out of this whole entire video. This is the part that's going to take the longest, because you want to make sure that you're taking your time, so you don't stain your lace so for the dye, i poured it into my little mixing bowl and i have a brush as you've seen in the Bowl and you're just going to want to take each piece like take your rat tail comb and part like as thin as you can for each piece of hair and just take the brush and lightly pat the dye onto it and just mix it in with the Rest of like the back of the hair, as you see i'm doing and that's all you're going to do is just like, i said, just paint the dye onto the hair lightly. So it doesn't drip down to the lace and just keep doing that all the way across the other side, and then i'm gon na show you guys well, i'm gon na talk to you guys again when i start doing the actual front of the hair with the Baby hairs all right, so after you're done dyeing the whole back side of the hair. You know not the frontal part you're going to want to comb. Take your comb and comb back all the hair towards the back, and once you do that, i'm going to take in a second you're going to see me take the end of the comb and you're just going to want to pull out the hairline. Because that's the part that you're that you basically miss when you're like partying off the hair, so as you guys can see the front of it, is like a little blonde like a greenish color. That'S because i did say in the intro. I did bleach the knot. So that's why it's blonde and i did try to watercolor this hair, which turned it like a greenish color. That'S why i went back and i'm doing it this way like with box dye and actually taking my time and getting all the parts that i missed. So what you're gon na need is a spoolie and you're just gon na take that spoolie and dip it in your bowl of dye and just lightly brush it on and just coat it. It'S gon na be like you're doing mascara and just cover up all the blonde pieces and, like you were doing before, make sure you take your time and do it really lightly. So you don't have any black dots on your lace and you don't you don't want to see that you know you don't want to stain it, which a few pieces of this you're going to see. I did stain it just a little bit, but it wasn't too bad for the way i styled it, but yeah. That'S all for this. Just make sure you take your time and you'll be fine, all right, y'all, so also the exciting part of this video, the install, of course, for this install. I did do the bald cap method and, as you guys can see what you've probably seen in other videos you're just going to pull the bald cap down. As far as you can cut out a cut out like the hole around your ears and then for this. This is my first time doing this method, but i took my bold hold liquid gold and i just marked out my hairline and then i think i took my melting spray from wig dealer and i just sprayed it on top and then just blow dry. It and i kind of struggled because i was like: why did i do this method? I just wanted to you know, try something new, but other than that you're just gon na cut around it after it's all dry and i took my new ebbin or even lace. Tint spray just to match it with my skin tone. Just so you know give that scalp effect, but other than that. That'S all i do for this bald cap and then i'll talk to you guys after i'm done this process. I will never is all right. Y'All! Don'T hate me because i could have sworn i filmed the part where i cut off the cap and sprayed on the lace tint, but i guess i got deleted. I'M not sure, but right here is the final product of the wig after we dye it. So right here, i'm just brushing it and i gave you guys all the specs in the beginning, but i'll say it again, really quick. It'S a 24 inch hd lace unit, and this is in 180 density, and i don't know if y'all can tell already like it's thick, okay, but right here. I think i already cut off the ear tabs. I did. I just cut it off already before i filmed this so right here, i'm just putting it on and i'm gon na clip the sides just so i can get it out my face, and so it won't interrupt me gluing. But if you guys have watched my other install videos, i'm doing the same process, i'm using the kiss lace bond glue and i'm going to do the same thing. I'M just going to cut the lace into sections and glue it down. However, after i did this whole process, i'm i noticed i messed up because this wig cap, it's in a medium and all of my wigs that i get normally are. However, when i did cut the lace as you guys are going to see in the mid in a minute, i didn't lay it down flat enough and it gave like that ripple effect like if you came up close to me, you could see like the lace was Like like it looked like ripples like it wasn't laying down flat enough, so i feel like for anyone doing this or installing a wig make sure you take your time for each piece and just make sure that, like one section is flat and done and dry before You move on to the next, so you don't get that ripply and not like scalp effect, even though i will say my wig still looked amazing like if you guys, i'm gon na insert a video in the end. Just so you guys can see after i got it curled the next day and everything, but other than that. I hope you guys enjoyed this video and sorry for rambling, but yeah. Thank you guys for watching make sure you guys like subscribe and comment, and let me know what you guys think of this do do i'm on the track. Do do hmm, so all right, y'all just wanted to mention really quick. I did skip the part where i flatter in the hair after i finished hot combing, because it was basically self-explanatory and at this point in the video it's really up to you. If you want to keep watching, because all i'm going to do is add some baby hairs and show you how i did that, but if you're not a baby hairs person, then that's basically it for this install after you like, apply the wig with your glue of Choice and you hot comb it and do the part that you want and flat ironing you're good like if y'all don't know this. By now like it's getting scalp, it's laid it's flat. It'S basically done like i could have stopped here, but i'm like it's my birthday tomorrow, i'm gon na do some baby hairs. I'M gon na, like i'm gon na get it curled. I was going for the full effect, but if you want to play it cool be simple, then you could stop right here, but if not right here, i'm just going to show you guys how i did the baby hairs for this unit and yeah make sure you Guys subscribe like and comment, and let me know what you guys think of this unit. Bye do. I know i already closed out this video a couple clips ago, but i just wanted to save you guys stay to the very end. Thank you. I really appreciate it and right here, i'm just showing you my end result of how i did the baby hairs and everything in total like how i dyed it styled. It did the middle part and, like i said, added baby hairs, and i really hope you guys enjoyed this video and, like i said this was my birthday hair and i did not keep it straight. So after this clip, i'm gon na insert a video and a couple pictures of how i got it curled the next day and the style that i went for and, like i said, i hope you guys enjoyed this video. Make sure you guys like comment and subscribe and give me a thumbs up as well and make sure you guys comment down below what you want to see next and what you guys want from me from this channel. I want to branch out and maybe do vlogs like you know, damn my life or whatever you guys really want to see. Just let me know down below alright bye. You
Comments
Nikki Thompson: WOW! Super gorgeous and very detailed video! New Subbie here! Great job! I look forward to more in the future. Can you do a kinky straight wig review please? Also, love the bob tutorial you did for Luvme Hair! Simply gorgeous! Thank You!
Beane: The lace is so natural
Caroline Green: Yessssss the lace is great!
MarcyTrillfiger: Love it
Nellyyy Divabr: Lace where❤so pretty
反正什么都可以 🌈: Wow !
chang bella: good job
Bailey White: The color is nice