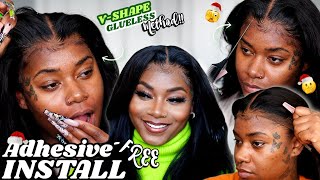
Chocolate Brown Wig Install From Start To Finish + Crimps On Straight Hair Ft Westkiss Hair
- Posted on 23 April, 2022
- Color Lace Wig
- By Anonymous
Hi guys! I'm going to show you how i achieved this Chocolate Brown #4 Start To Finish Wig Install + Crimps On Straight Hair. Enjoy!
#Chocolatebrownwig #Starttofinishwiginstall #Crimpsonstraighthair #Color4wigondarkskin #Westkisshair
*
▬▬▬▬▬▬▬▬▬♛#westkiss♛▬▬▬▬▬▬▬▬
Hair details: 200% density #4 straight 13*4 lace frontal wig 26inch
Video Hair Direct Link➤https://bit.ly/3DfyAOJ
Hot selling HD lace wigs➤https://bit.ly/36ooj7b
★westkiss official hair store➤https://bit.ly/3NkWI7t
Affordable 37% Off Curly lace wig➤https://bit.ly/3NqrHPi
Up to 43% off Lace Wigs➤https://bit.ly/3NjS35E
Hot curly lace wigs➤https://bit.ly/3qCrOxB
#westkisshdlacewig #westkisswig #westkisslacewig
#WestKissHair Official Site Huge sale Big Discount
Join Our VIP FB Group Now (Free Giveaway )➤https://bit.ly/3lzmAA8
❤Follow West Kiss hair on social media :
Instagram @westkiss_hair_store: https://bit.ly/2OlKstu
YouTube @West Kiss Hair: https://bit.ly/2Ol5U1m
Wholesale WhatsApp: +86 13323741050
*
Connect With Me
INSTAGRAM - @omoolewaa https://www.instagram.com/omoolewaa/
TWITTER - @omoolewaa https://twitter.com/home
TIK TOK - @omoolewaa
*
Feeling & looking beautiful has never been so simple with easy to follow makeup tutorials, hair tutorials and skin care tips for dark skin women to feel beautiful in their black skin.
Business & Collaboration
I film on a Cannon 80D & A Canon G7X Mark III
Light brown wig, light brow hair, chocolate brown wig, wig install, start to finish wig install, crimps on straight hair, crimps on frontal wig, frontal wig install, #4 wig, #4 wig color, color 4 wig on dark skin, westkiss hair, ore o, ore otun
Hi guys welcome welcome back to my channel, it's your girl, alright, oh what er! It'S me and i'm back with another hair tutorial birthday, if you're not watching my hair, tutorials, you're, really sleeping on a girl, because my hair tutorials slap, i'm not even gon na lie. I'M not even gon na try to be humble about it. My hair tutorial stop and if you haven't been tuning in you need to tune in because look at this look at this girl. You are missing out, but anyway, i'm back with another hair tutorial in today's video, i'm gon na be showing you guys how i slayed this look and i did slay this look. Okay, this look eats. That'S all i'ma say i'm just going to show you guys how i installed this hair from start to finish, literally from straight out the box up until now. What you guys are seeing right now and you guys already know how we do it i'll show you guys everything in detail literally every little thing i did. I'M gon na be showing you guys in this video and yeah if you're interested, make sure to keep on watching make sure to like comment and subscribe. If you aren't already and without further ado, let's go ahead and get into this video, giving them sugar tiny ways get the money. That'S my slogan. The wig i'm working with today is from west kiss hair. This is their 13x4 color number four straight lace: frontal wig! In 26, inches and 200 density right off the bat i love this color. It looks really really beautiful. I'Ve actually done a color like this before with their hair, but i colored it myself. The hair has a lot of luster, it flows very nicely. It just looks really beautiful. This is transparent lace. By the way, i can already tell that this lace is going to blend very well. The wig came with a pair of lashes, two elastic bands, a pretty scarf a wig and a silk bag for storage. Obviously, the hair is already brown, but i still went ahead and bleached the knots anyways, because i wanted the knots to be a bit lighter, so they would blend better. I used bw2 the dusted extra strength, bleach and 40 volume developer make sure to make a thick enough consistency when you mix your bleach and developer so that the bleach doesn't bleach the hair. You only want to bleach the knots so next, i'm gon na pluck and customize the wig. I always like to tighten the elastic band on the wig so that when i put the wig on my dome head and start plucking, it won't move around. I mark the middle of the wig, so i know exactly where the middle is, since i'm doing a middle part, i placed a white paper towel on my dome head and this is going to help me to see the knots more clearly when i'm plucking so before Plucking or customizing, i always start by pressing all the hair back with my hot comb, so that i can see the hairline more clearly having the hairline neatly. Pressed back, will save you so much time and make your life so much easier. I feel like y'all know my routine by now, but i always part out the front hairs on both sides, because i plucked those hairs last i plucked the sides first and then the middle last, once the front baby hairs are out of the way i press the Hair back again with my hot comb: now i'm gon na start plucking when you pluck a wig, you pretty much pluck the look that you desire. I like a natural hair line that isn't too thin. So that's what i'm doing always pluck from the root, which is the lace but be careful not to plug too hard, because you don't want to make little holes in your lace also make sure you're actually pushing your tweezers together. Every time you plug, i also transition from side to side, while i'm plucking the sides so that both sides look identical, or at least almost identical. Tell me something i need to know then take my breath in never let it go baby in that moment. Moving on to the middle, i do the exact same thing in the middle, except i don't pluck the middle as much as i pluck the sides. I, like the middle, a little more dense because i don't do baby hairs in the middle, so i'm done plucking around the frontal now so i'm plucking, the middle part. I made a part down the middle. Then press either sides with my hot comb to keep the hair down nice and flat. While i plug, i also went ahead and pressed back those baby hairs. I parted out in the beginning and plucked those a little bit also for the middle part. I just plug down one straight grid on the lace i parted out about a quarter of an inch of hair in front of the tracks and i'm pressing those hairs back with my hot comb to help to cover the tracks. Now i'm pressing the hair more with my hot comb so that the middle part is nice and flat. I also ran my ebb and wax stick through the hair and followed that with my hot comb, to lay down any flyaways and make the hair even flatter. More laid and silky smooth - i don't usually do this, but, lastly, i parted down either side of the wig ran my wax stick through it and pressed it down to make the wig even flatter, because it was looking a little bit bulky on the sides and my Hot comb wasn't really like getting those sides when i was pressing it on the top. Tell me something i need to know and take my take it with the paint and voila for this hairstyle. I wanted crimps, so i started by blow drying the hair, so it can be tangle, free dry and straight. So let's talk about how i had to go and buy a new crimper today, because i let an ex-friend of mine borrow the brand new crimper i had before and only used once and she refused to give it back, because she was mad that i broke up With her, basically, but honestly, that's between her and god, because my main concern was to just get out of that friendship as soon as possible. Even if i had to pay 40 for a new crimper, this crimper is great. By the way, i would highly recommend it, because it's so versatile and high quality. It has this dial on the top, which allows you to change the size of the crimps. I had my doll in the second turn in case you were wondering, but you can make the crimp smaller or bigger by turning the dial up or down. So what i did was run some bio silk through the hair. Then i sprayed the hair with my fantasia super hold spritz with 50 hold. This hairspray is going to make the hair crispy so that when you press it with the crimper, the crimps will be super defined and not only will they be defined. They will also last super long and then i comb the hair to make sure there are no tangles, and this is also very important. Then i start crimping. So i try to match the crimp with the crimps that are next to it, so that it's all symmetrical when you finish one crimp literally, all you have to do is start the next crimp, where the last crimp ended. I hope that made sense, but if it didn't, you can just watch me do it. I count to 20 each time i crimp to give the heat enough time to crimp the hair very well. I will suggest doing the same, also just to make sure your crimps. Last really long. Another thing i do is spray the fantasia hairspray on the hair, while i crimp so that all the hair gets coated in the spray, be careful not to spray. The crimper, though, just spray, the hair i've seen people crimp their hair while their wig is on their head. But i personally will never do that because i don't think the back would look nice if i did that and as a perfectionist that just doesn't work for me, so i would suggest doing this before installing your hair me just like this. This whole process took me about three to four hours and here's. The finished look definitely worth all that time. I'M not gon na lie. Crimping hair is such a long, tedious process. It'S definitely not for the week, like you'll, probably only catch me doing. This hairstyle like once a year because it took me so long and i'm such a perfectionist, especially when it comes to my hair. I want it to come out looking really good, so i literally took my time with every little clamp. I literally counted 20 seconds. Every single time i was clamping another row of hair, but it was definitely worth it because the hair came out looking so good can't wait to put it on it's going to look so good. I got some wine right here because i definitely need to wind down. Get it wind out so now we're about to get into the install i'm using ghost bond platinum. This glue is really good. My hair always lasts super long every time i use it and i never have any like lifting or anything like that. So i really like this glue, i'm tinting the lace with my fenty beauty foundation and this foundation brush that i always use for tinting my lace and i got this new straightener for my baby hairs. This is a red by kiss pencil ceramic tourmaline straightener. It'S a 3 3 and 3 12 inch. I don't know, but it's kind of similar to the heap heat, one that all the like instagram girls used like jada and tay, and all of them were promoting at one point, but the he pete. One is like a hundred dollars. I did not want to spend a hundred dollars on just a straightener that i'm literally only gon na use for my baby hairs. I did think about reaching out to ep, but i never like got around to it. So i literally just ordered this one on amazon and it came like the next day. I believe it was like 16 and it was definitely worth it. I'Ve used it already, since i got it and it works really. Well, literally, all i use it for is straightening. My baby hairs so definitely check this out. I have it linked in the description. If you guys are interested in purchasing it and yeah, let's go ahead and get into this install all right y'all, so i'm trying the wig on to see how it fits. This is me struggling to place the lace on the glue because, for some reason the lace wouldn't stick on the glue. I probably let the glue get too dry, so i added another layer of glue and it still wouldn't stick. So i had to go off camera to figure it out once i finally got it to stick, i tied it down with a silk scarf for about 10 to 20 minutes. Then i took the silk scarf off and, as you can see the laces melted into my skin very well, then i cut off all the excess lace in the front and the side and touched up all the parts that still needed to be glued down got once That was done. I tied it down for another 10 to 20 minutes. Oh look at that period, so i also added extra crimps on the top on either side because it looked a little funny, but i think it looks better now. Also, i just combed out the crimps a little bit. I just used a wide tooth comb. Let me show you all the comb a wide tooth comb. I do not suggest using a brush, use a wide tooth comb comb them out. They look like they're like not like crimpy anymore, like they're puffed out, but they're, not they're, still in crimps. It'S just like it depends on the angle but yeah. It looks really good. I like it all right so now, i'm gon na do my baby hairs. You guys get to see the baby hair curler in action, i'm curling them using my new baby hair straightener. I cut them with a razor. I also laid them down with edge booster. I wanted the fluffy baby hair look and when you do this style only put the edge control on the roots to hold the baby hairs in place, don't run the edge control through the ends of the baby hairs, because then they won't be fluffy. Here'S the finished. Look guys so my plan was to do all this like all today, but it's already 12 a.m, and i really want to go to sleep. So i can wake up early tomorrow and get my day started and have a productive day. So i'm gon na go to sleep, pray that tomorrow, when i wake up, the hair still looks fresh, i'm gon na try to like preserve it as best as i can and yeah i'll see you guys tomorrow, all right y'all. So it's the next day and i'm back to show you guys the finished look. I did my makeup. I got cute okay and y'all. I am feeling this like. Let'S take a look at the lace please, like do you see that it's melted, it's giving it's growing from my scalp. This hair is absolutely gorgeous like. Do you see this? No, that murderer, burn that bird okay. I absolutely am obsessed with this look. Everything came out so good, and literally all i did was put my hair up in a bonnet tie down my edges, like i always do and i went to sleep. The crimps are still intact. Everything is still intact. It looks just like how it did yesterday when i did it only thing. I think i caught this on camera. I don't remember if i did, but i added like an extra crimp up here on the top at the front, and that was literally it guys. I hope you guys enjoyed this video if you did make sure to give me a huge thumbs up, make sure to leave me a comment down below letting me know what you liked about this video. If you like my hair, let me know if i look cute, let me know if it's a hit or miss also, let me know if you'll be purchasing this hair. Obviously i like the hair, i would recommend the hair. I think you guys should go out and buy this hair and the thing about whiskey's, hair, their hair always eats okay. I'Ve never heard any complaints from you guys and i promote their hair all the time. I love their hair. They never ever ever ever. Disappoint me and i've been working with them since i started my channel literally. Let me know down in the comments if you bought the hair, if you're going to buy the hair if you're buying the hair right now, let me know you guys know the link will be in my description in case you are interested. I love you guys. So much and i'll see you in my next one bye,
Comments
Symphony Taylor: You did this wig so perfect and you have the best patience with hair the color fits you really well too!
Adore_vonn: You are such a great teacher. I really appreciate your videos. I just learned how to bleach my knots, pluck and crimp all from watching your videos!
Chantal Senterre: You slay the wigs/wig videos every single time!
Esther Baby: This hair looks amazing Ore !!! I really wanna try brown or blond hair but I have to find the perfect wig first
West Kiss Hair: Perfect color and curls!!! Love this look and thank you for trying West Kiss Hair~
FalineEmpress O: All your tutorials are so well thought true and very detailed
Zuzzie: when i say she is the queen of detailed / informative tutorials.. i am not lyinggggg !!!! <33
loveanpeace4eva: You have a new subscriber because your hair likes wonderful!
FalineEmpress O: Been waiting for this. This video gave me the boost to buy a hair crimper
Tia Broughton: Pretty, girly!
Milnon Taylor: Just beautiful period
dribaby91: This chocolate brown hair is so cute
Terrica Wells: Hi, what do you use to blend it in with your skin? And what shade?
Cynthana18: The wig come out beautiful ❤ We need a story time thou on the ex bestie friend
T: the hair looks so good on u would you say ghost bond platinum is better than bold hold active or the ebin supreme glue?
Dee Luther: Good Video as always Lovely thumbnail tho Beyond Gorgeous you are Ur Makeup always on Point Cute Ass eyelashes tho Hope you Having a Fabulous Weekend Stay Bless n Be safe always
Kiara Khensani: My fav posted♀️, miss gworll from start to finish you did your thing
uniquelady1234: You did that!
FalineEmpress O: Definite hit
lucie hannah: Do you have a video on how to make wigs from start to finish with the raw bundles. If no do you plan on?
Sandra Ekpe: Serving as always
Sammy Da Goat: Third Comment Stunning Hair Color Magnificent
Ruxy Bratz:
Mary Camara: What foundation do yu use on wigs pls
Sabrina Opoku: Aaaaannnddd we’re back again with the scissors ♀️♀️
Rob_ak1: I love your videos, really, but pls, fix that bad audio, turn down the gain or buy a good mic -Love u from Italy
lucie hannah: Why do you pluck the hair, don't see any difference or it does something to the hair
AfricanDiaspora.in.LondonUK: The trademark baby hair is a big shout out. Dat u wearing a wig!
babatope oyinkansola: Barddddddd Gurlllllllll
Sill Idill: No makeup or wig can hide that face