No Baby Hair! No Bald Cap! | Honey Blonde Highlight Wig Install | Westkiss Hair
- Posted on 18 March, 2022
- Color Lace Wig
- By Anonymous
No Baby Hair! No Bald Cap! | Honey Blonde Highlight Wig Install | WestKiss Hair
for the description box:)
▬▬▬▬▬▬▬▬▬♛#westkiss♛▬▬▬▬▬▬▬▬●
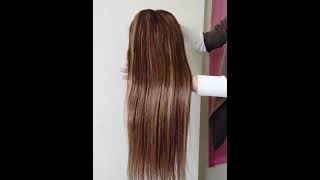
Hair details: 180% density #Piano 4/27 ombre highlight 13*4 lace frontal wig 22inch(large cap)
Video Hair Direct Link ➤https://bit.ly/3IgCNTG
EXTRA 8% OFF CODE: WK08
Hot selling HD lace wigs ➤https://bit.ly/3rqNzju
★ westkiss official hair store ➤https://bit.ly/3ru4Loo
Affordable 37% Off Curly lace wig ➤https://bit.ly/3rm9pEE
Up to 43% off Lace Wigs ➤https://bit.ly/3KjaE0f
Hot curly lace wigs➤https://bit.ly/3nzsMJi
#westkisshdlacewig #westkisswig #westkisslacewig
#WestKissHair Official Site Huge sale Big Discount
Join Our VIP FB Group Now (Free Giveaway )➤https://bit.ly/3lzmAA8
❤Follow West Kiss hair on social media :
Instagram @westkiss_hair_store: https://bit.ly/2OlKstu
YouTube @West Kiss Hair: https://bit.ly/2Ol5U1m
Wholesale WhatsApp: +86 13323741050
Shop My Amazon Store: https://www.amazon.com/shop/xoxosheba
How to DIY Highlights on Wig
https://www.youtube.com/watch?v=tSv9Zz...
How to Pluck a Human Hair Frontal Wig Like a Pro
https://www.youtube.com/watch?v=ytu8Pf...
Blonde for Black Women Playlist
https://www.youtube.com/watch?v=WvWUaY...
Beginner Lace Part Wigs Playlist
https://www.youtube.com/watch?v=rwGtH8...
Human Hair Wigs Playlist
https://www.youtube.com/watch?v=vhfKcE...
Synthetic Lace Frontal Wigs Playlist
https://www.youtube.com/watch?v=hJhRud...
My signature lip look:
NEW TO YOUTUBE? PICK UP MY GUIDE TO REACH 1K AND GET MORE VIEWS: https://mailchi.mp/ad7b5933b0ee/new-yo...
Paid Promotion: [email protected]
Follow ya girl!
Twitter: https://twitter.com/XOXOSHEBA
Instagram: https://www.instagram.com/xoxosheba/
Equipment:
Canon G7X Mark II /iPhone XS
Ring Light
Box Lights
Macbook/iMovie
I did what i came to do what's up guys, welcome to my channel xoxo shiba here, if you're new to my channel hello and welcome and if you're og subscriber, what's good welcome back. I went in this time guys, like i mean i always go in, but i want a little bit extra this time because i really wanted to get like a salon. Look if you want to see how i got this out. The salon looking wig install keep on watching but uh. You know, since you're here you might as well hit the subscribe button hit the like button. You know what i'm saying drop a comment down below i'm just saying you might as well all right y'all. So, like i said in the intro, i was going for laid slate. She went to the salon she didn't do this from home, even though i did do this from home kind of look. So i'm really putting some like elbow grease into the installation portion of this wig. I watched erica j's latest video that she just put out recently um to get some like tips, pointers. Anything i was maybe missing since she's, a professional wig. You know hair stylist and all that, so i'm going in it's a basic style, but i'm going in with it first things. First, that we need to know what this wig is. It'S definitely small head friendly. The cap wasn't necessarily small, but the frontal for me and my head size and the way my hairline works. It should have came up a little bit farther. So that was a bit of an issue for me, but i think if you don't ever really have issues with wigs and the sizing or you have a smaller head and you usually have issues with wigs being too big. This would be a good one for you. I did finesse this though y'all know i'm always finesse, so i did finesse to make this work um. I really wanted this to be a very flat install and i went with the side part, but i didn't go deep because it didn't really have a whole lot of room for a deep side. Part plus. The video that i watched for pointers didn't really have a deep side part either. So i'm gon na let that side be janky, because it's gon na be covered. So we're gon na act like that ain't there and we're gon na kind of treat this as if it's a semi closure, like maybe a 5x5 closure, we're going to treat it like that and we're going to make this work. I could have cut the cap behind the ears like i've done before. If you want to see how i do that, i will put that video in the description, but i didn't want to do that this time. I wanted to just do something a little bit quicker. A little bit easier um, you know just another method you can do if a wig turns out to be too small for you and, like i said i wanted this to be nice and flat, so i went in with the wax stick. If you don't know what that is, because sometimes people be asking me, what is that and then i also use my perfect line. Lace concealer. I just did like a tea part with it, because i wanted it to cover without me having to do a bald cap. So now i'm just pinning the hair back and i'm going to install it. I'M using the ebb and lace spray in the red can, i know y'all said the black hand is like the ultimate like that's the supreme top level of it. But i ain't ran out of this yet and i spent like eight dollars so once this runs out i'll, try that next one i've already tried the yellow. I like that too. Honestly, none of them have disappointed me yet, but i can definitely tell this red one. Is stronger for sure, like it, don't come up very easy, even with water it'll come up with water. Don'T get me wrong, but it don't come up very easy at all. I was like oh okay, i'm gon na have to like put a little more like effort into this, because i don't want to snatch my edges. I don't usually have trouble with my edges being snatched, but i had a little bit of trouble with that, but anyways moving forward cutting off the lace. You all know i cut jagged and then i didn't cut all of the lace off over here with the side where we're hiding things. I didn't cut everything off over there because i don't know what i want to do with that yet and i don't want to customize it to totally fit my head just yet, when i'm really just working on the side that you're going to see to totally fit So i didn't do too much over there just enough to where just the parts where you can see it basically and then i like to make sure to get up close as possible. I don't like no excess lace in the front because i don't want you to you know see. What'S going on, i want you to have to squint. I want you to have to try to see my lace. You know what i'm saying so then i cut off the rest of the lace and then i just lay back down the edge lay deck. What i lay back down the edges and then i'm gon na go ahead and put on my elastic band. I like using my elastic band that has the velcro in it like that, but the only thing with the elastic band that has the velcro in it is that sometimes it's not tight enough like you, can only get it so tight. So that could be a little bit of a problem. Then i went back in with my flat iron. I mean not my flat iron hot comb, that's what we're at with it right now make sure it got nice and flat, and then i added some layers - and i know i know i always add layers. But this time i didn't just kind of just freely add layers i wanted to do it like the professional style, so i am sectioning out the hair, pulling it outwards and adding layers like i watched erica j. Do i really wanted to give it like that salon? Layered look so i went in with that. These are long layers, they're, not super choppy. I just wanted to able wanted it to be able to give me some body and some movement y'all know i love. I live. I love and i live for body and movement when it comes to hair. I don't like it flat, i don't like it being, you know just moving all one way and it's got to have some body. Even if it's not a ton of body, it's got to have some body, so i'm adding layers all up in through this hair, not the kind where it's like it looks choppy. If you wear it straight, but definitely adding some layers through this, and then i went ahead and curled it i'm using a flat iron to curl it. What i love about this flat iron and i'll link it in my amazon store link will be in the description. If you want to pick up any of the tools that i'm using all in my amazon store, but what i really love about this flat iron is that it's shaped like a cylinder. So it's very easy to curl hair for real with this, and i feel like flat. Iron curls get a little bit closer to curling iron curls and i can't use a curling iron for nothing. I got to practice a little more with that, but i can handle the flat iron, especially this one. This is my favorite one to curl hair with. I have a few flat irons and this one, like i said my favorite to curl with. If you don't know how to curl properly, go opposite directions in the back, because it's gon na give you more volume. If you go one way when you like comb out the curls and everything it's going to look weird, so go different directions. So it'll give you more like volume in the hair and then, when you get towards the front of the face, your curls go away from the face. You want to frame your face unless you purposely want it to go in towards your face, but most of the time you wanted to frame your face now. I know if y'all been watching me for a minute. You already know that, but you never know who's new who might be new watching here. So if you don't know now, you know curl away from the face when you're framing your face. Oh also, let me note before i forget. I am straightening the pieces of hair that i'm doing before i curl it because i want it to be nice and sleek, since the hair isn't really that sleek like it's just been air dried. I didn't even blow dry the hair. It'S just been air dried, so i wanted to be sleek before i curled it, so i run the flat iron through it one time and then curl it. The lace wasn't too far off of my skin complexion, so i just took the excess foundation that was on my beauty, blender and just blended that out until it matched up with my skin tone and that's all i needed. Sometimes i do too much with that. With these wigs, i noticed like this color and this time i got it just right, so i'm very happy. I did what i came to do. I really wanted to. I went to the salon. This is not just i'm good for being in my home. I kind of know how to do hair. I wanted that salon look and i got it even though this side janky, but it's covered, so it doesn't matter. This is probably the best honey blonde install that i've done yet. Usually i require baby hair with these a little bit. I require no baby hair with this, which is edges. I'Ve learned a few things from doing this pre-done color a few times, and i didn't need to tint the lace. I was like i'm gon na hold off and wait to see what the vibe is. Once i install the wig, because i noticed sometimes like the lace - i don't know if it has anything to do with the pre-coloring job or wet, but the lace can sometimes like when i tint it come out too dark. So i was like i'm probably just gon na need a light tint with it, and i'm glad i did because the excess um makeup on my beauty. Blender was just fine, it's the curls for me, it's the body and the bounce. For me, it's laying flat. It'S doing it's doing everything i wanted it to do. The only problem that i have with this wig is, as y'all know, the sizing the sizing is not that great. I need a little bit more frontal to this for it to work for my size head. If you typically don't have issues with your frontals being too small or um your hairline, or anything like that, this should be fine for you. I feel like it's still an average size wig, it's just sometimes wigs, don't fit me right. This is one of those wigs and i could have like cut up the cap. I could have like tried to make it work or left some hair out, but i really wanted like at least the side that was out to to you know, look slate, so i sacrificed this side to keep up with this side. I'M just gon na have to make sure it's secure when the wind blows on me. This hair cooperated so well. When i put my heat to it and everything the curls cooperated well, oh obviously i did. I took a brush to it, um off camera. When i was finger combing the curls, i was like i kind of want them a little more like just together. I don't know how to explain that, but that's what i wanted so i ended up brushing them out. A little bit y'all knew i was gon na add layers. I always add layers, it's very rare. It'S very that i don't add layers to a wig, i'm just feeling myself like i, i you see it great value. Beyonce is back. I did bleach and pluck the knots off camera just so you know if you would like to see an updated tutorial on how i bleach and pluck my knots, follow me on tik tok, because i did just upload some content on that and i upload a bunch Of different content on there as well hair stuff, beauty, stuff, you name it. This is a look if you have an average size, a small size head. This is the wig for you, which, along those lines, if you're interested in getting it i'll, have all the details down in the description box below and check out the description box, because i might have a coupon, you just never know, maybe sending them coupons. Sometimes. Thank you guys so much for watching, as always, don't forget to like comment and subscribe, and i will see you guys in my next video bye

Comments
Stilllookingood58: Love the color blend as well as the lay down! Bravo!
Ms. Shabria Gxo: It looks absolutely gorgeous
West Kiss Hair: I love your video! Thank you for sharing West Kiss Hair~ Love the look!!
Blackberry- Rose: ♥️♥️♥️ the color on you. You look Gorgeous you always Slay. Tyfs
Miss Sheba Baby: Whole Foods Beyoncé! Looking like a snack.
Baadsha Gmx: sebg46 VUN.FYI