Dying A Synthetic Wig With Rit Dye And Adding Roots! Wig Transformation! Make Your Own Sisterwigs!
- Posted on 31 December, 2020
- Color Lace Wig
- By Anonymous
Dying A Synthetic Wig with RIT Dye and ADDING ROOTS! Estetica Avalon Wig Transformation! Synthetic Wig Tutorial to make your own SisterWigs!
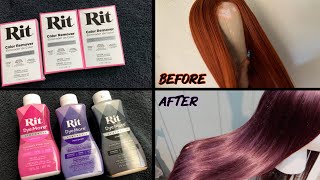
You found the perfect wig, but it's just not perfect for YOU! I am going to show you a method of dying a synthetic wig and adding roots in a very natural way that doesn't overwhelm or cover the color underneath! It's a WIG TRANSFORMATION featuring Estetica Avalon in Smokey Rose! Any synthetic wig can now be a CUSTOM Wig with simple techniques!
A SisterWig is a wig that is SIMILAR to another, maybe in style and color. Perhaps you love this Smokey Rose color, but wanted a more natural toned sister wig to wear in professional environments. Now, you can make your own!
If you are trying to dye a synthetic wig, then this video is going to show you which product will give you the best results and how to achieve a soft, subtle look of toning a synthetic wig. We will cover the following:
* How to dye a synthetic wig
* Technique to give the appearance of Toning a synthetic wig
* applying dye to a synthetic wig in a way that supplements, not hides the original color
* Adding Roots to a Synthetic Wig
* Making any Synthetic Wig a Custom Wig
Check out more reviews and tutorials at www.thewiggywoman.com
Instagram: @TheWiggyWoman
Link to Wig:
Estetica Avalon in Smokey Rose: https://www.wigstudio1.com/products/as...
Supplies needed for Dying A Synthetic Wig with RIT Dye:
Rit Dyemore Synthetic - Chocolate Brown - https://amzn.to/3o4p8FN
Copic Marker - Dark Bark - https://amzn.to/3n2cmGr
Copic Marker - Walnut - https://amzn.to/34XFN69
Must Have Synthetic Wig Products:
Milano Lace Front Wig Grip Band: https://amzn.to/3dcuZnU
Revitalize & Shine Wig Mist by Estetica Designs: https://amzn.to/3jGhfUx
Estetica Designs Nourish & Renew Wig Conditioner: https://amzn.to/2SB5P8T
Estetica Designs Cleanse & Clarify Wig Shampoo: https://amzn.to/3d9SMog
Silicon Mix Silicon Mix Bambu Conditioner: https://amzn.to/36WOLkC
SPECIAL FEATURES:
Lace Front Hairline - The lace front hairline allows for a natural look and provides the option for off-the-face styling.
Monofilament Side Part - A 100% hand-tied monofilament side part allows for the appearance of natural growth at the part.
Premium Synthetic Fiber - The synthetic fiber looks and feels like human hair and is pre-styled and ready-to-wear right out of the box.
Cap Size: Average
Cap Construction: Hand Tied Lace Front | Hand Tied Mono Side Part
Hair Type: Synthetic Hair
Product Weight: 4.48 oz
Approximate Length: Bang 10.5" | Side 10.5" | Crown 12.5" | Nape: 9.5
Colors Shown: Smokey Rose
Synthetic wigs don't take up dye the way human hair does. It works more like fabric so dying synthetic hair can be tricky!
We are going to be dying synthetic hair with Rit Dye without covering up the original color! This is going to create a truly natural level of multidimentional color to make this synthetic wig your own! We are going to be applying different methods that give the effect of toning a synthetic wig, and adding roots to a synthetic wig. Dying synthetic hair with rit dye is easier than you think, as is adding a root to a wig is too! We are adding a root to this wig with a Copic Marker after dying synthetic wig with rit dye.
This description contains affiliate links that allow you to find the items mentioned in this video and support this channel at no cost to you. While this channel may make a nominal sum from the use of these links, the viewer is in no way obligated to use these links. THANK YOU FOR YOUR SUPPORT!!!
Sometimes you take a wig out of the box and the color is just not perfect, but with only a limited number of colors available. Sometimes you have to take matters into your own hands. Well now we don't have to be limited by manufacturers, standard colors anymore. Those standard colors are now just a jumping off point because you can tone your synthetic wig or you can dye your synthetic wig and add roots with just a few steps. So today i'm going to show you how to dye a synthetic wig and add roots. So you get the perfect color for you. Welcome to the wiki woman. I am so excited to be bringing you this tutorial today. Today, i'm going to be showing you how to dye a synthetic wig and how to add roots to a synthetic wig. Synthetic wigs are notoriously tricky because they are not going to respond to typical methods that you would have if you were trying to dye a human hair wig when you're trying to dye a synthetic wig. It'S almost like on the border between doing some crafts and doing some hair. So today we are going to be busting out some craft supplies to achieve this. Look today, if you saw my last video, which you can check out right here, you'll know that i did an experiment to figure out the best way to dye synthetic hair, and what i found was that you can dye a synthetic hair with rit dye and um. So what i wanted to do was put that to the test, and i wanted to do that with a wig that, if you saw my original review on avalon right here, you'll know that my one big takeaway was that i wished it had a root. And i felt like the color just sort of blended in from my forehead in to the wig color, like they were just too similar, but i'm a sucker for pink wigs, and i really wanted to make this one work. So i took what i learned from my last video on how to dye a synthetic wig with rit dye, and i wanted to apply it to this tutorial today today. What i'm going to be doing is, i don't want to die over the original color of this wig and just to refresh your memory. This is what avalon looked like before. I did anything to it and obviously this is after and what i wanted to do was not so much cover up the pink. I really like the pink, but i just wanted to give it more of a smokiness that i had anticipated when i first purchased the wig, and i also wanted to give it more of a root. Because for me, a root is almost functional, because i have a pretty low hair line here and i really need that root to be able to blend some of my hairs that inevitably are going to stick out throughout the day. So we are going to be dyeing a synthetic wig today, but in a method that is sort of more similar to toning, we're not really trying to dye it brown. We just want to impart some of that brown pigment, but not cover up the pink. That'S underneath kind of as i expected they were going to be when i first bought it, because the color is called smoky rose and then we're going to go back in with another technique to put in a deeper brown root to really set off that part. So to dye this synthetic wig we're going to need a few materials and most of them come from the craft store. First, we're going to need a bottle of rit dye more for synthetics, and i used the color chocolate brown to tone down this wig and to add the roots i went back in with a alcohol based permanent marker. In my case, i used a copic marker in the color dark bark copic markers are a little bit on the pricey side. You can also do this with a sharpie or any kind of alcohol-based permanent marker and then we'll need a few other supplies that you might even have on hand such as foil and cling wrap, a paint brush and some rubbing alcohol. Normally we try to avoid alcohol on a synthetic wig because it can dry the wig out, but i'm going to use a technique. That only applies alcohol at the roots, where it's less likely to dry out. So i'm going to start by pinning my wig to my mannequin head and i'm going to section off the top layer of wefts. I think i went down about three wefts and i know it doesn't sound like a lot but you'll see when i'm done with just this step, that these are the ones that are sort of the top layer of hair that are the most visible and they are The ones that kind of made a pretty big difference: i've mixed equal parts of boiling water with the rit dye, and i am applying it just to the root area and you'll notice that just because it's so thin, it's just water and dye. So, there's really no consistency to it. That gravity is going to take a hold on here and it's going to pull that die down the strand, so i didn't need to pull it down. I really wanted a darker color at the roots, so what i tried to do was just focus on applying color at the roots over and over and over again, and allow the dye to gradually sort of pull through on its own, so that the roots are constantly Saturated with a hot synthetic dye - and you can see as this process goes along - i do have this speeded up quite a bit that um, just as i am applying it to the top. It seeps down on its own and sort of distributes in an uneven kind of a way down the strands. My paint brush only ever really touches like the first quarter. Maybe half inch of the hair but you'll see those roots getting longer and longer with each stroke. You do want to make sure that you protect your workspace as you're doing this, because the die is going to saturate the entire strand and at the bottom of the strand, it is going to drip off. So you'll see that the wefts that i do not want to have colored. I have covered those with a piece of foil and i also protected my floors, and i wish i had protected my table a little bit more because the dye did drip everywhere and i just kept going over those roots over and over and over again for about 10 minutes straight just going around this, you know horseshoe, that is the monofilament part, again being very careful not to get the dye on the monofilament, but instead really focusing on the strands themselves and allowing gravity to do its work. And i did this because i really wanted to make sure that the roots were very, very saturated with the dye, and you know, taking the straight dye with the boiling water made sure that the dye that was touching the roots was always as warm as possible. Because that helps open up and allow more of the dye to saturate the hair and impart more pigment you'll see here when i show you this all wrapped up, how much of this dye drips down from these roots, all the way to the end of the strands And off onto my table once this is done, i am going to wrap it up in cellophane for another 30 minutes once this color has fully processed i'm going to rinse it in cold water all right so here it is after just that toning process, and since I only dyed the top layers. You can see that the bottom still has that beautiful rose gold, but the top has a lot more of those smokier shades. But again it's very subtle, which is what i was going for. I really just wanted to kind of add a little bit of smokiness, almost like multi-dimensional color, and while i did get some rooting on this, remember that i only did it at the monofilament and i really wanted more of a prominent rooting, and i decided that i Wanted to root it throughout. So now i'm going to show you the steps that i took to do a darker root throughout the entire piece. So now i'm going to go in with my alcohol based permanent marker. This is my copic marker in dark bark and what i'm going to do is i'm going to be very careful of that track line, and i am going to color in a section of rooting about an inch long and then i'm going to follow along with that. A with a paintbrush and some rubbing alcohol and i'm going to essentially paint over the section that i colored in uneven strips so that i get a little bit of an uneven rooting because i don't want to have like a really flat line. I wanted it to look like natural hair growth. I chose the copic markers because they come in pretty much every shade that you can possibly imagine of brown and you can buy the markers individually. But you could also do this with a sharpie or a number of different alcohol-based markers as long as it's alcohol-based, because you're going to need a permanent, staining and you're also going to want to be able to use this paint brush and alcohol technique to make sure That your line isn't completely straight across and i'm going to continue here, weft by weft, and i am going to continue to color and then paint over each one of these, and i am doing it weft by weft, because i really wanted to have this rooting. Go all throughout. I think that that makes a very dramatic and also a very polished look, and while it was rather time consuming, it was you know, a little bit therapeutic just to put on some reality tv and enjoy my shows, while doing a little bit of crafting and a Little bit of hair, so again i am going weft by weft and i am adding my root to my synthetic wig and then i am following it up with a paintbrush that has been lightly dipped with rubbing alcohol, and i am pulling the dye through and extending It out a little bit farther again. We are only applying the rubbing alcohol to the top inch or so of the wig, so the amount of drying that you're going to get from that is going to be minimal. This is not a technique that i would use to say, pull color all the way through the ends. That'S what the rit die was for, so i'll continue to work. My way up the wefts until i get to the monofilament layer once i was done, rooting this synthetic wig. I went ahead and i rinsed it in cold water, and i followed it up with a silicone mix, deep conditioning as well as a jon renau fiber love conditioning spray. Once i am done adding my root to this synthetic wig, i am going to rinse it in cold water and then i am going to follow it up with my regular conditioning regimen, which includes a silicone mix. Bamboo conditioner and a jon renau fiber love spray. Alright, so here she is after i have toned her you'll notice that i will do a side by side here with the original and you'll notice, that this is much more of a strawberry, maybe like a rose, wood, um and much less of like a rose gold And where, before it sort of felt, like my skin tone, blended right into this hair, now you can see that there's a lot more separation. Now i didn't dye this completely brown. Instead, you'll see that there's still tons of variation in this color, i'm gon na turn around show you the back and show you the part up close. So you can see that, even though i only coated the top three wefts with that chocolate brown, it did make a pretty decent difference in the top portion of the wig, which i felt was a little bit blonder in the original wig and now taking a look At that part, you can see that that color goes all the way through and even on the side, so it helps to cover my really low hairline, even though it was a lot of work to add those roots throughout. I really think that it made a very dramatic and polished look. Let me know in the comments which version of avalon you prefer the original or this toned down roots added version. I hope you enjoyed this tutorial today and if so, please don't forget to give me a thumbs up and don't forget to subscribe to my channel and click the bell so that you never miss a wig review or tutorial. That'S posted weekly thanks for watching and i will see you next week.


Comments
The Wiggy Woman: Leave a comment if you've got a wig that needs some color! ENTER MY $150 Gift Card Giveaway at www.thewiggywoman.com
Marlene's Wig & Chat Studio: Wow, Heather! I love the finished version! You did an amazing job!!!! xoxo
Leslie Nelson: Beautiful! I love your version. It's like you read my mind...I was wondering if I could dye a wig and then add some roots. Thanks so much for this. Can't wait to try it.
Sharon L: This is gorgeous and very helpful! Thank you!!!
Amaryllis Calendula: Wow! Love the darker root. Wish I knew how to do this when I bought a synthetic too light for me years ago!
Katie Blackwater: You did a fantastic job with this Avalon, it looks 100 times better and you look lovely. Thanks for this useful tutorial!
Mary Gillies: Amazing ! Absolutely beautiful and thank you for doing this video. I am so inspired but I will definitely try this on an old wig first. Can you do this same method on a synthetic/human hair blend ?
Karens Kreative Korner: Wow, this was really helpful, thank you! I never would have thought of Copic markers either! Now I have to figure out how to darken the tips of my wig fibers because there is too much blonde.
Gloria Lagroon: Girl you did a fantastic job. Of course I love the 2nd Avalon version. I agree the original color blended with your skin color. ☺
brooks269: Very creative! You did an amazing job? The original color of the wig was disappointing, and you made it attractive!
allykatt1849: Omg girl! One word...Spectacular! Thanks for sharing!
Jill Creagh: Interesting! I was wondering if there is any point in the first stage using the Rit Dye? The overall colour change was from the Dye travelling down the strands through gravity? Would it not be easier to dunk the whole wig into the dye, rinse and let dry, then use the markers?
loverainthunder: Great job it's so gorgeous!
Jerry Scott: I have this Avalon and have been trying to figure out how to make this color work. I am going to try this technique, I hope it works as well for me as for you.
Val S: Excellent job! I like the toned down version much better.
Jacki H: Love the toned down rooted Avalon!
Adrienne Stark: Looks wonderful!
Cheryl J: I joined your Instagram- it’s great. You are funny! I’m getting ready to try your dye method to add some lowlights and wondered if there’s any more information on Instagram, or if anyone else attempted it and tagged you with results. Cheers!
Cheryl J: Beautiful job!
Asra Raevamps: Much prefer the toned-down one. Well done
Stevie Love: I would really love to see the results for this... unfortunately, your lighting //camera setting is WAYYY too highly contrasted, you can’t see what any of the actual colors are, nor any of the mid-tones. (I’m not being shady, I really DO want to see these results!) please keep that in mind in the future...
Mama Sass: Very helpful for my Lucoa cosplay wig! <3
Nancy Deutschman: I love the rooted version. Very nice
Michele Simone: love your work. Looks a lot better!
Cordel Ballenger: Beautiful!
Laurie Lebowitz: I tried out the Coptic marker on a small area of my synthetic hair wig and it made the hair all fuzzy looking. Any ideas why?
Veronica Taylor: Hi, after you rooted with the Copic marker did you follow with alcohol & brush and then used cold water with the conditioner? I also do the rooting too with the Copic I find sharpies to make the fibers a red cast....I also found if you let the Copic marker dry well for a few days and then wash it blends nicely and takes away any lines....I also use the same conditioner...thanks for the video great job.....
Marjean: Roots added version, beautiful.
Maureen Austin: I have a blonde wig with dark brown roots. Is there a way to lighten them to light brown? It is synthetic - Alva by Noriko. I also have a blonde wig I want to turn strawberry (light) blonde. Can you recommend a color dye? Thanks so much. This really made me feel it was possible to get what I want. Strawberry blond seems impossible to get - either blond shades and two little bits of light auburn or light auburn with a couple of highlights. Very frustration.
Chisty A: Hi. I've done this rooting technique with a Copic marker before, but without using alcohol. I found that the color rubs off on my hands. Does applying the alcohol completely stop the color from rubbing off? Thanks!
Denise Sheets: Great video! Thank you!
Cheryl J: Is the only purpose of brushing on the alcohol, for blending? Does the alcohol make the marker more permanent?
NefFy: Seems like adding cornstarch or conditioner or something to make or less watery would be good… thanks for making this!
--: Thinking of trying this, but possibly adding a bit of Xanthan Gum to give it more of a gel effect - more controllable when adding low-lights? Have you tried this? Cheers
Nicole French: is there a way to get blonde wig to have more warmth? My wig is an ash brown but i want it a lil more yellow or a “warm” look rather then a cool tone. Would i use brown to dye it? Or should i use a yellow?
Lulu Puff: Which color marker would you recommend for making a black natural root 1B shade ? I'm worried a black sharpie will look unnatural
Elizabeth Kirby: The wig designers should hire you. You did it until you got it right & you sure did! Don't return a wig, alter it!
A Pippin: Great video but don’t see the pink only a blond wig. Looks great after trmt
My Vibe Sierra Bloom: Super cute.
Vicky White: Nice. Good video.
Paula Sidley: Wouldn't have a clue how to do this
Victoria Smith: Number 2