Wig Transformation: Ginger, Brown & Blonde Highlights Ft Clemyluxhair
- Posted on 10 March, 2022
- Color Lace Wig
- By Anonymous
Hey Manigang, in this video I am dyeing my virgin hair wig from black and adding dimension to it by giving it some highlight.
Thanks for watching till the end :)
Xoxo Mani
Products used;
Bleaching Powder + 6% Developer: https://amzn.to/3MFvGaj
12% Developer: https://amzn.to/3tMvPjL
Hair Dye set: https://amzn.to/3Kzunbf
Hot Comb: https://amzn.to/3tMMWC1
Support the Channel: https://www.paypal.me/Manikeny
For PR & Business Inquiry: [email protected]
My online Shop: https://clemylux.com/product-category/...
IG & TikTok: @Clemyluxhair & @Clemylux
Let's be friends:
Tiktok: Manikeny
IG: https://www.instagram.com/_manikeny/
Twitter : https://twitter.com/_Manikeny
My Equipment:
My Ring light: https://amzn.to/2I2EjOf
My Sony A5100 camera: https://amzn.to/2H08JNQ
My Sony A6400 Camera: https://amzn.to/3Mz10aM
My Sigma lens: https://amzn.to/3tHGvjs
My SD card: https://amzn.to/3sPx5TR
My Rode videoMic: https://amzn.to/3sR5lOJ
My Rode Podcaster Mic: https://amzn.to/3pUGbgn
My led light on camera: https://amzn.to/3HSSXST
My external hard drive: https://amzn.to/35UD0hA
Bluetooth Camera Remote: https://amzn.to/2ZUffO4
*Never Limit Yourself*
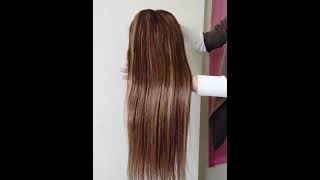
Hey manny gang welcome back to the channel. It'S your girl, manny kenny again, if you are new here, you're very, very, very welcome, make sure to subscribe below and join the family while you're at it click the little bell beside it. So you get notified every time. I post something new and if you are already part of this gang, you are very very much appreciated. So in this video, as you can see in the title, i'm going to be transforming a basic black curly wig into this beautiful wig, with some beautiful colors ginger color, some little blunt a little highlight here and there um yeah. So if you want to see the whole process of how i do this transformation, then stay tuned and let's jump right into this video, it's manny kenny. First, i want you guys to see the before. This is what the week looks like this week is about two years old and i did like a shitty job on it some time ago, but i was wearing it like that, and now we are going to transform this. So what i need is my obviously my bleaching powder, which is what you can see right there, the blue powder um. I have two bottles of the developer, which i would link um down below, because i got all of this from amazon, so i'll leave a link below for you to be able to get it so yeah. I need that with some combs, this mixing comb, this bleaching comb and a brush which i pretty much did not end up using but um. Those are the things that i kind of put on the side: oh yeah and aloe foil, which is aluminium foil. Exactly so, then now i would just take my old container, don't mind the stains in it, it's just old dye which just yeah. So i put some of the bleaching powder and i add my six percent developer in it. First, i am actually going to mix both of them, but you guys see that so first, i just put a lot or enough, and i mix that make sure that it gets to a consistency at this point it was still too thick and i just keep adding The developer, until i'm satisfied with its consistency with the texture and i'm going for a more runny texture, because it's a lot of hair and um. I don't mind if it goes into the hair, it's not as if i'm bleaching a lace, frontal or something. So i just want it to be runny enough, so they can also like a little amount can go a long way. Now i'm adding some of the 12 percent developer, which i have, which is obviously 12 percent, means it's stronger, so i'm adding it into the same mixture. Normally, the six percent is going to give me up to like a light brown gingerish color and the 12 percent. Can go like really blunt or more so i wanted to go that high. So that's why i mix all of them. So now i'm just going to wear my gloves. As you see me doing, you have to protect your skin. Okay, you don't want to burn yourself, and then i start separating the hair just the way i want it to be. I'M going to separate it in three major parts. Just make it easy for me to apply in the spots that i want to. You can see it has been divided into three or four parts actually, and i would just start taking random parts of it because i want i want to have some black in the hair, so i'll just start taking random parts of this hair and applying my mixture. My bleach to it and when applying i just make sure that i go through it with my fingers again after applying with the brush that it gets like right into the hair. You want to make sure you saturate the hair with the bleach and then, after doing that, i put it in a aluminium foil. Just like you see i tied in a burrito. That'S how i call it my little collar burritos. So i it in the burrito and i go to the next part of the hair, and i do the same thing so i'm actually just getting like random parts. I don't have like a particular formula which i might have in the future, but i don't have a particular formula and i was doing this on an all week and it's a week for myself, so i wasn't really, you know calculating but yeah. So this time i just held, as you see me doing, i will hold that now apply the bleach in it and make sure that it is well soaked in that the hair has a lot of the bleach in it, so that it makes it. You know it touches all the corners, so the color is a bit more uniform and then, after that, i'll just tie it into this aluminum foil, which will help with the heat and the processing and yeah a little back story on this week this week. It'S actually about two years old. I got it in 2020 from clemmy lux hair um, which you may or may not know, is my hair company and um. I just don't know why i destroyed it. This bad. I was working on another hair and i bleached its knots and i bleached the other's hair not and the remaining bleach that was left. I just don't want to waste it, and i just put it in patches in this hair, and i just did not care like yeah. The hair has had it rough, but i finally decided to get it out of the cupboard and stop using it. The way i was using it and actually make it look beautiful the way i want and that's what i'm doing so yeah i just keep applying the product. Just what you see me doing, till i'm satisfied with how many portions i have put in the bleach, like i said, there's no particular solution or strategy which i use here, but that works for me. You might want to calculate exactly where you're putting the product like it depends on you, but this is how i do it. So at this point i did not want to apply too much of the product up, as you see me doing, because that part has already been bleached a bit, not known it's over bleach, which you will see that it did over bleach a little bit at the End but yeah, so i just applied that and i do the same process and go through all of the hair. Like you see me doing, tighten the aluminium foil, burrito and yeah we're going to let it sit soon. So now that i'm satisfied with how many portions of hair have the bleach on it, i'm just going to let it sit. This is it in my bathtub after at least 30 minutes, i'm just checking to make sure that the color is you know getting where i want it to be, and it's not over processing and yeah. I just check all of them. I make sure i check all of them just to be sure, and after doing that, i let it sit again a little bit before i wash it. When i'm finally satisfied with how the color looks, i take out my hair from various burritos. As you see me doing here, and i'm just first of all, going to wash it out with water to remove the product and i'm going to then wash it with shampoo and put conditioner on it, leave the conditioner for 30 minutes to an hour before washing out The conditioner and letting it air dry the washing process, i'm going to do off camera because you pretty much understand what i mean, but this is how the collar was looking when it was wet, really beautiful. I love it. This is what the hair looks like the next day, because i always let my hair air dry, that's just the best for me just to reduce the heat damage and anything. So it's looking so fire. I am in love, there's so many colors, you can see dimension. You can see lighter browns, darker, browns and ginger colors just the way. I really wanted it to come out. So i'm just showing you guys and touching the hair and feeling it. The hair is looking a little raggedy now, but now it's time to style it first i'll, pin it down on the head to make sure it doesn't move throughout the styling and then i'm going to spray a little bit normally water. But this time i use a heat protectant because i'm going to use a hot comb here, so i just use a heat protectant and use that to push down the hair a little bit, i'm going to use the wax stick from clemmy locks hair to to help Me style this hair, i'm making sure that my part is exactly where i want it to be, and you see me using the wax stick on the hair that will help the hair lay down flat and i use the hook comb and make sure that it lays Flatter now i'll comb the front just because i wanted to detangle it a little bit and you see me applying the wax stick. Just a waxy does magic, but then i use the hot comb to like press it down. You know you want it to be flat flat. You don't want it to be hanging on your hair like some cartoon hair or something. So i do the same thing on the other side. So now i want to plug the hair a little bit. I have taken a little part from the front and i just take my tweezers and i just pluck a little bit. I do not like overclocking, because i really want my frontals or my closures to last longer, so i always do minimal plucking. So now i've just moved a little bit of the hair, which is going to be my baby hair later on and i'm plucking the other side, you will notice that i always keep going back in with my wax stick and my hook comb, because i always want To put the hair in place, so i can see it's like you exactly what i'm working with so yeah. You see me. I push the hair back because i don't want it to be like really laying on my face. I just wanted to know. Hang a little bit, you know, look a little bit stylish yeah and i use the wax stick to help me achieve the look, and i just use the hot comb to put the hair in place and yeah. That is pretty much how i style this hair. So the front part which had already combed out kind of looks a little bit more fluffy and voluminous, and i know on that. So i'm just spraying water, i'm spraying water on the hair and just brushing through it to make sure that it gets back to a curly texture and match the back of the hair, and i'm doing the same thing on the other side, don't mind the bottle. That'S just an old bottle. I put water in it just to be able to spray, and that is pretty much it. You can add some conditioner to it too, to give it back its curls and that kind of spoiled my front style. So i'm just going back with my white stick again. I do this one million times, but at the end it looks good, and this is the final look, oh my god, i'm so in love. Ah then, there was a little bit of sunshine and i was like you guys have to see this hair in the sun. So i open my windows, i let the sun shine on it and film it a little bit. It'S so beautiful. What do you think about? How it looks in the sun, i love it fire so guys. This is how i got the look. I hope that you enjoyed this video and learned something new. Are you going to dye your hair yourself at home? If you do, what are your fears and let me know how it goes if you decide to do it, but i'm really happy with how this came out and i'm struggling so hard not to look at my screen at myself and look at you guys instead and Um yeah, so it came out just the way i wanted it to come out with all the colors. Some highlights of blonde that you can see here or here and some other ginger color some different dimensions of brown and that's how i wanted it to come out. You know i did not want it to be like a boring, two-color wig. I wanted it to have like colors, so this is how it came out. I hope that you guys love the results. I love the results and that's the most important, but i love the results well. This brings us to the end of this video. If you liked the video, please click the like button subscribe and join the manny gang. Okay, join the family and you're welcome and um yeah. So for more of this type of videos, let me know in the comment sections what kind of videos you guys want to see i'll, probably doing more hair and makeup stuff, obviously, because they are my favorites, okay and um yeah, i'm so happy that you have washed Up to this point, thank you so much before i leave. I will put my next video right here on the screen, as usual. Click that binge watch you're welcome and thank you guys so much for watching, and i will see you guys in the next video love. You all


Comments
Mani Keny: Would you like to see how I installed this wig? PS: I have linked all products used in the description box
Dede Mom Boss: Chai .. you make it look so easy … .. the way hair is stressing me errr … i need these videos.. please keep them coming
Kenna KEA: My favorite girl
Dede Mom Boss: It’s MANIKENY