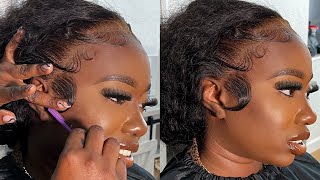
Extreme (Pre-Colored Knot) Transformation! Bleaching & Plucking A Pre-Dyed Wig Ft West Kiss Hair
- Posted on 12 May, 2021
- Color Lace Wig
- By Anonymous
▬▬▬▬▬▬▬▬▬♛#westkiss♛▬▬▬▬▬▬▬▬●
Hair details:200% density 99J Colored Curly Hair 13*4 Lace Front Wig 26 inch(medium cap)
Video Hair Direct Link ➤https://bit.ly/3roTfZf
Hot selling HD lace wigs ➤ https://bit.ly/3crgQEz
★ westkiss official hair store ➤https://bit.ly/3ctknlP
Up to 43% off Lace Wigs ➤https://bit.ly/3rrNl9Q
Hot curly lace wigs➤https://bit.ly/3utU3xN
#westkisshdlacewig #westkisswig #westkisslacewig
#WestKissHair Official Site Huge sale Big Discount
❤ Follow West Kiss hair on social media :
Instagram @westkiss_hair_store: https://bit.ly/2OlKstu
YouTube @West Kiss Hair: https://bit.ly/2Ol5U1m
Wholesale WhatsApp: +86 13323741050
Hey y'all welcome back to my channel so today i'm going to show you how i transformed this 99 j wig and got the knots to look amazing. So if you're not know the 99 jane wigs, which is another time for red wigs like the wigs that come already dyed and everything like that from the hair company, i know most of us is like okay. If we buy a wig, that's already pre-dyed or pre-colored in any type of way, how will we be able to go in and reach the knots to get it to match our skin and give a stop effect right? So basically, what i did was, i left the bleach on the wig on the nuts for an hour literally an hour. I didn't show this part because i once again i was still testing it, but i got a bad habit of testing things off camera and they wound up coming out really good. So i was really pissed about that, but i wanted keeping it on there. 40 volume developer, of course, bw2 powder, and i left it on for an hour and clearly i can see them. Knots is not red and the knots came right too. That was the thing the knots came right, so that was really good. So another thing that i did that really helped give a scalp effect with this look is my plucking method, and i don't know if i'm gon na dedicate this video and make it seem like this is my parking routine, i'm not really sure yet but um. Basically, i just used a plug skip method and i parted about three inches back and then kept parting, all separate sections once i would finish with the plug skip so, and it also might look a little overbleached which it was slightly, but i'm gon na show you How i fixed that um uh, you know a few clips that anyway, so um. I just continue with my plug skip method, and this is an extra step. Obviously you can see, i don't need to pluck it anymore on the front, but this is what i wanted to do, and this is how it came out. So, there's that side, how it initially came - and this is how i plucked it now, as you can see, there's only two inches of space on the side which we all hate, but it got done whatever so yeah. I basically repeated that same step on the next side and look how bomb this hair is plugged and it's not too over plucked either. It'S literally depending on what type of person some people like their wigs. You know super overplugged, some people like they're kind of medium, like you know some people like to barely plug that on i'm kind of in the middle. I don't like it too overclocked depending on the style. It really depends on the style too, but this is what i'm liking right now, and this is working for me. So this is what i'm sticking to so just to see how my work looks. I know i always have to go back over with the hot comb. Just to see how my roof is looking how my plucking is coming out. You know everything like that um and that's basically like that, and that's also how much hair that came out. Y'All yeah, if you don't have a whole bowl of hair in your hand, when you finish plucking, you did not plug enough okay. Personally, if you want to get it look like mods and you don't got a board. I look like that. You ain't doing it right. Go back in anyway, so remember, i told y'all that uh the hair was a bit over bleached right. So when i parted it, as you can see the knot, the part is very wide and we don't want you don't never want a part. That'S too skinny where it looks unrealistic, but you don't want a part. That'S too wide like jesus is walking through it. So let me put y'all on game. If you didn't know so anybody any normal person would um you can go in with red dye. Like the same color of the hair, i did not have that y'all know i just moved so i don't really got my whole stash, i'm you know, i'm re-upping, that's what i like um. You can use that you can use root cover up if they have it. In this color um or you can use eyeshadow, which is what i wanted doing so i took the taken to brazil palette um in a flat brush flat angle brush, and i took um any color that was closest to this color. Now i'm not gon na lie in that palette. There wasn't a red that was exactly this color. So what i did was i took the red that was just just as close as i can get it to be honest, and i just built it up. You never want to take too much product and slap it on there, because sometimes you can't do that. You know run it back and fix your mistakes, so i'm just building it up and, as you can see, it's going from looking over bleach to a slight shadow. So what i did to darken it was. I just took like a brown with a red, a really red undertone, and i put that on top of that super light red to kind of make it make sense. Don'T ask me how i know this. Don'T ask me what made me think of it. Sometimes my mind is just super creative and i just you know you got ta just work with what you got, sometimes so being that i didn't have the exact color i had to kind of make the exact color you know, or at least make it look like An illusion because look how that part is close enough period and i sprayed it just to set it. You know how that goes. So once again, we're gon na go back in to see our progress and see how everything is turning out, and you know i don't know. I wish i want y'all to kind of tell me how y'all feeling about it so far down below in the comments. Look at this bomb - and i i'm gon na - show y'all in a few too how this wig really came because it was looking like a carpet. It was looking like a real fur. You know synthetic wig, it wasn't given, but we transformed this yeah no period yeah. I did that, yes, it looks great so now look i'm gon na go on my concealer that matches my skin. I'M gon na apply that all over the lace. Now i'm not gon na lie y'all. I was on the phone my best friend, so you're gon na see me move my lips and probably gon na, be like this. My phone, not working whether you're around my computer, whatever no, i was on the phone so um. You already know how to install and process goes, but this time i wind up using um the wig. I think it's your wig grip, uh oars, olive oil spray, the holding spray. I didn't want to use glue this time, i'm trying to get my hair on a bit of a break. Now, let's be completely honest, i feel like there's a of course there's a major difference between using holding spray and adhesive, but here's the difference. For me. First of all, besides the literally the literal outcome of it when you use the spray or any holding spray to hold down your lace, it just stiffens the hairline and the lace itself to the point where it won't lay as natural like. You will really have to play with the lace, maybe going with a product cover with baby hair. It'S not gon na look as soft. The hairline won't look as soft. If you use um this spray now with the adhesive, it doesn't really affect the lace too much, and it still gives the lace some type of flexibility. With this. It literally freezes the lace which makes it hard, which makes it harder to blend. So if you want a supernatural hair line, look i would go with the adhesive now. Of course, people know how to make it work, glueless and it still looks fine, but you have to see these things in person and i'm just keeping it real with y'all, and this is the thing that i see the things i see on myself, um with other People everything it just always look better with adhesive, so it's not mandatory, but look if you want a certain type of look. You got ta use a certain type of product, so that's basically what it gave for me other than that, i'm just basically applying this wig rub gel and i'm just doing what i do blowjoin it letting it stick onto my hairline and then after this we're gon Na go in with some cute babies, so that's right, wow, try wow! So as i'm wetting up my hair, i didn't want to point out something. So when i take the elastic band off my hairline, you guys are going to see how the hairline just look a little stiff. Now it might look natural. Of course it wouldn't look anything other than okay, but it was very stiff and you're gon na see. When i pull out my baby heads, my babies are kind of stuck in position. You see that so i had to kind of reverse the motion of my baby. Hips to get it to look natural and it wasn't really a big thing: it's not that serious, but i'm just letting you know for the in-betweens the things that people may not tell you when using these products also, i only have two inches apart and space on The side, so your typical half a pack down, will have a lot of scalp or extra scalp showing, but i have to improvise okay and um. I have to make an illusion, and you know how usually, when you do a half a pack down, you can see the part that um separates the back in the front. Well, you're not going to see that with me so um. I have to kind of just change that up and do what i could and really really really improvise that to give that have a half down, look! Try it uh! Ah so try bye! So that's right! Uh, try all right y'all. So this is how the look came out. Look at these babies. They look so cute and the wig is not. I hope my head don't look too big, because my wig usually be a little bit more forward i'll, be trying to tell y'all it's the way i cut the cap that make my forehead look so short, because my baby has come all the way up. So i just you know, don't want to cut my baby hands, but this came out so cute and the hair on the sides that um lace on the sides is only two inches. So i don't even have that much. I don't even have that much space on the sides to be doing a half up, half down, which i know i'm going to improvise in queens, so i'm gon na always find a way to make it look cute. You couldn't even tell you could not even tell i'm not you all up in my face anyways i noticed like sudden and the light up is a little bit. You know whatever i'm in my beauty, woman, the sunlight is coming in so light for my ring light. Just looks kind of weird, but let me back up a little bit so i can show y'all okay, so this is what the hair looks like, and this is what it looks like from the back. It'S dripping all over me: jesus christ. This is what it looks like. Let'S get a close-up on the baby heads hold on harriet, oh, yes, the baby is together hurry up, anyways y'all once again. Thank you so much for watching this video quick little video take tips from that plug-in routine. I always show y'all, i made a few dedicated plug-in routines. I think. Well, i probably didn't say it in the title and did it in the video. So if i don't mention it in the title and this one i'll literally make a strictly dedicated plug-in routine, which somebody asked me for so i might just do it anyways, but i don't know what i'm going to title this video yet so i'm not sure, but Me and my red slash, burgundy curls, is about to get up out of here and thank you so much for watching this video quick little cute in store with no adhesive. Only the olive oil wig works spray super hot spray. This is feeling pretty good and looking pretty good as well for a temporary hole. So i'm gon na see on my next video thank y'all, so much for tuning in and yeah bye-bye


Comments
Cameryn Williams: Can we get a in depth plucking tutorial??? ❤️This pluck was screaming Arrogant TAE
West Kiss Hair: it looks so pretty on you, literally obsessed thanks for sharing WestKiss Hair
Mel B: The hair texture dry looked terrible but that final result tho !!! YOU DID THAT! ... AS ALWAYS
Hair By Jordann: Love your works❤️ have learnt so much from you
Nya Bella: This by far the best red lay I’ve ever seen
Ni Time: I loveeeee love love this red against your skin, it fits you so well
OnikaStar Malone: Girl you killed this curly red hair perioddtt!!!❤️
TherealShae: I love this wigand the hair line is everything
Caroline Green: Love your videos girl!
Beane Shaw: ¡Me encanta el color del pelo!
yeahitsann: The pluck The color
feliece: i love this texture on you
ASJAHDIORR: so prettyy we need an in depth plucking video
Melissa Nelson: I'm LIVINGGGGGGG for this hair
Victoria Kaz: Luv it...but how come you didn’t do the wig cap method because you can kind of see the lining of the cap
Kimberly Kyles: ❤️❤️❤️❤️ it an you slayed it
natalie iyanna: her bestie was on the phone with her the entire time she installed the wig where can I get friends like that
Lisa thisit: This was really helpful
Cameryn Williams: Flawless pluck omg what tweezers are u using?
FJ: This curl pattern is fire
Zaidaplug: Gorgeous
Jazmin B: if we are beginners and dont know how to pluck is that needed? cause i cant pluck but loving this wig
Life with Lulrhed: Where did you get the hot comb ?
Sharlonda Harrison: Gorgeoussssssss❤️❤️❤️
Autumn In Atlanta: Wow sis! hella cute
linda Boo: come through color and texture
Beautifully Made: What kind of tweezers do you prefer?
Carla White: Beautiful❤❤❤
Brandon Star: I love that style
Keon Elam: Parisssss doooo moreeee storytimes
Isabell E: What flat iron is this
反正什么都可以 🌈: ❤❤❤❤
keonna mckinney: i like da way she did det PERIOD
chang bella: so nice color
Valentinesx __: Sssiiiisssss i was just thinking about u and looking at this whack ass wigg i bought i hate how the brown and blonde highlights look on me im like hmmm i neever seen u do curly red hair and thats what i wanted to go for …i open the app and. I see this im like yeeeaasaa great minds think alikee
Jada Gilbert: What hot comb you used??? I brought one and it’s trashhh. & what’s your favorite flat iron
Maniii Johnson: hi pretty
Bailey White: color wig is attractive
TherealShae: What inch is this
iiamniy: hey check your dms @iiamniy