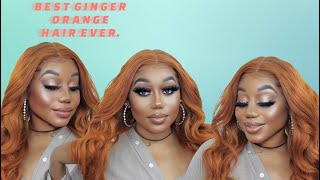
How To: Red Orange Wig | Diy Neon Hair Color
- Posted on 18 May, 2018
- Color Lace Wig
- By Anonymous
Hey Guys I'm back with a HOW TO/DIY video on how I achieved this Blood Orange neon hair color. The hair I using is from Feshfen hair & Beauty ! The Link to this hair is listed below as well as the link to see the hair in its original state. Hope you all enjoy. If you have any questions please leave them below :) Thank You all so much for watching ! Ya'll are my ROCKS!
SashaFierce411❤️
Color Used:
Ion Color Brilliance Semi Permanent Neon Brights Hair Color Blood Orange
3 boxes w/ 10 vol
Hair originally:
Feshfen Hair and Beauty
I have was sent : http://www.feshfen.com/free-part-lace-...
Product: Brazilian Remy Straight with Closure
Hair Length: 16x16x16 inch hair bundles
Closure: 16 inch
Hey guys, I'm back and I'm here with a new DIY on this hair. I did receive this hair a while back and if you guys want to know more about this hair in its original state, I'll link the video right here, but I did go ahead and color this wig. So if you guys want to see how I achieve this color just continue to work so starting off. I'M just gon na make sure I have a good amount of Clips just so I can pin up the hair while I'm dying in and keep everything nice and neat, so I'm gon na section off the hair into four pieces. As you guys know, this unit was super thick. It is like really really thick so you're. Definitely gon na want to section off everything, so everything is so saturated and covered and you're not having any missing belong spots. I did call this video like creamsicle blood orange, because there are going to be spots that are gon na, come out lighter or like more creamier, more peachy or depending on the area, as you can see, there's some gold running through this blonde, so I definitely did Receive like some like peach, eNOS or, like I said, creamsicle ish tones so yeah. I just keep that in mind. I felt like the longer you leave it, the more it's gon na stay in the hair. I know it's not actually depositing or doing any any work. After a certain amount of time, but I feel like it's definitely staining so if you can leave this overnight, I would definitely leave this overnight. You guys know I usually don't like to use gloves, but for this one I'm going to be using gloves, I did realize I look like a little bit of a hobo, so I want to change my gloves a new one, but in the meantime, I'm using the Ion color in the color blood orange I'm using three tubes of this with the ten flowing developer, you don't need anything higher than the tin. Vuong fell apart. If you are only depositing, so I mean you, don't really need to go anything higher than that. There'S small tubes: you need about two of them just to be on the safe side. I definitely think this is affordable color. So if you guys can find this in your Sally's pick it up beautiful color like home nice, it looks like Capri. It looks inside of the bull, I think it's absolutely gorgeous the oh. The key helps out a lot with making sure you get all the color out of the actual tube. So once you section it off, I'm definitely gon na start off in the front, because I want the top in the front to be the most vibrant and that's what everybody sees right away and for some reason um. The color, like you, only had a certain amount of time you leave the color on and you only want to leave it on the recommended time. At least you know, the top is going to be very, very vibrant, and you know you're not gon na be missing. In spots because you have a lot of product left over or whatever the case may be, so I definitely recommend starting in the front when you're doing this now you guys can see um. I am using a wig that I already pre-made again I'm going to leave a video up here in the cards for you guys and down in the description box, but it's a 613 with dark root. The roots are gon na, like the number two. I wouldn't call it a 1b. I would definitely call it at number two. This is the easiest way to go about doing this. You can always get the bleach and bleach your hair up to like a really light, color I'll list, a video down below, as well as right here in the cards for you guys, so you guys can see like the bleaching process. If you wanted to do this and a different colored wig that lime green wig, I did, I did believe setup. So if you guys want to know the process of doing that, I'll go ahead and put that there for you a. But this is the easiest way to go about it just going ahead and depositing the price difference for the hair can, depending on where you're picking it up. You definitely be a deal breaker if you are like on a budget, but if you are trying to save your coin and at the end not trying to waste more money because you're not experienced, I would definitely just go ahead and get it already done with a Six: thirteen because worst case scenario, you're gon na go ahead and jack up your hair when you were trying to lift it with a bleach and once your hair is damaged on the blue, it just feels and looks disgusting, so I definitely don't recommend it so, making Sure that you're just saturating all of the hair and just completely covering it and rubbing it in so that it's penetrating and making sure it's gon na get in there and stay in there, especially because this is not a permanent color. So when you shampoo this, I definitely would recommend only co, washing and with cool water, just to preserve the color as long as possible. But if you had to wash it shampoo, that's like something there like that's a no-go for you have to have shampoo. I definitely recommend getting a sulfate free shampoo. Just so you can, you know, make the color last as long as possible, because this color is definitely gon na bleed out once you start watching it as well as putting heat on it. I do recommend that you use as least heat as possible, just because you know the heats gon na make the color fade too. So keep that in mind. So I'm just covering this every single part of the blonde. I do go up a little bit past. The blonde, of course this is the 10 volume, so it's not going to do any lifting. So if you get it on the darker areas, it's not a big deal. Nothing'S gon na happen just keep in mind. Once you get closer to the lace area, you don't want to get too close to the root just because you don't want to stain any of the leaves and, like I said, it's not really necessary because it's dark and it's not gon na, do any lifting. So once you have this complete, go ahead and wash it out, and it should look like this. I'M gon na go ahead and deep conditioned before I show you guys the end product it looks so gorgeous. I can't wait to see how it looks once it's dry. So I'm gon na do condition it with the macadamia natural oil. Deep repair mask. You guys have seen this on my channel so many times you guys know what I live by this stuff. So I'm just gon na deep conditioned with this, because I know it works. Well, so this is what I mean about the crimson like if you can see that there's lighter spots that are like more creamier and it's not because I didn't hit those spots, it's just because those spots are super light that it gave it more of a like Peachy tone instead of that blood orange tone, so now this video - I recorded this part so long ago, like I recorded this part like before Thanksgiving, so I never was gon na post it. But I get so many compliments when I wear this wig out in public. That, like I just decided, I was gon na, go ahead and put this up for you guys since I had it on my memory. Stick still so I was like you know. Let me go ahead and record an intro and an outro for this, showing you guys how I actually would. Ah so I am experiencing a little shedding at the beginning of this whole thing, but ever since then I have not experienced any shedding. I do want you guys to keep in mind that I never Co watched it when I first did the video, so I kind of didn't really get to see what it was gon na actually do once it got wash, but ever since then it's been really great And this should give you an idea of how long color will last you I've only washed his hair since November, probably about 2 times 3 times maximum. I haven't really had to go wash this hair. Therefore, I'm getting most wear out of the actual color. Ok, guys sign, though it looks like way more red on camera, but in all honesty this is orange the shirt here. So hopefully I can fix the lighting. I guess to make it look like how it really looks, but um it looks a lot more red on camera. I'M just not matter. It still looks really really cute. I still need to customize the front part here, a lot more just because I feel like it's still a little bit thicker than I'd like I went in here and took out a lot, but it still need to get like right in here and get all of This you see that you get all that to look more natural, so when it falls, does it fall like that, so this is a closure like I mentioned at the beginning, but it parts back pretty far, so I go have some versatility with this. Let me know down in the comment box below what you guys think about this color. If you guys want me to do more videos like this with color, if you guys haven't seen the video from the hair and its original state I'll link it right here um. I always don't forget to like comment subscribe share this video, you might find it useful, and I will see you in my next video bye if you enjoy feel free to check out some of my other videos and don't forget to follow me on instagram ryan flash. Your fears for one one


Comments
Coren’s Corner Boutique My Paparazzi Journey: Love this video. Very informative and helpful!!!
TashaSoSimple: Loves it
Lakeisha Forbes: Very pretty