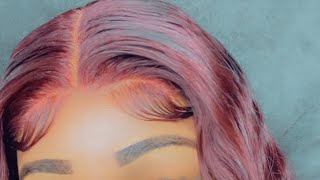
Color Sensation Intense Burgundy By Garnier Fructis/Colorin Deep Wave / Bleaching Knots /Wig Try On
- Posted on 22 October, 2019
- Color Lace Wig
- By Anonymous
In today's video I'll be showing you what I used to achieve this color . Which I dyed twice first using Hi color for dark hair but it didn't come as it should of. So I had to go over the hair again using Garnier Fructis color sensation intense burgundy. I love how the color came out so Beautiful.
Products used
Loreal hicolor for dark hair - magenta
Garnier Fructis color sensation - intense burgundy
Hair clamps
Hair mouse on baby hair
Elastic band
▪︎▪︎▪︎▪︎▪︎▪︎▪︎▪︎▪︎▪︎▪︎▪︎▪︎▪︎▪︎▪︎▪︎
website https://gigiwigservice.com/
I DON'T OWN ANY RIGHTS TO THE MUSIC IN THIS VIDEO
AdRev for Rights Holder
On behalf of: Kasirivu Productions (Skumba Music Library)
Hey guys, thanks for tuning in once again so here, I'm going to be showing you the product that I used to previously color the wig in the clip that you've seen before this, I used the high color for darks in magenta and for some reason and me Using this product it did not come out the way that I expected it to come out and I have used this product before and it came out beautifully. But I don't know for some reason. It just didn't come out right and, as you can see right here, the color difference is way off and, as I stated, I use the magenta hi color for darks on the whole entire wig, and I don't know why it came out like this. But I'm going to be recoloring, my hair, using this new product that I have never used before, and it's gon na be the boxes eye that you see next to the wig and it's intense burgundy and this is from Garnier Fructis. So I'm gon na be showing you in that coming up soon and I just sectioning my hair off in like four sections so yeah. As you can see, I just tossed that box because I'm like pissed off that I have to do this all over again. But yeah this is the box dye that I'm going to be using to recolor they here and, as I stated, this is intense burgundy and this product is the bomb like I've seen some reviews, it's been a little iffy, but it worked out fine for me. So so here I'm going to be showing you what comes inside the box. So here you have your instructions, your conditioner, your cream dye and the developer, and basically I'm just gon na empty. The greens I into the container, with the developer and mix it up. So after I apply everything into the bottle, I'm just gon na shake it up and make sure that it's mixed up really good and then for the second box, I'm going to apply everything into the white bowl. Yes guys, as you can perfectly see. This looks like some like some strawberry yogurt or something or cookies, a no I'm not could use a cream, um, peaches and cream yogurt. Exactly pictures are creamy. Okay, that's what this is looking like. So when I seen this color, I was like how is this supposed to be intense burgundy, but, as you can see, the color came out perfectly fine and beautiful from the clip of me trying to wiggle of anything. But yeah don't be a longer. You see this color, so, as you can see, I took down the frontal for the little bun that I had it in and when coloring my wigs, I like to color the frontal part of the wig first and I'm basically gon na part it into small sections And apply the color, but I'm so sorry that I was not able to show the entire process of me coloring the whole unit, because I thought that the clip was in my files but for some reason is not there. So what basically got deleted. So I'm! So sorry, for that, but I'm just gon na be showing a small clip of me applying the color to the pencil, and you will see right here so when mixing up the developer and leach, you want to make sure you make it too thick consistency as you Can see it's a really thick hair and usually how I tell when it's really thick and ready is when I put this or applicator brush in there and it doesn't roll, as you can see right here. So, that's basically how I know it's really thick and ready, and it's Mike wants a seat to do the lace and get onto the hair, but I'm gon na add just a little bit more to that, so the B, not too too thick we're just you know. Just right so, as you can see, the color came out just right and I love how the color came out. So here you can see that some of the dyes that stained the lace and what you can do to prevent that from happening is spray. A little got to be glue on there and let it dry and then spray a second coat, and that will be like a barrier or just in case. You know the dye seeps through and gets onto the lace and that's what I forgot to do. But right here, I'm gon na be using the got to be glue to spray the hair line so that I can comb any flyways back and also to protect it from just in case. The bleach does see the release and gets onto the hair, because I find when bleaching your hair around the hairline front portion of the way. Sometimes the bleach does seem to that portion because the nuts or a bit smaller in that area. So I like to do this to help kind of protect it so that no bleach gets on through the hair at that front portion of the wait. So I'd like to start applying my bleach farther back away from the hairline because, as I stated before, the hairline knots are much smaller and they tend to bleach the fastest. So I like to apply my bleach in the back part and then once I'm done with that, then I worked my way up to the front.


Comments
Ravenpicks: I love this dye.
VIC LEVI HOLLYWOOD.92: My wife used the same brand box dye but its was the deep burgundy to dye her bundles to cover redish pinkish when she rinse the color out its looked more like purplish color.
Kenda's Corner🇹🇹: #Supportfriday watching #new #subscriber