How To: The Perfect Blonde For Dark Skin Feat Yolissa Hair
- Posted on 25 September, 2019
- Color Lace Wig
- By Anonymous
♡OPEN ME!!♡
CONNECT WITH ME
INSTAGRAM: @sidiachin
TWITTER: SidiaChin
FACEBOOK: Sidia Chin
BUSINESS EMAIL: [email protected]
HEYYY GUYS!!
PRODUCT USED
I’m using #yolissahair 613 14inches180% Density Blonde Bob Lace Front Wigs:➤http://bit.ly/30NyBWi
Affordable #yolissa613 bundles with frontal:➤http://bit.ly/2ZxUdZn
More coupons Click the Yolissa Hair Official Store:➤http://bit.ly/2ZvzBB5
Follow us on Instagram➤http://bit.ly/30NyFp0
Use the code “ Sidia”, Get $$ OFF
Hot selling hair:
Top 1 #yolissawaterwave Lace Frontal Wig:➤http://bit.ly/2ZBHogz
Superfull #yolissabodywave 13*6Lace Frontal Wig:➤http://bit.ly/30N1Rwp
Beginner friendly #yolissastraighthair lace wig:➤http://bit.ly/2ZDMXv8
Silky Brazilian Straight Hair 3Bundles with 4*4closure:➤http://bit.ly/30OHE9w
Infinite Repurchase Summer Bob Wig:➤http://bit.ly/30LQcOd
Email: [email protected]
Tel: 0086 15803834514 (WhatsApp, iMessage all available)
Subscribe us on Youtube ➤http://bit.ly/2ZKbQW8
Facebook, Twitter, Pinterest, Snapchat: yolissa hair
MUSIC IN INTRO:
Song: Nekzlo - Moments (Vlog No Copyright Music)
Music promoted by Vlog No Copyright Music.
Video Link: https://youtu.be/TCFMO24whuM
MUSIC IN VIDEO:
◇ FTC Disclaimer ◇
This is a sponsored video. Sponsored or not, gifted or bought I will always give you all my honest thoughts and opinions in my videos.
Thank you so much for watching and for the support you always give me - it truly means the world to me! ❤
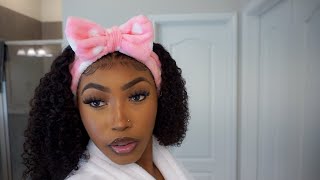
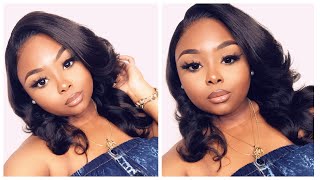
Hey guys welcome back to my channel so in this video, I'm gon na show you how I style and color this wig. This wig was sent to me from yo Lisa, Hair Company. This is what the wig looks. Like I'm sorry, I couldn't find the clip where I was showing the wig before I actually color it, but I have to just show you guys how it looks. So it came with three clips, one two in the front and one in the back and I just double chop. I add the elastic band to the wig, as you guys can see, there's a little bit of stain on my list, but that's okay. Just a little bit, I'm just glad it didn't cook it all over this videos, gon na show you how I got this hair color. This time I use colors that are accessible to you, guys from Sally's use a demi-permanent color in 6n + v and i mix those two for my roots and then I went in with 7 and B and 9 and B for the rest of the hair. So in the package it comes with directions; it tells you what you're going for what you're using it on and the time frame you should have. The color sits on the hair, and now I'm gon na show you I've never show you guys. When I'm doing my mixtures so what I use, I use a kitchen scale to get my accurate rate. What'S the thing proportions, so what I was doing, I used that 5n and the 6n, and I mix those two and I think I did 11 ounces. 11 gram. Each and then I went in with a 10 volume, it was a 1 to 1 ratio. So it's if I use 10 gram of the color, I'm going to use 10 gram of the developer always use that 10 volume, because I'm only depositing color onto the hair. Not lightening and then deposit, so I mix that until it comes into a cream consistency and then I start to apply, the hair apply the color onto the wig. I already did the back of the wig and I wanted to show you guys how I put the color onto my list without staining the list. So I pretty much use a small, the smallest brush that I have from free Mar and I pretty much like literally take my time and like distribute that onto the scalp and then I you know this cup little bit here then I use my fingers to blend That so there's no light of demarcation. Everything can blend smoothly, so you guys can just watch what I'm doing. I take small section and then literally just like literally lightly press that color onto the hair. So that's what I do. I also want to tell you guys the reason why I use demi-permanent colors, because because I know a lot of guys probably get confused about demi-permanent and Simon semi-permanent, so they were prominent. But I use this because it only deposit color it doesn't lift permanent lifts and deposit. At the same time, this is already lightened. So you don't want to lift. You only want to deposit calm. If I tried using the permanent color, it wouldn't do deposit the color as the diamond from an INT is doing. I hope that makes into another poop, I'm not confusing you guys anyway. So no I'm going with a 7 and B and I'm just gon na drag like just take random sections and put that on to the hair. And I'm just gon na put that like a little bit more than half of the hair. And then I'm gon na go in with the 9 on the ends of the hair, so I want it to be like a faded look, I wanted the back the side section that I'm not doing that. I already pin-up the sections the back and for the back. I didn't want no, the darker color to be no for the back section that I pinned up. I'M gon na just use the 9b on that one and then the remaining chart, I'm gon na just use a 7 B and then I would put the 9 in on the ends. In some sections I put, I bring the 9 and, although not a 9 in the 7 NV, all the way to the end, just to give some dimensions and such forth so yeah. You can just watch me to see what I do. Some sections that we vote. It was just alternating and just doing what I didn't have a plan. It was just going with the flow and just do what I want to do. You guys can just watch me and yeah after I finish, I added the 9 and B onto the ends for somebody's not kind to find that clip. I don't know what I did with my where is or if I didn't film it. I don't know, but no I'm editing and I kind of funny, but that's what I did so you guys can just continue to watch that. So I let that sit on the hair for like 45 minutes or even less, then I wash it out. Let it here dry and then I went on to cotton. I wanted up Bob. He has not been rocking a lot about, but I wanted like one, that's a really shorter than the tool that I have know. So what I did first, I measure from my center part of my face to where I want the Bob to start to stop on my cheekbone and then I put that on put the wig on the mannequin head and made that measurement to see exactly where I Should cut then, as you guys can see, with my tape measure, I started cutting using my scissors or shears, which way when you call it first, I start so I cut and yeah. I think this is self-explanatory, so I'm doing a one-length bob. So I'm going around the hair and continue doing that and I follow my guide all the way around. Then I go in with a razor comb too, so it can look feathery and not so blunt. It looks like something similar to the ones that I have, but it's actually not. I don't know lighting. Those are lots of things. Lighting really doesn't make things look different friend down what they actually are in person, but yeah, it's not the same color. It'S not. I promise it's not the same color a little bit about the hair, so this is a 6 13 14 inches, 180 density lace, front Bob. To be honest, this is one of the best 6:13 hair of every use, normally they're a little bit dry. I guess, because of all that bleach or you know the pre coloring process that makes it dry, but this is one of the best 6:13 I've ever used and also I love the lace part in space. Only when I get six thirteen wigs, it's just a crown area. I was like a lot of parking speed, but this from ear to ear as a lot of parking space, which I really really like the hair is good. It didn't tangled it took the color. Well, it's low maintenance, it's just one of the best succeed. 6:13 here i've ever used so check out your Liz's hair company, a lot of the information in the description bar and yeah after I finished cutting the hair. I it was a little bit too heavy on the end, so I started to point cut and texturize the ends, so you could take out some of the weight from the hair, so the hair can have more movement and look more in lighter and nicer. So yeah, that's what I did and this is how they came out. I really loved it. I loved all the information in the description bar, but the hair and stuff. If you have any question, leave it in below and I'll get back to you on that. So yeah take care and I'll see my next one bye guys you


Comments
Destiny Adam: You definitely have the best hair coloring videos on YouTube. So professional and well explained Please keep on going
Yolissa Hair: Professional and detailed 613 Bob tutorial ! Thank you so much, Sidia Chin!!
Kye Face: I’m doing this color for my bday I hope it looks good on me
The Pink Apartment: I wish I could but this wig pre-colored to perfection. Idk if I have the patience for all of this
Sx Ax: Gorgeous!!
Michelle Johnson: It came out beautiful what length was the bob when you got it?❤️
Kersha Beaver: So pretty
Trina Michelle: Hi! Why did you make such a 6in in a 5in for your roots? What number in the color world does it give you?
HER BABY MY BODY: I havent see you in a while! Glad your back!
My boys: Honey where have you been? I’ve been missing your videos. Love this video btw
Shalonda Reddie: Sis are you selling this wig or can you make one and sell it just like this?
Kellyann Bishop-Siland:
Misha Lee: Pretty
Misha Lee: Please list the hair colors
Dolliann: Are u Jamaican??
Jodie Melissa: After 3:50 her speaking just totally confused me.
mrsrussell58: This was confusing