Ash Brown Roots On Blonde Hair| How To Dye Your Roots Dark On 613 Blonde Hair
- Posted on 01 September, 2021
- Color Lace Wig
- By Anonymous
I used Wella 8a for the root
Shop Blessedbethemane.com for your next wig!
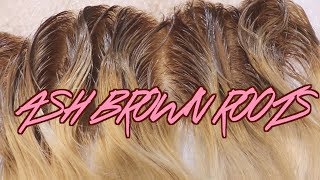
Guys welcome back to my channel, that's so blessing today, i'm going to be showing you how to create a dark root. A dark root gives you a lot of versatility in terms of trying new colors, because it makes the blend a little bit more seamless. It'S not so harsh on the eyes. So, if you're interested stay tuned, i'm going to start off by sectioning the hair off into three, i already kind of have an idea of how i want my dark root to look. I don't want it super small, but i don't want it so large that it looks like my hair is super grown out, so i would say like an inch, an inch and a half as far as how much color i'm putting on. In my humble opinion, i don't feel like a root is supposed to be really really large. I feel like it should be no more than like two inches max, because then it just looks kind of weird. But if that's your thing definitely go for it, but that's something that you want to establish before you even go in and start your color, because you need to know how far you're going to go down in each section. I'M pretty much just going section by section and i'm being really really careful as far as my saturation, because if you take sections that are too big, you will have spots of color missing and your root will not be consistent throughout your hair. You can kind of see in the video that i'm not just hitting the top of the section with the color. I'M also checking the bottom and making sure that the color seeped through most of the sections it didn't. So i ended up kind of hitting the top and the bottom, because i was taking sections that were honestly a little bit too big. It can get a little messy, so i would highly suggest like having a towel, or you know, paper towels next to you to kind of wipe your fingers off to make sure that you don't stain the rest of the hair with the root color. So make sure you don't have like dark spots on the lighter sections of hair. After i finish with the back section, i did move on to one of the sections on the side. The most important thing throughout this entire process is to stay organized and to watch your saturation. I definitely forgot to mention this, but the color i am using for my root in this video is 8a by wella color charm. So now the back section and the left section are done, i'm going to move on to the right section, which is the last section and just pretty much repeat the process. So so at this point i'm just about done. I'M just going in along the hairline and the perimeter and pretty much just checking my saturation and hitting any spots that are dry. So here is the finished product. If i can find a better picture, i will insert it, but if not, i hope this helps, but you can still achieve any of the looks i inserted in the beginning using this technique. I promise you


Comments
Britanniã Blair: A video on how to sew on an elastic band please xx
Cambria Hudson: Do you have a Instagram?