Easiest Way To Tone 613 Hair Ash Blonde With Dark Roots---►Brown Girl Friendly Feat. Cranberry Hair
- Posted on 07 October, 2019
- Color Lace Wig
- By Anonymous
#Cranberryhair #Ashblondehair #BlondeHairforBlackWomen
► T H U M B S U P if you are apart of the SLAYGANG!
► FOLLOW ME ON INSTAGRAM---► (@Nyyahregine)
https://www.instagram.com/nyyahregine/...
► FOLLOW MY LASH LINE ON INSTAGRAM [@Honeyglolashes]
SHOP HONEY GLO!! [https://www.honeyglolashes.com]
Lashes in this video are: "Drama Queen"
► S U B S C R I B E H E R E→ https://www.youtube.com/channel/UCbKPt...
(HIT THE NOTIFICATION BELL SO YOU DON'T MISS ANY OF MY UPLOADS)
_ _ _ _ _ _ _ _ _ _ _ _ _ _ _ _ _ _ _ _ _ _ _ _ _
Today’s Video Was In Collaboration With Cranberry hair from Aliexpress! This video is NOT sponsored however, these products were sent to me for an HONEST review. ღ Aliexpress Cranberry ღ
UP TO 50% OFF
SHORT BOB WIG
Hair Details :Brazilian 613 Silky Straight Lace Frontal wig :20 inches
Some hair in the video :https://bit.ly/320vJ9j
Top Recommended :
Peruvian Silky Lace Frontal wig :https://bit.ly/2Vlp7Q3
Brazilian Deep Wave Lace Frontal wig :https://bit.ly/2IsMB0B
Brazilian Bob Silky Straight Lace Frontal wig :https://bit.ly/2Mjv8bU
Brazilian Bob Kinky Curly Lace Frontal wig :https://bit.ly/2Orlx5x
Peruvian Straight 613 , Pink , Purple ,Grey wig :https://bit.ly/30NOJpS
Human hair Wig :https://bit.ly/35bO9px
Brazilian Deep wave bundles with closure :https://bit.ly/2MfdAhi
Brazilian Silky Straight bundles with closure:https://bit.ly/2VqTYLn
Hair Bundles with Closure &Frontal :http://bit.ly/2LNgR8q
613 Hair:http://bit.ly/2nmQblB
AliExpress CRANBERRY Official Store :http://bit.ly/2AO5nLq
Cranberry Hair Website : https://www.cranberryhair.com/
Top Recommended on Cranberry Website :
Peruvian Bob Deep Lace Frontal wig :https://bit.ly/2GEEVay
Indian Bob Kinky Curly Lace Frontal wig :https://bit.ly/2YjExcr
Brazilian Bob Silky Straight Lace Frontal wig : : https://bit.ly/2SVfIO4
Hi,guys,Welcome to our channel.if you have any question ,pls contact us ,Email:[email protected]
Follow us to join CRANBERRY
Facebook : https://bit.ly/2YCFThP
Twitter:@Cranberry_hair
Youtube:@Cranberry Hair
_ _ _ _ _ _ _ _ _ _ _ _ _ _ _ _ _ _ _ _ _ _ _ _ _
Get the details on this look:
KISS COLORS Semi Permanent dye in Honey Brown (T871)
Wella Color Charm Toners in T28 and T18
20 Vol. Developer
DIY LACE TINT SPRAY:
Spray bottle
Warm Water
KISS COLORS Semi Permanent dye in Honey Brown (T871)
Iodized Salt
_ _ _ _ _ _ _ _ _ _ _ _ _ _ _ _ _ _ _ _ _ _ _ _ _
► Thank you for stopping by my channel today! If you like what you see then don't forget to hit the subscribe button to join the Slay Gang Family and hit that like button! Connect with me through my social media accounts as well! I love to chat with you all. Comment below as well!
_ _ _ _ _ _ _ _ _ _ _ _ _ _ _ _ _ _ _ _ _ _ _ _ _
S O C I A L M E D I A: Connect with me!
► Twitter- @Nyyahregine https://twitter.com/nyyahregine
► Instagram - @Nyyahregine https://www.instagram.com/nyyahregine/...
_ _ _ _ _ _ _ _ _ _ _ _ _ _ _ _ _ _ _ _ _ _ _ _ _
B U S I N E S S I N Q U I R I E S
For product reviews or collaborations, please email→
_ _ _ _ _ _ _ _ _ _ _ _ _ _ _ _ _ _ _ _ _ _ _ _ _
This video is not sponsored, all my opinions are my own!
_ _ _ _ _ _ _ _ _ _ _ _ _ _ _ _ _ _ _ _ _ _ _ _ _
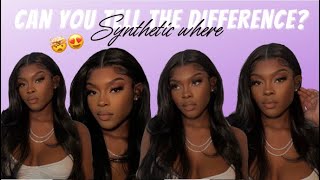
Hey guys welcome back to my channel or welcome if you I knew my name is Maya for those of you who do not know if you are new be sure to hit the subscribe button down below. So you never miss a beat and so you're a part of the family also hit the bells. So you can receive notifications every single time that I post. So it's been a minute, but I am back I plan on giving you guys a life update on my next video, but for now I am showing you how to turn a 6 13 20 inch wig into this beautiful ash, blonde wig with brown roots. So, if you're interested to see how I achieve this look make sure you keep on watching if you're interested in my lashes, I launched a lash line which is called honey, glow lashes, and these are lashes drama queen. I will link my shop down below, so you guys can shop, hey guys, so just jumping in I will be using cranberry hair today. Thank you so much cranberry hair for sending me this wig. This is a 6:13 wig, 20 inch straight wig and I'm absolutely in love with this hair. The hair is super duper soft, even after I toned it after I dyed the roots, it's still so soft, so bouncy. I think that this is probably my favorite hair that I've had. Yet if you guys hear that beeping sound it's because my battery and my smoke detector is dying. So let's just ignore that. But here I put the wig on the mannequin head and I'm just playing with it. I'M parting it down the middle, because at this point I wanted a middle part and then of course I changed my mind to a side part because I just love side parts and I can't depart from this time. For so that's why this is down the middle, because I just wanted to work with everything with it in the middle, so I will be using a fine-tooth comb, some clips, a mixing bowl, some kiss hair dye and honey brown for the roots and a tooth brush To apply that color to my roots, so now I'm just sectioning off the hair, I'm sectioning in the frontal from the actual sown on track parts and then I'm also keeping the middle part. So I have it and two sections in the front and then in the back. I have that all sectioned off I'm just going to pin my wig on to the mannequin head and I'm going to begin applying the color. So in order to apply the color, I'm using the tooth brush and I'm taking SuperDuper small sections from the section of hair that I'm working with and I am applying it SuperDuper delicately you'll see later on in the video. I got a little bit more rough because I realized I didn't have to be so delicate, but since this was my first time working with color, I wasn't sure if the dye would stain the lace or fill it mess it up and honestly, you can't even see This part of the hair, because that's not where my hair will be parted, so you really don't have to be too super meticulous about this, but do take your time so you're, just not getting dye everywhere. So I'm literally parting and applying the dye one thing I will say is to make sure you have a crisp straight part. So you don't get dye all over a few strands of hair, which I did do later on in the video and I'll point that out to you so make sure you're working with a clean straight section of hair, so you're not getting the dye all over the Place so I'm just applying the dye. Nothing too serious about this, just make sure you're careful, I'm applying it on the front part of the hair and then also on the hairline which you'll see here, I'm applying it on the hairline. So it all will look like it's coming from my scalp that same color, there's no little blonde streaks peeking through it's all that honey brown color and make sure you use the comb to comb through your hair after you apply it with the tooth brush, because that Helps give it a nice gradient effect, so the comb is really important here. You don't want to skip that part out. You want to kind of layer, your brush, your brushstrokes, and you also want to use the comb to give it a gradient effect. So it's not just a straight line of dye, going across that's brown and then underneath of that is 6:13 platinum, blonde hair and then you'll see on this section. I applied the dye and upward motions on the under part of the hair. I go back and forth between the two. It really is. You can do it. Whichever way you like, I like to do both because it ensures that the dye is on both well, it's all over the hair, pretty much so now, I'm going to the other side and I'm literally doing the same thing, sectioning off the back and then only applying The guide to the frontal part, taking small sections from that part from that section and then applying the dye with a toothbrush and you'll, see now I'm not to like meticulous or too careful about this, I'm just kind of applying it and getting it on the hair And this part is where I got the brown dye on a whole strand of hair, because I wasn't being careful when sectioning the hair, so I had flyaways. I had strands of hair from this section that was on top of this one. So, as you see, I got dye all over some strands of hair. I didn't mind it, though, because it wasn't, you know a continuous thing throughout the frontal, so it just gave this section a gradient effect, so it was fine, but just make sure that you're being careful with that with the whole frontal. So you want to make sure that you are doing straight parts and now I pretty much sped it up and I'm pretty much done. I am doing the last section and just applying it all over the frontal, and now I am going to do the back part. So I'm sectioning the hair from the frontal and I'm going to apply the dye on that first track behind the frontal just so it won't be that Brown root from the frontal and then just blonde right, underneath it'll kind of all blend together. So I'm just going to apply that color all over this one track here and just kind of fan it out and make it gradient, and this is how it turned out. I was absolutely in love with this. I really did love how this color turned out and then now I'm going to move on to the toning, which I use, wella color charm toners, I use t-28 and I use T for teen. So for this you want to do one part toner to two parts developer, which you want to use a 20 volume developer, nothing higher, because you don't want to over process this already processed hair. So I empty out the toner and then I pour the developer into that same bottle, and I do that twice and I just mix that together. So it's one part toner to two parts developer and then I just apply this all over the hair. So I have four boxes, but I only wind up using three. I use two t28 and one t14. So right now, I'm applying the t28 I'm using the brush. But then you'll see later on that I just opted for using my hands because I was easier and it was a little bit more efficient and effective. Then using this brush and it took me less time to just slap it on the hair with my hands. So I'm just using this t28 now I'm getting that all over the hair and then once the hair is coated completely. Then I went in with the t14 just to add some more dimension and just add two colors. So it's not just this one flat color of t28 and I just kind of wanted to mix the colors together and see what I would get so now. Here'S where I'm adding the 2-14 doing the same process. One part toner two parts developer and I let this sit for about 25 to 30 minutes, and then I went ahead and I washed it out using the pure ology hydrate line, the shampoo and conditioner. I washed it about three times just to get that SuperDuper ashy color out. As you can see, it's really ashy and I didn't want that ashy. So I washed it three times and then I let the conditioner sit for about twenty to thirty minutes as well before I went in and started to tent the lace which you see me doing here, I'm making my own lace tent with hot water, that same dye. That I used to dye the roots that kiss honey brown and some salt. The salt makes the color actually stick. So you need the salt and that's just regular iodized salt and I'm just spraying this all over the frontal. I turned the wig inside out to actually get that tent all over the frontal, not just on the hairline and then after you spray it. You want to blow-dry - and I did this about four times before, turning the frontal back to its regular inside-out. I don't know, and there the the frontal back to normal - and I just sprayed it on the hairline closer to where I would be cutting. Since you know all of this, and the front is going to be cut off anyway. So I just a little bit more closer to the hairline so spraying on the net that would actually be showing after I cut the excess frontal, and then I blow dried that, and I did that about two more times and then now I'm going to pluck you Guys have seen me pluck, I don't know how many times, but now I have a new technique where I don't pluck the hairline really at all. I really just focus on behind the hairline, so I part the hairline and then i'm focusing on the back part. Just really plucking that i only pluck the hairline a tiny bit when you pluck behind the hairline. It makes your hairline look much more natural instead of just having a semi, bald hairline and then fake hair behind that. So I found that plucking behind. It is much better and this is how it turned out. I was obsessed with the lace tent how the dye looked, how the color looked, how the plucking turned out with the edges, like everything just came together so nicely. I applied this wig off-camera, but if you want to see how I do so, please let me know - and I can record that for you, but I just wanted to keep this focused on coloring the wig um. So that's it guys. Thank you for watching bye. You


Comments
Chiara DIY What: You did a great job! Looks beautiful on you
Dennings Kat: Just purchased this, thanks for the review, just hope mine turns out as beautiful as yours !!! Thank you sweet�
Odd Goddess: Love this look on you!!
Tody A Johnson: Hello great job...i want to know did you wash the unit of the honey brown color before adding the wella colors?
Zamaria Muse:
Sonia Akua:
STAR: How did you do your intro with the blurry background and title
Kimberlyn Crawford: And gloves would work