How To Get The Perfect Rose Gold Hair Color With Dark Roots (Beginner Friendly)
- Posted on 03 December, 2021
- Color Lace Wig
- By Anonymous
Colors used :
Kiss tentation : Rose Gold & Honey brown
Wig is from : Instagram.com/aljamilahhair
My personal Instagram : Instagram.com/xojamilah
E-mail : [email protected]
Thanks for watching ! :-)
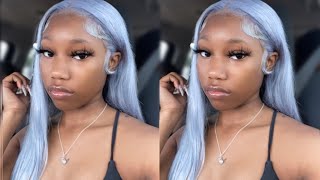
Hey guys, i hope everyone is well so we're just gon na hop right into this video, as you can see from the thumbnail. I'M gon na be showing you how to achieve this. Beautiful beautiful rose, gold kind of dusty, pink, hair color with darker roots, so i'm starting off with applying this chocolate brown color to the roots of this 613 wig and yeah. The chocolate brown roots just make the wig a little more wearable, and i'm taking my time with this, like this there's really no key to rooting. The the key and the secret um is to literally take your time. That'S how you're going to ensure that you don't get the lace stained. You really don't want to stain the lace, especially on a 6 13 wig with this color, because it'll just make your wig look very unnatural and very messy. So you just want to really take your time and make sure that you use like a small utensil to apply the product. I like using um an eyebrow, uh spoolie. I think that's what you call it, so you can use that or i've seen people use like toothbrushes. I'Ve seen people use um like a tiny comb, so whatever works best for you just make sure you can get really close to the the roots of the hair. Without actually dying the lace, so literally just take your time when you're doing this like i, what i like to do is like listen to music or i'll, have i'll be talking to someone on the phone or i'll, be like you know, having a conversation and just Take your time like you cannot rush this process. Otherwise, your whole lace is just going to be full of stains and we don't want that and i'm only applying the color about an inch, not even an inch. I feel like three quarters of an inch down and you're going to see that at the end, the roots are not actually going to be this color, because once i apply the rose gold color, it's going to kind of color the brown a little bit. So it's going to be like a mixture of a rose gold and a brown. So it's going to come off more of like a dusty rose, but it's still gon na make the wig a lot more wearable and a lot more natural and give it like the slight ombre effect. So just take your time honestly, just take your time. I actually didn't apply, got to be to the lace, as some people like to do. I just like to apply a white napkin underneath the lace like basically, i apply. The napkin on the mannequin head then apply the wig on top of the napkin, and i feel like this just helps me to see exactly what i'm doing and also helps me to kind of know. Um, if i'm getting too close to the roots and stuff like that, because i don't know the white just makes it everything much more easier and also also you want to apply a very small amount of color to your applicator when you're applying the color to your Roots, you don't need a lot of color and that's what's going to also minimize your chances of staining the lace, i'm just showing you that there's no stains on the lace, the stain that you see in the front is um on the napkin. So now i'm gon na go ahead and start rinsing out the hair and preparing for the next step. Also, i let the color sit on the roots for about an hour before rinsing it off. So in this clip, i'm showing you the different variations of the rose gold color. As you can see, one is a lot more brown than the other, and i achieved these colors just by applying the different mixtures like different combinations of the mixtures like i'll. Do 75 of one 25 of the other, and then i do half and half just to see what color i wanted. In the end, i lent i leaned more towards the rose gold color and, as you can see, i'm using the watercolor method. So i have a bucket with some hot water in it and now i'm applying the semi permanent color to the bucket just to get my custom color so i'll have all the colors i used in the description box. But i am mixing some a little bit of the rose gold color and then a little bit of the more brown color just to kind of get um the color that i'm desiring. So as you can see in the beginning, the color was way too light. It was way too pastely, so this was a process where um, you know i kind of added more color, depending on um, how much darker i wanted the wig to go or if i wanted the shade to change so this is. This was actually a lot of fun for me, but just take your time and remember it's much easier to build up the color than it is to take away the color. So just take your time and add the color gradually um, depending on. If you want to, you know change the shade or darken it up so after you know several attempts i just kept going like see. As you can see, the color is getting dark, the water is getting browner and browner because i was like yeah. This is just too too pastely for me. So just take your time and now i'm just gon na let the music play, because what i'm doing is pretty self-explanatory and pretty repetitive. So i'm just gon na let the music play. But i just think it's really important to include these clips in the video, because you might get a little discouraged in the beginning because you're like wow, it's, the color of the the wig, is not changing, but because it's such a light color. It takes a while for you to actually see the effects, but just as i said, as i keep repeating just take your time and apply the color gradually and you'll get your desired. Color. Also um. As you're doing this method, you want to make sure you're opening the wig up and kind of wreaking the color onto the hair. You'Re flipping it upside down, just to make sure that every single strand of the wig is saturated with the color. So after letting the wig sit in the water for about a minute, i rinsed it out. I blow dried it, and this is the result. I got. I apologize for the lighting, it was very late and i didn't have really good lighting at the time, but this is how the wig came out and what i'm going to do is use my clippers and start cutting a bob, i'm doing an asymmetrical bob. So the back of the bob is going to be shorter and the left and the right side are going to be a little bit longer and after that i just flat ironed the hair and bumped the ends a little bit, and here is the finished product. I really like the way the color came out. I love the way the roots came out, as you can see. It'S the roots, aren't brown anymore, as i mentioned in the beginning of the video they're, more of like a dusty rose color, but that makes the wig just so much more wearable and yeah. You can see the rooting really well right there once again, there's no stains on the lace. Those are stains that are on like the mannequin head, and here is the color and more natural lighting. Thank you guys so much for watching this video. If you enjoyed it, let me know you can leave a comment or you can also like the video and if you have any more suggestions for future videos, let me know, and until next time take care. Oh, i almost forgot to mention the wig is from my hair company, al jamila, hair and i'll leave details to my hair company below


Comments
uwaekwe blessing: This so beautiful ❤️
Cissed_Fit: Love it !!
Nocka Mama: I just came across your wigs, going to have to get a wig and try yours out. They look nice.