Honey Brown Roots On 613 Wig Tutorial
- Posted on 08 May, 2020
- Color Lace Wig
- By Anonymous
Hi! I’ve been wanting to do this look for so long and I loved how it turned out. Enjoy
Wig link: https://www.premiumlacewig.com/blonde-...
Hair Dye will be at local beauty supply.
WATCH ME PUT IT ON: https://youtu.be/3cpWqEAg3yI
FOLLOW ME ON IG AND TWITTER: @takiyalashay
FOR BUSINESS INQUIRIES EMAIL: [email protected]
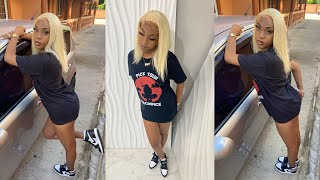
What'S up, YouTube is Takei Lachey welcome back to my channel, so my last video was a video of me putting this wig on and this one is gon na, be a me showing you how I died: the roots, honey, brown, okay, so I have my wig and I'M just showing you all the frontal part on the inside I'm about to use a pan brush and rub Vaseline all across the frontal. This is going to be to protect the lace and the knots from getting dyed. The brown color and usually all we use, got ta, be glue spray with for this, but I decided to use the wrestling because I've seen it somewhere and it worked out good. But it was just hard watching that wrestling out of the lace when I, when it was time to wear the wig, so I would suggest got ta me spray. It works just as well. Okay, so now y'all see me partying the frontal part of the wig and separating it from the back. So I can put the back in a ponytail. I'M not gon na dye the roots of the back of the wig, because you're not really gon na, be able to see that part at all. So we don't leave the back alone and just focus on the front. Oh, I'm gon na part really thin piece on the side of the wig down by where your ear goes. Okay, so I'm about to show you how the diet that I used is the color honey brown and kiss collection brand, and I was cornered in this little scooper and using a toothbrush to dip it in there. But I ended up throwing it on a plate later. On in the video okay, so with my small section, I'm just gon na die like an inch and I don't do it in a straight line. I'M just doing it kind of jacket so that it'll blend, like I'm Bri, I'm making sure I dyed the top of the piece and the bottom of the piece. So I don't have any stray blonde roots in my hair, and now I'm just got to keep doing that to each section. Until I get to the middle of the week, okay - and I would say when you get into the top of the head, if you didn't already, you should be making a middle part in your head so that when you get up to the top, you can make The sides match make sure you are rubbing a toothbrush and up and down motions so that you're not creating a super straight line like it should be evenly straight, but it should be very jagged, so it can look like ombre again, okay, so I've done both sides And now you're gon na see me comb it just to drag some of the product down a little bit all over and then I'm going to go in with the dye on my part all around. So that looks neat and pretty make sure you especially focus on the back part of the part, because that's gon na look crazy if you don't have died on it. Okay, so now that the part is all good and neat and clean, I'm gon na go in on the edges, because my main reason for dying this week was because I didn't want blonde edges. I wanted Brown edges, so I'm gon na separate all the hairs that are gon na be baby hairs and I'm just gon na go in really as far as I want to on the baby hairs, because they're gon na get cut anyway, but I just want them All to be brown in all right, that's the end of the video. This is how the wig ended up looking after I left it on for an hour and then washed it out. I didn't tone the hair at all yeah, and these are my final results. I'M gon na also put in a picture of how it looked on me and if you want to watch me, put the wig on in the picture that I'll show you guys go ahead and check my page up, because I have a video that and yeah. Thank you for watching. Let me know if I did a good job explaining or and if you have any questions on how I did it and yeah subscribe like and comment. Thank you.


Comments
Everything Amaya: Girl I love this! Best one I seen yet
Queen Brittney (QB Wig Collections): looks good! ♥️