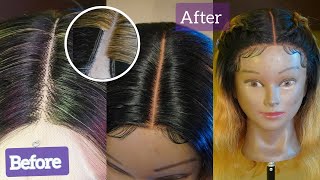
Use Photoshop To Fix Hair Roots Color / Change Hair Color
- Posted on 26 July, 2018
- Color Lace Wig
- By Anonymous
This video is advanced level. But don't worry, we go through everything step by step so you can follow along. We fix the hair roots color by using the selective color adjustment layer and color paint over with blending mode. For more detail adjustment we use Frequency Separation, it is optional.
If you find this video helpful please give it a THUMB UP so more people can find this video. We upload tutorials every week, make sure you hit the subscribe button.
If you have any question please leave in the comment below.
Model:Rebecca Busuttil
Follow me on Instagram:
https://www.instagram.com/amanda.hsu.p...
FB:
https://www.facebook.com/AmandaHsuPhot...
Hello welcome to CPS cranberry photography studio. My name is Amanda. She in this channel. We give Photoshop tutorial photography tutorials to help you to develop your creative skill in this video. I'M going to show you how to color correct the hair roots. You can also use this method to change the hair color, that's Devine! This image is a shot of a beautiful model. You can see her hair roots. Color is different than rest of her hair. It gives a character to the hair. Some people like it, but if you want to change it, absolutely you can so I am just going to show you how to change this hair color. It'S a little bit complicated and it's for advanced level, but I will go through all the step with you. So don't worry, let's get on with it. So, let's see the hair color on the roots. Here is dark and here is bright. So, first of all, we have to change the brightness differences. Let'S go to the quick, select tool here and then quickly select these area. Okay, just like this and then I'm gon na make the brush smaller, and I don't want this area to be get included. So I'm gon na hold down my Alt key and you see the minors here, I'm just gon na deselect this area and slider here and also here. I don't want this to be selected at light area, just sigh it slightly a few strains of here and then I make the brush smaller and go over here again. Okay, so I'm gon na select just right here: okay, that's just a rough selection, that's good! So, let's go, he go over here to adjustment layer, select this selected color, so this area has already been selected. You see the layer mask and I'm going to neutrals and black here. Let me just go over the black. Let me just lighten it. You see the hair is going quite light now, okay, so I am going to put a little bit color back, which is, I think we need a little bit yellow to match the color here. New, yellow grease the cyan. This is the color state theory. If you study a little, but you know how it works, but otherwise you can always drag judge. You see that just about right over here. I think all right, so I am gon na take my brush. You see here it's surprise. I'M gon na just gon na to use select blank to deselect. This area, you see, has come off now, okay, so this is before this is after so you can see some areas been selected. I'M going to go to the layer mask feathering, so give it a bit soft edges. Let'S have a look okay before and after looks pretty good, so the next step is, I am to going to color all this part to become more like me to show you. This is more orange, this one I like this color, so I am going to color all this area to become more than this color. So how I'm going to do it? I am going to add a new layer, okay and select my brush here and I'm gon na sample this color. I hold down my Alt key here: okay and then I can just roughly brush over and over this area. Okay, that's it! Then I'm gon na change! The blending mode to Kali, I'm coloring this one right so have a look. It looks pretty good right before and after so I evened out more color here and also, I think, they'll feel strained here. I'M just gon na go in to color them. Okay, let's go like there's like this okay, so it's more even colored out. Let'S have a look, so I can do a little bit more, but at this game, yeah yeah. Okay, let's have a look that looks really good. Look at that okay, so the color here is pretty even, but you can always back down a little bit if you want, for example, you can change the opacity so look more natural, not like very very even this is your choice, your artistic vision. So I'm going to just leave it to 95 percent here and there's another step I want to. Do you see this still a little bit color differences right here? If you, if you find that annoying, if you want to even these color out the differences, there's something we can do about it, so we can use frequency separation to even the compact okay, so frequency separation is not only apply on skin, it can be using it. Also so way, I'm going to do it use my frequency separation action here, and so that's just do these figure, I think, is about six and then click. Ok, Photoshop is magic. Let'S go for the low layer and to know this one and then circle just this area: let's have a look and filter blur Gaussian blur. Then that's just go, for this is pretty good figure. Alright, it's okay! Nice go for 7.4 click. Ok, so you can see before after right, that's improving and here this area, if you don't like it, let's just do it. Ok, see that's even out the comment now here and here and here and here be there er. You can't do ok, so that's pretty even, but I think that's a bit too much', so I'm gon na back down a little bit. So I'm just changing the opacity of the frequency separation, the two layers to 70 %. You see! Ok, so I think I get back down to 60 % look. So that's pretty good for me! Look at this before and after. If you find this tutorial helpful, please give yourself up so there will be more people able to see this video. I will upload more tutorials like this, so make sure you subscribe and thanks for watching

Comments
Gabriel Félix: This was extremely helpful. Thank you
Mary Hurlbut: Your are definitely a photoshop master - wish I had the skills to keep up
Judy Gray: I was with you all the way up to where you used the separation action and then you totally lost me. However, I was able to benefit from the part I got.