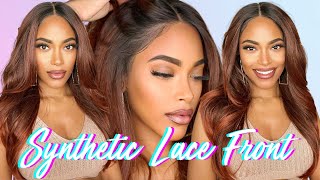
Honey Blonde Crochet Wig With Combs Tutorial | Jasmine Defined
- Posted on 23 November, 2017
- Color Lace Wig
- By Anonymous
Honey Blonde Crochet Wig with Combs Tutorial | Jasmine Defined
**Expand for more info!**
Hair Used: http://amzn.to/2hMoGLU
Zury Naturali Star V8910 Gogo Curl
Wig Cap: http://amzn.to/2hXYmlL
Wig Head: http://amzn.to/2hN6bXH
Wig Head Stand: http://amzn.to/2zuBjXj
Subscribe!: http://goo.gl/W8NrwM
▬▬▬▬▬▬▬▬▬▬▬▬▬▬▬▬▬▬▬▬▬▬▬▬▬▬▬▬▬▬▬
Instagram: www.instagram.com/JasmineDefined
Snapchat: WhoIsJasmine1
Facebook: https://www.facebook.com/JasmineDefine...
Twitter: https://twitter.com/JasmineDefined
Contact me: [email protected]
▬▬▬▬▬▬▬▬▬▬▬▬▬▬▬▬▬▬▬▬▬▬▬▬▬▬▬▬▬▬▬
*Popular videos*
Crochet Faux Locs: https://youtu.be/weOsux_qlRI
Middle Part Bob Sew-in Tutorial: https://youtu.be/0pQ9LADHiXk
Curly Crochet Braids Tutorial: https://youtu.be/e4wp_w_hPV4
Box Braid Tutorial: https://youtu.be/K5eKgN7U2-w
Crochet Marley Twist Tutorial: https://youtu.be/l9BnLRxIq08
▬▬▬▬▬▬▬▬▬▬▬▬▬▬▬▬▬▬▬▬▬▬▬▬▬▬▬▬▬▬▬
#crochetwig #blondewig #curlywig
You know it is everybody. I am back once again with another hair tutorial today, I'm showing you how I felt this crochet wig. This is my second crochet away from my channel and it's actually from the same brand. This is Suri's, naturally star hair. It is crochet here - and this is the V 8 9 10, which basically just means that it has its OCD shaped and it has eight inches, 9 inches and 10 inches. My first time around you all may remember, I was trying to wear this despite it being clear as day with a package, so I'm just gon na did my own thing and restyle it this time around. I actually tried to find this time. I actually decided to stick to the plan. According to the pack, I actually started with the 10 inches followed by the 9. Then they ate at the top. Now, let's get started. So this is the hair I'm using. I have two packs one. Is this 30 color and the other is a ombre 3033, and this is the wig cap I'll be using? This? Is the crochet wig cap with combs, so first I'm going to unpack all of the hair and kind of organize organize organize it by left, said my eight, my nine and my 10 and then I'm taking the ombre hair and organizing that also to make sure I Have the lens in order making sure that the tag of this wig hat is in the back? If you need a wig head, I will leave a link in the description box below for you to purchase one from Amazon like I did so for the first row. I'M gon na be using the ten inch, so this is the lighter colored hair, and what I'm trying to do here is just make sure I maintain that ombre look, so I don't want too much of the light hair on top. I do want it to appear to have dark roots on this wig, so I'm gon na kind of stagger things and I'm starting with the light color first, as you can see, I noticed that the hair was a little looser than I thought so I started pulling Out small strands from each side and tying a knot just to make sure that they don't slide out and, as you can see for the next row, I'm using the darker hair. This is my ombre hair with colors, 30 and 33 and I'm just gon na. Let this run a little longer than I did in my last video, so you guys can see exactly where I place each color and lift okay. So now I'm on my third row and I'm back to the brighter colored hair and I'm just gon na keep switching back and forth between the two. Until I get to the top, then I'll start doing more of the darker hair, as I said just to make sure I had that the look of dark roots. So at this point I started using the nine-inch hair notice. I haven't put any of the hair at the front. I'M gon na save the shorter lengths for the bank area. Now that I'm pretty much at the very top, I'm going to start using the 8, the 8 inch strands and, as I said, I'm gon na make sure I use mostly the darker hair. Once I get really towards the very top - and I'm also going to make sure that the strands are a little closer together just so, you can't see the net or my hair underneath the way. Ok so next day and my wig is all done at least a crocheting part, and now I'm just gon na cut a bang into this week, so I'm taking it curl by curl and cutting it. I don't want a blunt cut, so I'm just doing it and curl by curl. Some of the curls are kind of big, so I broke them apart and cut them that way and here's the finished look thumbs up. If you liked this video make sure you subscribe for more, and I will see you guys in the next one

Comments
Jasmine Defined: Finally decided to play around with some color. I love being able to just pop on a whole new look!
Nita Dean: Love it! Very detailed video! You look amazing
jaideg1218: Perfection.. inspires me