Ultimate Start To Finish 5X5 Closure Install Ft. Isee Hair
- Posted on 09 June, 2021
- Color Lace Wig
- By Anonymous
Hello my beautiful subscribers (and non subs) ☺️
• I sell wigs after I review them! (Follow me on IG) I post the wigs in my story if for sale! But this wig has been sold !
Want a wig made? Want me to pluck and bleach the knots for you wig? Contact me!
IG:holaa_caro
Email:[email protected]
♡H A I R I N T O D A Y' S V I D E O:
Hot Summer Sale , Up To 32% OFF. Treat yourself for new season please!
Buy now, pay later!
Pay in 4 interest-free payment available now on https://www.iseehair.com/
♡Use My Special Code: Summer Get $7 OFF !!!
The hair I'm wearing in this video is : https://bit.ly/2SuoFlf
#ISEEPrincess
Density: 180% Density
Texture: Brazilian Body Wave
Length: 26inch
Cap Construction: 5*5 Lace Closure Wig
♡2021 New Arrivals Highlight Wigs Brown And Blonde:https://bit.ly/3oNtkJl
Nice Packaging (Free Shipping ) 27mm 3D Eyelashes: https://bit.ly/3oK9BeW
♡Other Deals:
Brazilian Body Wave 13*4 Lace Front Wig: https://bit.ly/3uw2NDn
Bob Brazilian Body Wave 4*4 Lace Closure Wig: https://bit.ly/3oX0fgp
Brazilian Body Wave Headbands Wig: https://bit.ly/3frdT8s
♡ C O N T A C T ♡
IG: @iseehairbeauty--http://bit.ly/2IyNNkJ
Email: [email protected]
Imessage/whatsapp: +8613271220951
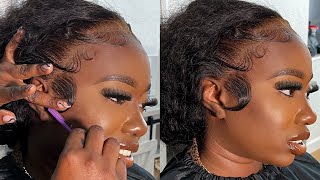
Hello, everyone what's good with poppin, welcome back to my channel in today's video we are going to be doing a start to finish closure, wig, install and when i say start to finish, i'm talking about i'm going to show you guys how to pluck how to bleach And how to install as well as a little bit of how i got this body wave style? Alright, let's get right into it! So since i said to start to finish, i'm going to talk about what the wig looked like straight out of the box, so this is the wig that i'm going to be working with. It is from ic hair company. This is their body wave 5x5 closure. I have 26 inches and 180 density. This is what the wig is. Looking like a straight out of the box, i love working with closures. I feel like they're, very beginner friendly and very you know, quick and easy to work with. So here you can see the hair did not come pre-bleached or pre-plucked, but don't worry we're going to learn how to do that in this video. So i put the wig on my head just to show you guys what it looks like straight out of the box on your head and for me i always feel like it's necessary to bleach the knots and pluck the wig before install that's, because this helps give You a very natural look with your install. As you can see, the hairline is still very thick in my opinion and those little black dots that you see need to be bleached, so it looks like the hair is coming right out of your scalp. So first step is bleaching. Our knots and here are all the tools that you're going to need. I like to use a random bowl that designated as my mixing bowl and i like to use this hair coloring brush one that has like a nice thick bristle. You can also use a plastic knife or a plastic spoon to help you spread around the bleach, but do not use anything that is metal, because this will affect the bleaching process and then, of course, you need your bleaching powder and your developer. I like to use just regular bw and i like to use 40 volume developer. The reason why i use 40 is because i've been bleaching here for quite a while, so i feel, like you know, i'm more confident in knowing i'm not going to over bleach. My knots, but if you are a beginner i do suggest going with 30 volume and making sure you set a timer, so you don't over bleach over process, so nothing over 40. In my opinion, and nothing under there, i'm just brushing away all the hair to push it all back because to bleach the knot you want to make sure the hair is pushed back all the baby hairs, because you don't want to mess up and get bleach on The actual hair, so i always use one scoop of developer. One scoop is enough for a regular 13x4 frontal and it's more than enough for a closure. So i just used one scoop and i like to add my developer in in parts, because you want to make sure you're not getting it too liquidy. It needs to be a nice cake, frosting type of texture, so i like to just add a little bit stir and you know check out what the texture is like and then i just keep adding until i get that nice and creamy spreadable, but still thick texture. If you pick up your um whatever spreading tool and the product is dripping off your brush or your knife, whatever you're using then it's too liquidy and you have to add more product at the same time, you don't want it too dry and it's like chalky. You want a nice smooth mix like we got right here now we're ready to go ahead and start. You know bleaching the knots so excuse me and i apologize in advance for this terrible camera angle. I wasn't aware that it was not showing the whole process properly, but i just flip the wig over and i like to just go in and start from the top to the bottom and just you know, drag down the product with a little bit of pressure. But not too much where i'm like bleeding into the actual hair, because you only just want to bleach the knots, not the actual roots of the hair. That makes sense so i just go in and push in and just you know spread it once i'm done. I like to let the hair sit for about 15 to 30 minutes. Every hair is different. Some knots bleach really fast and some knots you know, take a long time to bleach. So i can't give you a specific time, but minimum 15 set a timer and just keep coming in and checking on the hair. What you're? Looking for you want the knots to go from this black that you see right here to a blonde color. Hence you know the bleaching term the blonde color makes it look like you know it's coming out of your scalp. Now that it's been about for this wig, it was about 20 minutes that the hair was blonde. The way that i wanted to be so i'm ready to wash out the hair, and so first i just shampoo out the hair, regular shampoo, and then i go in with this purple shampoo that i got from walmart purple shampoo helps so you know remove that orangey Brassy tone that you're gon na get after bleaching the hair - and this helps you know, make it more of a neutral color. So i go ahead and just saturate the lace with the purple shampoo, let it sit and soak for another 10 minutes not too long. Come back wash that out and our knots are nice and bleach, and it's looking like the hair you know is coming out of the scalp. Now that we have our knots bleach, we can go ahead and pluck them to give us that natural hairline first thing. I'M doing is applying this little white wipe under my canvas head and the reason why i do this is because i like to have something white under my canvas head. So i can really properly see those knots. So i just use this wipe because it's like really stretchy and you know it's affordable and i can keep using as many as i like. I get the wig pinned down and i like to just part the hair right in the middle. This helps me to protect my middle part, because i feel, like the middle part, is the part that, if you over pluck will be really affected. But i don't do this for like my side parts only for the middle part, i do have a recent updated detailed plucking tutorial, so you can go ahead and check that out. If you want more information on how i pluck my wigs, but for the purpose of the start, to finish, i'm going to give you a quick little mini gist of what's going on, so i'm pulling out the hair that is not pre-plugged, because the front line as You can see the hair was pre-plugged slightly, so i pulled that part out right and then i start to plug behind what the company has already pre-plugged a little bit for me, because i don't like plugging in the front. I realize whenever i start plucking in the beginning of the hairline, i start to get lots of bald spots and my baby hairs. Just look really weird because i've over plucked the front, i'm using this slant, tip tweezer, which i'll link down below and i'm just going in, plucking and skipping a line making sure i'm not plucking in the same location and i'm just trying to thin out the hairline. Because you know, naturally our hairline is not super thick in the front. It starts off a little bit thinner and gets thicker as we go deeper into our hairline. Another thing you want to be mindful when you're plucking is that you are pulling out the hair from the roots like from the knots. If you don't see these little blonde pieces, like i'm, showing you right here, then that means you're not pulling the hair from the root, and that's also going to give you a very like messy and blotchy type of pluck so make sure you're pulling the hair from The roots and that you're not plucking in the same spot, you're not trying to make a bald spot you're trying to lightly thin out the hairline. Once i've done that, i just go ahead and pull away, pull the hair back to the front, and i just lightly a little bit pick a few pieces in the front of the hair and pluck that just you know finish off the look and that's all i Do super easy super fast and i go ahead and do the other side and i'll come back to you guys. Okay, now we are finally done with the wig prep we plucked her. We bleached the knots and she's looking more like scalp she's, looking natural she's, looking like she's going to come out of our hair and we're finally ready to install this wig. So for my install first, you got to do you got to tint the lace because you can see this was a transparent lace and the lace is looking very ashy, giving very ghosts. I'M using this ruby, kiss concealer and i'm using this little dense brush to help me go ahead and just buff in that concealer into the lace i put under and over the lace once i've done that i go in with my blow dryer and just try to Dry up all that concealer, because you don't want any like wet products when you're trying to install the lace, because, mixed with the hairspray, it's going to be really messy, it's going to make it harder to work with now, as you can see, the wig is looking More, like my skin tone, it's going to melt a lot easier before i proceed to glue everything down. You got to make sure for closures that you cut off the little like white, excess lace that comes with it on the side, this for my adhesive, i'm going to be using the got to be hairspray and i'm just spraying that onto the front part of the Hairline using my fingers to help you know, spread it out and make sure all of the lace is properly covered. And then i use this rat tail comb and my blow dryer in a warm to cool setting to help that dry and let that really just stick onto my hair. The blow dry is very, very important. This is what helps you know: dry, the glass to be fast enough. So it's sticking to your hair really properly. Then i cut the hair into two little sections and use this eyebrow razor to help me just cut the lace off i like to use an eyebrow razor instead of a regular scissors to cut, because this helps create a jagged look onto the lace, and you know, Like your natural hairline, you don't want it to just lay straight and flat onto your head. It has to kind of look a little bit jagged on the lace for it to blend, naturally into your head and your hairline, and all that good stuff. Once i've cut off the lace, i am going in with my scissors to kind of just be more detailed, because i like to cut off every piece of excess lace like if there's no hair on it. I'M making sure i'm cutting it off because there's no reason to be saving all this extra lace like what are you saving it for cut all that lace off? Okay, i then go in again and do another spray of got to be, but this time i pull out the baby hairs first and just pull it all out and i go in what got to be and spray in between the hair, because i want to make Sure i'm not getting any lifting once i go in to do my baby hairs because sweeping the baby hairs does cause lifting and lifting is really annoying when you're trying to you know, install your lace, because now everything is just not working the way supposed to so I like to what i like to do now is go in with the got to be spray and spray again after i have pulled out the baby hairs and use the blow dryer and the rat tail comb to dry that all up and push the lace into. My skin, once i've done that i go with this elastic band and i just let the lace you know finish drying completely and make sure it is laying flat, because i'm really trying to avoid getting any type of lifting i'm telling y'all lifting is the devil. I feel like i always say that, because once it's lifting either the install looks crazy or even just doing your baby hairs is hard whenever the lace is lifting, while i'm letting my lace lay i'm going in with my hot comb, and just this wax stick to Go and start just you know, pressing out the roots and the wig, because i want it to look really flat. Don'T look like it's just floating on top of my head now we are ready to start doing our baby hairs. So first thing: i'm using this little razor comb to just break cut down the baby hairs a bit more. I don't want them to be super long, but i don't cut them too short at first, because sometimes i feel like i cut it too short at first now. I can't go back, so i just cut it to like a nice decent medium size. I also do have a detailed tutorial on how to do my baby hair. So, like the plucking, it's going to be a quick little mini tutorial, i'm using the got to be i'm sorry, not the got to be i'm using the eco styler hair gel the green one, i'm using that to lay my baby hairs. I like to use this because i feel like it has some hold, but it also is not too sticky. So if i want to like re-swoop the baby hairs, it won't, like you know, be a big hassle. Also, it gives me more of a softer look than that very gelled down look which is no problem with that. I, like a good gel down. Look, i don't like it looking too hard, but yes, i'm just going to go ahead and do these two little swoops really easy and yeah i'll come back. Do bye! My baby hairs are done, i'm happy with them, so i'm going in and just you know, laying them down with the elastic band and next i got to go ahead and just fix this parting situation, because i did slightly over bleach but not in a way where It'S a big deal so first thing i like to do is just use this black mascara, it's just a random mascara and i go in and just fill all the over bleach spots and then i go ahead and use some concealer. That is like about one to two shades lighter than me, and i use that and just pop it in the middle to really give a clean, perfect part. Look, i went ahead and just trimmed the ends of the hair. As you can see, the ends were a little bit dry. I always feel like i have to trim the ends of all of my looks because i feel like that. Just helps the hair. Look more fuller and just you know makes it look healthier. In my opinion, i did cut very light layers in this. I did want to keep the length of the hair and, for my styling i just went ahead and used my curling wand. It is a one and a half inch trimmington curling wand, i'll try to link it down below. If i can find it, i got it from walmart but yeah. I just used that and i pinned the curls up for a few seconds to let it dry. It was honestly a very simple styling i feel like curling ones are like just the easiest way to go. I wanted all the curls going away from my face, so i did make sure i'm curling the hair all backwards and yeah. I also sprayed a little bit of hairspray as a finishing to really just help set the style, but that's basically it for this install really. So i'm just going to show the rest of me curling the hair and come back for the finished product bye. Now that all of the hair is curled, i'm just using this loose comb to just go in and brush out the waves, slash, curls and just kind of manipulate the hair. Until it looks like how i want it to look, i'm also going to be going in with my hot comb as well to help me. You know shape the top of the hair, make it flat and just shape it into the look that i am going for, but y'all see her. This is looking a lot better than what it was looking like straight out of the box. I hope y'all found this tutorial really easy, and you know i hope you found it helpful as well. If you have any questions, comments or concerns, y'all know comments down below make sure you like and subscribe and follow me on my socials as well. You know if you want to see more of me and the content i create, but thank you again so much for watching. I hope to see you in another one and yeah peace out girl scouts, goodbye


Comments
ibadie: You're a life saver!! Ive been wearing wigs for a while now but I couldn't make the lace look natural.
Ayana Ajomi: You are so thorough and did an amazing job!
Brianna Rashay: It's giving scalp mamas! Love your videos!
Kennedy Thomas: the fact that you plucked it so fast
neeyuhh: i love watching your videos!!
Premium Lace Wig: Gorgeous !!~~~~~~~~~~
Cion Divine: Serious question .. how long does the install last before it starts lifting ?
Misha L: that necklace is so pretty! where’d you get it ?
Panda_Cubee: Yep got my snack lemme sit down and study this video right quick
Wendy Santos: I recommend you research fast hair growth fortified shampoo to double hair growth.
Nights - Frank ocean: This might sound like a stupid question but it’s really the only thing stopping me from purchasing a 5x5 closure. What happens if your out one day and it’s windy. Would the wind blow the hair to the side and reveal the empty sides? like what do you think the posibility is of that happening it’s literally my only fear if I purchase one.
Tinashe Ruze: You slated this girl
Nappygrl TV: Lol you’re Nigerian I can tell by the way you said “EH HEH”
Tonette Moales: Name of these tweezers please?
Monica’s Preference: What kind of Wax Stick do you use?
Skye Grant: do you wear a wig cap under your wigs ?
brianca lockhart: What’s the tweezers name ?
Shaneece S: Them Vivia paper towels the truth and wet the hair before bleaching
Taylor Smith: Did anyone buy this hair ?
Najah: Big head friendly?