From Blonde To Lavender Iseehair 613 Brazilian Straight Front Lace Wig
- Posted on 15 August, 2021
- Color Lace Wig
- By Anonymous
Hey y’all I know it’s been a hot lil minute for those of you who been rocking with me over the years. But I can honestly say that I am back, and will be uploading every Sunday for now. To all my new and future supporters please don’t forget to subscribe, Like, and show mad love in the comment section.
.
.
.
AliExpress
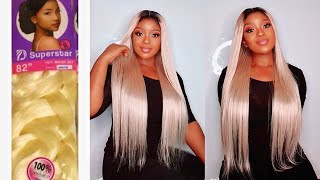
US $90.90 55% Off | Brazilian Straight 613 Lace Front Wig 150% Density 13x4 ISEE HAIR Straight Honey Blonde Lace Front Human Hair Wigs For Women
https://a.aliexpress.com/_mrR30MF
.
.
ISEEHAIR DIRECT SITE:
https://m.iseehair.com/isee-hair-brazi...
.
.
.
Follow Me
Instagram: https://instagram.com/hairislee?r=name...
.
Twotter: hairislee
TikTok :hairislee
Hey y'all welcome to my channel so today, as you guys can see, we will be reviewing this wig that i got from icy hair and it is their 13x4 613 wig is brazilian straight. It'S 150 density and also i got into lymph 22.. You inspire me to be better so just to be clear. I purchased this wig with my own money, so the things that you see are the things that they included with my purchase, which were a pair of lashes and a pack of stocking caps of two. So the wig came with a total of four combs three at the top one in the back also adjustable strap in the back as well as you can see the side panels of the wig. The lace amount isn't that much. It'S only like two inches of parting space on the side, which it kind of classifies the wig as a front lace wig. Instead of a frontal just to not be confused about that. So in preparation to tone the wig we're going to be using shimmer and light purple shampoo, and i'm just going to simply just do it in my sink, you guys. I know a lot of people like to eat buckets and totes, and all this extra stuff, everything the whole coloring process of this hair, will be done literally in my sink just to be clear because girl ain't, nobody got time for that, we're not doing all of That so i'm going to make me a nice shampoo bath and i'm just going to dip my wig in and out just to know kind of tone it because we are doing lavender now when you are doing a warmer tone. There'S no purpose for this deal. So if you're doing anything like, i want to say orange or green or even um red, you do not have the tone, your wig, but if you're going to be doing cooler colors, please always tone your wigs with the shimmering light shampoo or any purple shampoo. Okay. So i did let the wig dry overnight, but i'm gon na go in with my color from ion and it is the color brilliance bright and it is a purple color. It'S like a true purple like a dark purple, because i wanted a shadow root. It'S already. You know made you can just use it right right out of the peg, so you don't have to mix anything with it. You can just apply the color to the roots and be done with it, but i will say i was very nervous when it came to when it came to doing this part i was, i was honestly very nervous. I don't really mess with color like that, like it's red and i miss my color, i mostly always dye like natural color hair and i'm always for the most part, leaving a root on it. Is it very much so easy to leave a root on when coloring hair, then to add a root, especially if you are very particular like me, and i'm very you know critical of myself and how i do things so, as you guys are going to see on This far i started off very timid, like i was honestly like. Oh i don't know, i don't know, i don't know, i don't know. I was very unsure. I was very scared of this process and i never use this product. Well, i'm not gon na say i never use this product before, but i have used this product before, but in using it it was a very easy. You definitely want to go with a color like this when adding root and do not try to add roots with the rinse. This was actually better because it was the consistency of it is so thick um. It was very like creamy and easy to apply and it almost kind of made it fool proof, so i would suggest you get this color and i did get this from sally. So, as you can see, i came in the back. I was like a little hesitant on what i was doing, how i was doing it, but i quickly got the hang of, especially when i got to the other side working on the actual hairs that were ventilated in the lace as you'll be able to see. I started spreading it out. I got more comfortable when it came to using it. So if you guys are feeling unsure, let me tell you something: i ain't, never did it and i did okay, so you guys, i think you would be okay as well, so give it a try if you want to add roots to your 613, a shadow root And normally a shadow root is normally within the same color family, sometimes for the most part, and it's just a darker tone, so i just wanted a little shadow root. That'S also why i added it with this color, so you'll see from the clip when i'm all done with applying the color of that it came out good, i like it, so i don't know if you guys can see from the clip. I actually got a few little. You know patches of dye here and there, but honestly after i wash it out and did everything it really didn't make any big of a difference. You could not see it, it wasn't damaged or anything. It was still very much so workable um. I didn't even really notice the color on the lace um, the little color that i did get on the lace. For the most part, it was clear because i don't use vaseline or i don't spray up underneath my weave when i dye my wigs. I just refuse to do that. You know i don't want to wash out grease. I don't want to be responsible for that. So guess what i don't do it so, basically you just rinse it out. Honestly, the hair is going to be lavender anyway. So if it ran on the hair uh, you know somewhat colored the hair, like the blunt parts of the wig, and that would have been fine. But honestly, it was kind of a breeze to work with it. Didn'T give me too much trouble at all it just washed right out. So now we'll be going in with this adora color, and this is in the color lavender. Remember we're doing lavender hair. I did buy two bottles. I only end up using one you guys, honestly, that was all i kind of needed um the thing with these 613 weaves, especially when they're budget friendly, is this icy hair wolves, this icy hair, wiggles um they sometimes can have fillers in them now. I have definitely gotten weaves, they like c13 hair or wigs that were horrible. I would not even put this close to this scale. I say in affordable, hair and just weeds um. I say i would give them honestly a 10 out of 10.. This week was really amazing to work with um. I like how the color came out. I was going to go in and use another bottle, but honestly i did not want it too dark and i know if i use the other bottle, it would have came out too dark. But honestly i thought it was looking a little blotchy. You do have to open up your wig, you guys do not leave the week lying still or just sitting in the water or just going in and out it wasn't an eye color in the middle trust me you want to move it move, it constantly move it Around and make sure you get everything, but i like how it came out with just that. One bottle and i like that it kind of put like different tones in the hair like there were different tones in the hair, but it did not look stupid or blotchy or like a bad job at all, because i'm very particular about that. Oh, i can't stand to see a girl with a bad job, so i am very like cautious about that, but yeah it came out amazing. I like how it came out, so i would be taking my aussie moisture miracle um conditioner. Honestly, your hair was so super soft. It didn't really need conditioner and you guys do not wash after you do a rinse a door is a rinse you're, never supposed to wash. I hate to see people washing their hair, like with shampoo girl, you're, just washing the color away. It'S a rinse trust me and it's a very conditioning. Rinse a door is conditioning. You guys do know that right, so no, never use shampoo. When you're doing a rinse. I only use conditioner just because out of habit, but honestly they need conditioner. Honestly, just gon na took it out of the sink and let it dry and it would have been fine to be quite honest because you have to think we did already kind of shampoo the hair anyway, when we use the toning shampoo. So don't use shampoo like y'all. Do not wash your hair after you put a door on after you watercolor it don't do that. There'S no need for you to do that. Stop and pop y'all on your hand. Y'All should not do that, but i put the conditioner on now. I want to. I rinse it right out. Um, do not let it sit. This hair is silky. If you let it sit, you can possibly get build up, and if you have buildup of conditioner, you can deal with a lot of tangling and matting. So i washed it right out, as you can see, i'm making sure that conditioner is rinsed out of their hair. Okay, so i did let that dry as well, and then i went in with my wax stick and i just simply like put it on my part and the whole hairline area, i'm going to press it with the hot comb, we're going to do a little bit. Plucking and yeah - that's about it, so you guys watch this clip if you're interested in watching this clip um and just see how i doing what i do. I really need to explain it. The video will explain it itself. So i'll come back is is so you guys when i'm squeezing my lace? To be honest, i kind of just move around. It'S like an eyeballing thing for me technique. For me, i just kind of see where i need to kind of pluck it at and where i kind of want to be in it, i feel like there is no real wrong way to like who's your lace. You have to do it to your liking me. I like to leave my hairline a little bit on the full side i do not like to over plug, because you have to think, especially if it's a wig, that you want to wear more than one time and if you are going to be using an adhesive. Like a glue to apply your wig you're, naturally going to lose a lot of hair out of their hairline anyway. So to me, it's never a good idea to over plug um. I do just try to break up the hairline for the most part, because i don't like a sharp hairline, so i will focus on my hairline and in the temple areas just in certain areas to where i feel like a hairline would naturally be thinner at um. I don't do too much at the top any of that, but especially when it comes to 613 hair. You don't want to over pluck because you don't want to expose so much of the transparent lace, especially if you are a darker complexion and yeah, because i mean you'll kind of pretty much see it easily, especially like if you sweat, do anything like it'll expose too Much of your lace, so i always kind of keep it full just break up the hairline for the most part, and that's all i really pretty much did this hairline was kind of cool, so i did do quite a bit of plucking, but i always focus on My hairline, i just like to break that hairline up for the most part, especially on the sides and with this wig, because you don't got that much lace to be like really like peeling it back in layers and plucking backward and backward and backward you ain't gon Na have no hair on the side, so, with that being in mind, i just move around you guys do it by eyesight um, there's so many videos on here of people like customizing their legs and plucking their legs. So this is how i do it. So just continue to watch. Hopefully you guys are visual learners like i am and you'll kind of see what i'm doing and you can kind of emulate that imitate it. Do whatever you want to call it. I'M trying to use a big bird girl doing too much, but yeah just do this and yeah. That'S how i put my lace is so now that we're done with that we can go in with our heat protect. Now i always put heat protectant um. So, silk elements is from sally's, it's a all base and the garnier fructis one is not all based. So we're going to go with that one, because this is a circular textured hair. So you never want to apply all base heat protectant to silky, textured hair. So go in with your garnier fructis or anyone. I think tresemme also makes a good one. That'S not all based so go in with one of those opposed to like something oily hello. So because i know some of you guys are going to be interested in what banner and i'm using. I am using the rimmelton flat iron and i think it's like a one and a half inch plate. They are very affordable. You can find them at target and walmart and i'm sure other department stores they're, always around 20 plus dollars, they're very affordable and they last for a long time. They do start like the older. They get. They start to kind of distribute the heat a little unevenly. So i mean they do good. I mean for a 20-something flat, 20-something dollar flat iron. You can't really go wrong with it um. I think they sometimes do better jobs than some of the pricier ones. However, the other day i did get the chance to experience a bayless pro flat iron and, let's just say i would definitely be getting one of those they are worth the money they are. It works really really well. It shrinks the hair in one slow pass um. I don't know i've always straightened my hair, like in one pass for, for the most part with any flat iron but yeah. Those are the true and they are the truth for, like natural hair, i can see them giving you a good silk breast, so yeah. I would definitely be investing in the babyliss pro a babylist pro. I think. That'S how you say it, but yeah continue to watch you guys, i'm just reading the hair. I honestly did not know what i wanted to do like if i want to throw a wave in it or what um i knew. I wanted to cut it because it is super thin at the ends. I always get your wigs longer if you are unsure or if it's a company that you have not purchased from, then you will actually want it. So you can have cutting room to like kind of thicken it up and make it appear thicker. You definitely want to do it. I got this wig in a 22 inch, knowing that i probably was going to have to cut it, because i did go see other reviews before ordering this hair. I'M not gon na lie to you guys, and that was like the big thing about it. A lot of it was a lot of people. Weeks were saying like just about everybody. We were seeing towards the end, so definitely always order wigs longer than you would really want them to give you that room to like kind of tweak it if you need to so. I know i didn't really want 22 inches in this look, but i got 22 inches because i knew i was gon na have to cut it. So with that being said, continue to watch you guys i'll come back in when i need to bother me. Why are you so, as you guys can see, it is very thin towards the end. I was not happy with how thin it was towards the end. I knew i wasn't gon na keep it like this. After i put it on, i was like there's no way this. This is strings. Basically it's long by trends, so i definitely went in and cut it. So this is the finished outcome. After doing a little trim, putting me a little layer in it - and i absolutely love it like it's worth the 210 dollars that i spent on this wig - i love it like it did what it needed to do and it gave what it needed to give. So what i recommend you guys get this wig absolutely! Yes, the link is entered by your girl, which you ain't on, because this is gon na turn out any special occasion that you may have, and you just want to be different and stand out. This is my finished look. I took my barrel curl, i'm just putting quick curls in there and comb them out and yeah. I love it. You can tell me nothing so if you guys enjoyed this video, please don't forget to subscribe. Turn your notification bells on, like the video girl comment and i'll catch you guys in my next one girl hit that subscribe.


Comments
Lesley Keith: Im still watching the video at this moment but I wanted to let you know how missed you were. You are so honest and I love that you are not commercialized and trying to help these companies sell to your subscribers. I love how you teach and I love your personality....huggs from St. Louis
Denise Riley: This was very informative for me. I never knew the process to color a wig. Love the color!
Goldi Creates: Oooooooohhhhh my god! lol ok! “You can’t tell me nothing !!” You DID THAT I love how neat and precise you are. It came out great!
chocolatenbeautiful: Long time no see. You look amazing and so happy that you’re back!
Elizabeth Marquez: This was an excellent and very detailed video. Loved the final look!!
TazzOneAnOny Jackson: I love that Purple! You did an amazing job on that hair! But you always SLAY!!!!!
Princessa G: Wow! Great that you are back. The color is fabulous
Janelle LaFond: Loved the final look! I love how clear and easy each step was .
litebrite84: I loveeeeee this color, and you did an awesome job. Oh i'm from your dollstagram
Jasmine Robinson: Beautiful this might be my next color, but I've been trying to find a 613 wig thats big head friendly
Shaneil Wright: Hi Lee I love your work you need to come on more often. As soon as your video is done I be like dame we more I be learning so much from you .
Icy The Rebel Official: Slayed as always
FitMomOver45 LetzgetPhysical: I need to get a wig from you ❤
gypsyladyification: Beautiful
BlaqueBeauti2u Johnson: Yesssssss come thru lavender this is everything….
amanda chappell: color is just flawless
Phildah Chasi: Looks great
Shima M: Beautiful
Lee Whitelocke: you know I gotchu beau!
S. E. BY D.:
FitMomOver45 LetzgetPhysical: Ooh I love this
MetalHead:
Yolanda Holmes:
Dee Smith:
Danielle Legree: Do you prefer 613 by isee or ondibu?
Fantasia Taylor:
Alexis jaames: Are you willing to do make up videos?