How I Customise My Wigs: Bleaching Knots + Plucking Ft Isee Hair
- Posted on 20 September, 2021
- Color Lace Wig
- By Anonymous
#WigCustomisation #BleachingKnots #Plucking #WigReview #AliExpressHair #ISeeHair
For Collaborations & Inquires:
Email: [email protected]
Hey SUBBIES!
Hope y’all are doing good!
Here’s a simple Beginner Friendly Tutorial as to how I Customise my wigs from Start to Finish with this amazing hair from ISEE Hair.
If you’d like to purchase the hair, here is the direct link to the hair:
| ISEE HAIR Straight Lace Front Human Hair Wigs For Women 13X4 Lace Frontal Wig Long Malaysian Straight Lace Closure Wig
https://a.aliexpress.com/_vEK8jC
______________
My Socials
Let’s CONNECT :
Tiktok: https://vm.tiktok.com/ZS3dpPMB/
Facebook: https://www.facebook.com/profile.php?i...
YouTube: https://youtube.com/c/TumeloMotaung
Instagram: https://instagram.com/tu.melomotaung?i...
_____________
Music I used in this video: Snoh Alegra Cover done in isiXhosa by Khanyisa Jaceni
Link to the Cover: https://youtu.be/OYUOjN18zBY
Nkocy The Artist: Elaine Risky Remix
Link to the song: https://youtu.be/FXyyTiyBZ30
For Collaborations & Inquires:
Email: [email protected]
❤️❤️
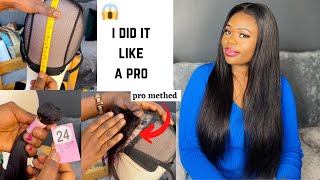
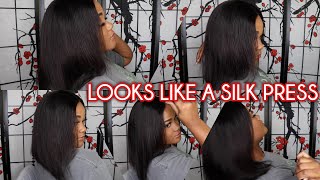
Hi guys welcome back to my channel, so in today's video i'll be showing you guys how to bleach the knots on your wig. So, as you guys can see, this head is from icy hair from the aliexpress store. So basically, this is the malaysian hair and, as you guys can see, it is straight and it is 24 inches. So in the box. Obviously it's the hair and um. They gave me these 3d eyelashes as well as this card. So basically, this card has all the information you need to know how to follow the company and also how to get your five dollar cash back when you review the hair and also it comes with this amazing wig cap. So, basically, now i'm going to show you as to how you can actually bleach the hair. So what you need is this uh? Basically, you need a bleach, so i'm using this new light bleach powder as well as this uh cream oxy cream peroxide. So i'm gon na need about obviously to mix everything up and if you'd like you can use gloves, i mean it is safer to use gloves than using your actual hands. So i'm just mixing everything up and i will need a specific consistency for this. So yeah keep watching, see ya. Okay, so once i've mixed everything up. Basically, i'm just pulling up my hair, as you guys can see. This is a 13x4 wig and yeah. It has three comes in front and one comb at the back. So basically, i'm just going to take this wig and put it on my mannequin head and yeah we'll get through to the bleaching process. As you guys can see this lace, it's not giving you understand, like it's, not doing what it's supposed to do. It'S not you know, so, basically, i'm just going to bleach it and i'm just going to put the bleach all over the lace and make sure the pressure that you put on the lace. It'S it's not as harsh, because you don't want this bleach to transfer right through to the hair, so you put it as lightly as possible. Yes, once i've put all the bleach all over, i'm just gon na, let it sit roughly. You can wait 30 or rather 20 to 30 minutes, depending on how you want your lace to be bleached, so i'm just going to wait for 30 minutes. Okay, so once the 30 minutes is done basically, as you guys can see, i'm wearing gloves in this process because ciao i got acrylics on so my nails, my nails, that's all i can say, but i'm just going to rinse it off as you guys can see. I'M using hot water, but it's actually according to preference, you can use hot, you can use cold. Also, warm water is fine, but i'm just gon na rinse that off and then going in with my shampoo, i'm just gon na shampoo all over the lace and just make sure i clean it as much as i can, because we don't want the excess bleach to Bleach, the hair, you see me: okay, no, wait. Do you see that lace? Do you see the knots? Do you see how bleached it is? Okay, not really, but it is um bleached and i like it this way and as you guys can see, it did not transfer right through to my actual wig, but just on the knot. Only so that's what we were going for. So basically, this process that i'm going to do now is that i'm just going to um brush the hair and then i'm going to go right straight into the plucking process. Tell you this wig already came in pre-plugged, that is okay, but i'm just gon na plug. It a little bit more because i want it to look as natural as possible, so here what i'm doing is that i'm just letting go of the baby hairs, so i'm just going to twist them up so that i don't plug that because it was already pre-pragged. So now i'm just going to pluck the rest of my wig. So, as you guys can see it's it's just self-explanatory, so i don't necessarily have to explain this process, so you do not pull um as harsh as you can, or rather you do not pull as harsh, because you don't want to mess up your lace guys because Once you pull as hard, it's gon na you're gon na tear up the lace, and you don't want that. So it's just slightly pulling as i'm plugging i'm basically brushing the hair off. As you guys can see, this is the excess hair. This is all the shading from the plug-in process, so you don't necessarily have to worry about that because in mind you're pulling the hair off no okay. So now, once i was done with that, i just hair dried, my hair, because it was a little wet. Look at that guys. Look at that like what do you mean says like? What do you mean? Do you get it like? So yeah guys hope you guys did enjoy that. Please do not forget to like comment and subscribe. Also, please stay tuned for my next video because i will be installing this hair, but thank you so so much for watching see in my next one

Comments
Priscilla Kubu: I love how sweet, short & informative this was Mama♥️. The knots came out so perfectly !!
Amy Thorinda: Love your content girl❤️ love how this came out!!
Pako Sesotlo: It looks so perfect
Prudeee: You just made me to want to buy a new wig ❤️
Naledi Swaratlhe: I love this!! Where did you buy the wig stand?
KLMN: This length honey!!
Beejou.: Love your content
Beejou.: