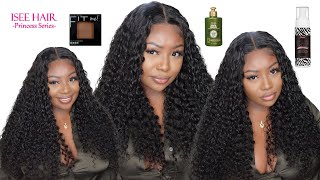
Curly Hair Wig Install|| Ft. Isee Hair|
- Posted on 05 December, 2020
- Color Lace Wig
- By Anonymous
Hey guys welcome back to another video!! I am back with another wig install. This time with ISEE hair company. I hope you like this install
Don’t forget to like, comment, and subscribe
✨Hair Details ✨
Length: 26 inch
Density: 150
Frontal: 13x6
Direct Link: https://m.aliexpress.com/item/33010049...?
Social media
Instagram: Ameelamber_
Snapchat: Shoelover3487
Keywords: ISEE, ISEE hair, ISEE hair review, hair, review, wig, wig install, ISEE wig, ISEE wig install, curly wig, long wig, curly ISEE, black, black hair.
#iseehair #aliexpress #iseewig
Hey guys, it's me mia welcome back to my youtube channel, as you guys might decided today. I am going to be showing you guys how i installed this icy hair, wig um, so yeah, if you're interested on how i did this install make sure you guys stay tuned to this video. I forget, most importantly, to subscribe to my youtube channel before you start watching, and that way you can stay updated for all the videos i have coming so subscribe subscribe before. You start watching, and i hope you guys really enjoyed this video. I hope you enjoyed this install. I hope you like the hair and all that and all that stuff and everything about this here will be down below in the description box. So make sure you check that out, but yeah hit that subscribe button and enjoy the video guys so jumping right into the video. I already did my ball cap off camera um, i didn't add any makeup to it at all. This is just what it looks like. It looks pretty good, it's blended into my skin, pretty good. I look bald as but um. Yeah sorry put this on off camera because i feel like i've done it enough time on camera, it's not going to be showing it. I'M pretty sure you already know how to do that, so we're just going to get right into the wig. So this is the hair. Let me back up so you can see this is the hair, so i have it on my mannequin and everything looks like this. This is from icy's hair. Let me show you guys the box, so it's from. I hope. I'M saying it right. I see icy's here, and so i got it off. Aliexpress alex first express. I will be leaving all the links, the direct links to where i got it from in the description box, so make sure you check the description box description box down below um. This is the hair completely dried and i brushed it out a little bit um. But i'm going to wet it and show you guys what it looks like afterwards, but let's just get it onto my head and get started applying it now. Okay, so this is the hair. This is the lace, so the lace looks like i've already parted it down. The middle um, so yeah, just gon na put it on. Oh, my god. I hope this thing is not too small right here. There we go. Okay, so really right here is good um. I need to add so i'm gon na be using the ruby, the ruby, kiss um i seen slayed by jordan. He uses this a lot and i found the color that matches me pretty good. So i'm going to be using this inside the lace, i'm going to need to apply that first on the lace okay, so i went ahead and applied the makeup. The makeup off-camera, i'm just going to spray it on some pretty spray and blow-dry it okay. So this is what it looks like with the um makeup on it. It'S very much tan, but now just gon na see where we need to put it. I'M just gon na clip my clip the um hair back, while you lay it secure down, because it's literally sliding everywhere i'm bad at cutting the air table such there. We go just after 20 minutes. Let me try. Okay, perfect! That'S good, like that. Now, the other side, i'm going to be using ghost bond glue to secure it already cleaned my primer with alcohol. So i already did that so now, i'm just going to make sure i know where i'm going to place it at before. I put it on we're going to start off with the so we're going to start off with the middle part of it. Okay, let that dry till it's clear and then do the next layer so i'll be back once i'm done with this part of the layers and then i'll come back, showing you putting it on okay. So i'm on my last side, i'm about to apply my last layer to this side and i said i'll come back, but i figured i'd just show you guys how i do it on the last side, then all of them, but let's apply my last layer. I'Ve been doing like two layers, because i really don't like to leave my wigs on for that long, because i like to take them off at night and then i'm gon na back one in the morning like with the gospel. So i figured. I would only do two layers anyways instead of three but yeah. Just that's what i've been doing plug figure just because i don't know, i'm not really good at um throwing baby hairs on wigs, so i didn't want to over. Pluck it just in case. I would. I just decided not to do wigs at all. So if i decided to opt out on the um edges, i would just leave it. So that's why i didn't really plug it. A lot. Some comb is nice and high. I need to wait for it to cool down. I really want one of those plug-in ones. I know i already said that, but i really do let's go down. Oh that's hot! Now i'm gon na take my elastic band and put this around here and let that sit for a minute, probably 15 minutes and then i'll come back well, no well yeah! I'M done letting this sit and then we'll cut the lace off. Okay, it's been 15 minutes with this band on my head is tight, so we're going to take it off um and then we're going to start cutting the lace. What it's looking like so far, we're going to cut it off now this i really have to pay attention to i've been trying to do the razor technique. Lately, um, i'm more! I like using scissors more. Sometimes it's just easier to me. Well, it's just a razor yeah. There is um. So here we go. I'M going to be looking at my mirror because i got ta focus. I got ta. Do this right? No, we went a little too far back bring it back down there. We go i'll fix. I kind of messed up right here, one too far back, but when you fix that no big deal see like right here. Let me show you what i'm talking about right here: kind of got to go back and fix that pair, but it's okay, i'm going to stop cutting um from that beginning and make another line right here to start off with okay. So we got this part off and i'm going to go in right here with my scissors and i'm going to use my scissors for the rest of it just because it's hard for me to angle my hand that way. Okay, so i got the lace all cut out and everything so now we're just going to style it um, i'm just going to be using some lottie body mousse the focus lottie body moves, i'm going to be using this and just a spray rattle with water and Aloe vera gel and put that through my hair, because i want to show you guys what it looks like wet and then i'm going to fix this middle part with some high. This is called high beams, intense, temporary spray on hair, color and brown black. I didn't want to get super blood because wigs don't really be that black. So i got brown black and i'm going to show you guys how to do that. So i'm just going to take my right tilt. Comb put it in between my part and then just spray it. So let me show you, let me zoom in sorry, okay, so just like this okay, just to define the part just like that. Okay, he says, make sure you don't get it on the lace, because then it's going to be hard to get off. So just like that - and it just - i guess, defines the part more because, as you see, like my part, looked a little holy in the middle, so it just gives it that straight nice defined look which i think it did really good at split in half one Thing i love about this wig is how deep the parting is. It'S not like a short part and it's actually a 13x6 and some wigs i'd be feeling like don't really be 13x6, because the parts looking shorter, but this week actually looks like a good 13x6. So i like that, go in with my mousse okay, so this is what it looks like wet versus dry. I like both of them. I, like the wet, i think more than the dry, but i don't know i like them both ways. I like it dry and i, like it, um wear it so yeah. I would wear both out the um. If you like, bigger hair, i would go with the dry and it's probably going to get bigger once it dries completely me all right. So this is it all nice and wet i'm going to take the band off now and wow, getting very much scalp scalp scalp! Okay, so this is how it looks guys. I'M not gon na do any baby hairs just because, like i said, i'm not good at them um. I don't know why. I decided to do something okay, but this is what it looks like anyways. I hope you guys really enjoyed this tutorial, i'm sorry again. If it wasn't the best to show you guys me trying out the icy hair, i saw somebody else use this same exact hair and i just thought it was so beautiful and so pretty so i ordered it, and i wanted to show you guys me installing it. I hope you guys like the hair. This is the hair once again yeah. Thank you guys so much for watching hope. You guys really really enjoyed this video. Do not forget to like and comment your thoughts. Once again, all the information on this wig will be down below in the description box, so make sure you check that out and most importantly, do not forget to subscribe, subscribe to my youtube channel and join the channel and stay tuned for all the content that i Have coming for you guys and thank you so much for watching, and i will see you all in the next video so bye. You
Comments
Luxxe Lexx: Yass my wig is coming next week from isee and I’ve been watching and takin slayed by Jordan tips and girl you got this wig laid
Keisha Wilson: So interesting I love the look alot
Kea TV:
Erabadu village: Wow ..nice video ..come again friend ..my friend god bless ...