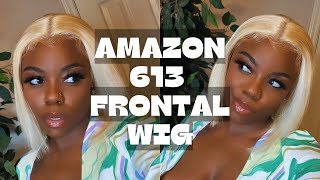
Ash Blonde Hair On Dark Skin + Wig Styling | Toning 613 Hair
- Posted on 29 September, 2018
- Color Lace Wig
- By Anonymous
I finally did it yall ! I went blonde !!!!! I've been watching to do this for a while but i wasnt sure if it was going to look right or if i was even gonna like it BUT i LOVE it !
Hope you like this video!
Hair Used
https://aliqueen.aliexpress.com/store/...
Products Used :
Wella T10 Toner (x4)
Wella T35 Toner (x4)
10 Developer
20 Developer
Shimmer Lights (Purple) Shampoo
Hair oil
Lotta Body Setting Foam
Wig head
Connect with me
[email protected] (Serious Business Only )
https://www.instagram.com/princess.kaa...
https://www.facebook.com/princesskaae/...
https://www.twitter.com/_princesskaae
Snapchat : Kingkaae
-------------------------------------------------------------------------
Affiliate / Discount Codes:
MORPHE BRUSHES
https://www.morphebrushes.com/
Use code "PRINCESS" for $$ off
10% off Muddy Body Products
https://www.muddybody.com/Detox-Clay-M...
Use Code "PRINCESSKAAE"
10% off Sigma products ----
http://sigma-beauty.7eer.net/c/348370/...
Use code "LoveKae"
10% off Lashed Out Lashes
https://www.lashedouteyelashes.com/
Use Code : "LashLove20"
10% off Powder Room D Wigs - (My Pink Wig, colorful wigs )
Use Code : LoveKae
------------------------------------------------------------------------------------------------
My Contour & Highlight Rountine:
My Full Eyebrow Tutorial:
A little Bit About Me :
Age : 23
Camera : Canon Rebel T6i
Editing Software : iMovie
What I Edit My pictures W/ : PS Epress , VSCO , Facetune
If you'd like to send me anything
P.O Box :
PRINCESS KAAE
601-c EAST PALOMAR ST. PMB #134
CHULA VISTA CA 91911
Xoxo,
Thanks for Watching
Okay, guys so, let's get into this, so I'm gon na be using the Wella toners today, I'm using t35 and then I'm using a t10 it's build, but that is t10. I promise you so I'm going to be using the little Bowl in the mixer and then I'm going to be using the purple shampoo to like get any like purple out of the hair. Once it's like toned and then I'm gon na be using a 10 developer and then a 20 developer for the tolerance so for this hair. Today I am using my favorite hair company. This is Ali Queens hair. This is my first time using their 613 hair, though so I have two bundles of 24 in a 20 to 20 and then a 18 inch closure, so the hair is actually really soft. Like I said this is my first time using 6:13 hair at all. Usually I just work from like black and then lighten it, so I'm excited to actually try this out. This is my first time ever toning hair or, like anything, I dyed it. I'Ve dyed hair before, but this is my first time like going lighter from a blonde color so now getting into toning it. So I'm starting off with the closure, I'm abusing that t35 for the roots in the night time developer. So I'm using two parts developer and then a one part toner and you just want to add those two together and then mix them until you get kind of like a jelly consistency. So that is what it should look like thick and gross like that. That'S a Pacific like this is my first time actually toning roots, so I was lowkey confused when I first started I was just like: am I not supposed to get it on the roots, and then I figured like I mean on the lace and then I figured Uh like you're supposed to so excuse me if it's like not the best like angle or whatever, and my big ol arm is in the way but yeah. I was like confused trying to figure out this out, but later on the video it gets like a better angles and stuff so yeah, but yeah so you're, just gon na go through part everywhere and saturate the roots. You don't want to go too far down, but you know their roots, so you just want to go. Maybe like a couple inches not too far and just repeat the steps of like parting it going through it again, just making sure everything is covered. I end up going down the middle part too, so like parting, it like horizontal, does that make sense our vertical part of your vertical it's just because I figured I would have a middle part and that just makes sense to make sure that it's accentuated that way, As well so and now that we have the roots toned, we are gon na go and Tony bottom of the hair. I'M using that t-ten toner get the same thing, two parts developer and one part toner, so you're just going to saturate that and yeah. This part is pretty self-explanatory, so I'm just gon na be saturating parting. It making sure that it is all over. I use a bigger brush just to make sure that I'm getting all the parts, but that is what it looks like, so I left it on for like 10 minutes, you can definitely see the difference of the hair at once. It'S toned. It actually turns into like an ash color, and then we are gon na. Do the same exact steps on the bundles as well, so you're gon na start to notice that the roots start turning like a pink color. So that is what we have the purple shimmer lights shampoo for so that is gon na get rid of any of that like brassy or like purple color in the hair and is gon na kind of just like wash it out for you. So don't worry about. If it's looking like, oh my gosh, this is wrong because that's what its gon na look like, so I'm gon na repeat those same steps with all of the bundles. I'M actually going bundle by bundles. So I'm doing a bundle washing out doing another bundle, washing it out and letting them like air dry. While I do the other ones. So that's what I'm gon na do and then I'm going to be making a wig. I do not film the part of me making a wig, but if you would like to see that, let me know down in the comments, but I am going to wash blow dry it and make the wig and I'll be back. So this is what the wig looks like once it is toned, and you can see that like pinkish color at the top came out, so I'm just going to be blow-drying. It cuz. It was still a little bit wet like the root part, was a little bit wet while I was making the wig, so I'm just making sure to dry everything, and now I'm gon na be taking up my lot of body like foam mousse. I like to work with this like this, has changed my life working with mooses before it. Sometimes you know the hairs, don't always want to lay down, so I'm just doing it this part to make sure it's laying down flat. While I work and like style it because I hate having all those flyaways and also too I wanted to like - establish the middle part of the hair, while I'm working on it, so I'm going to be putting in just some like body wave type curls. But before I do the curls, I am going to be straining the hair at the like roots, just to make sure it's flat and not poofy, because I only just blow-dried it. So I just I'm running through straightener through the hair. I'Ve already sprayed some like heat protectant on it. You can see it right there in the camera, it's the dare to have hair, dare care, and is there a heat protectant, so I sprayed that over it and I'm just running the straightener through it a couple of times just to just to tame it a little Bit more and then I'm gon na go ahead and put some body wave curls in it. If you guys want to see like a more in depth video about my curls and like how I curl them and what I use, then you can go ahead and check out my video. I do like a whole video on, but um yeah. This part is kind of like self-explanatory, I'm just curling the hair, but honestly, just after, like toning, the hair, washing it making the wig and everything like the hair still feels really nice, especially once I put the conditioner on it. While I was washing it, it was just so nice and soft again and it's really thick hair, but the way came out so nice guys, I'm kind of proud of myself, because it's my first time ever toning hair, I usually just dye it so yeah. So now I'm going to just style it a little bit more before I actually put it on my head, so I'm just gon na be adding some oil in my hair just to flatten it, and I kind of like when the hair has kind of like a Curl around the face, if that makes sense, so I'm just styling it a little bit more and I'm going to like mold it as well, so now to put this babel, my hair literally, I was like. I do not know how this is gon na look at me. I was just like whatever, but also you can get this wig mannequin head from Amazon I'll put the link down below so I use like blonde sewing thread to do it because I thought the black would look a little bit tacky but um. So now I'm going to be cutting off that, like you, part that comes in the cap, I'll link the cap that I use to down below everything I got on Amazon but I'll use. It sorry guys I'm struggling to try to cut this on camera, but I wanted to at least show some important parts and not just do everything off camera. You know, so I'm trying to include everything that I can. Okay. So that's what it looks like I mean. I'M pretty impressed no line like that lace looks really good. I'M not gon na lie, I'm and then I like to take the adjustable straps and tie them and kind of like a double knot. As you can tell, I got a little peanut head, so my head is kind of small and so that just helps me secured a little bit better and I don't have to add the elastic band, can time to put this baby on and bam. So the lace was looking a little wonky, not too bad, but I'm just going to be adding my black radiance contour, I'm using that contour color just to darken it up a little bit and make it match to my skin tone, just a little bit better. So but other than that, like the lace, looks really good, and then I noticed that my part was kind of crooked, so I'm just gon na be like prepping the hair a little bit more. Just you know like once, you put the wig on you have to fix certain things. So that's what I'm doing here but honestly, like I'm obsessed with this color, I was kind of iffy at first cuz. I was like I just don't know how this color is. Gon na look, like you guys know like I always have dark colors on it like black and then like whenever I do wear a light color, it's usually just for a day and then I'm over it, but I really really love this color. I think it looks really good my mom, like oh my gosh, I love it. It looks so good on you, so I'll have this for a while, but yeah. I hope you guys enjoyed this video. Let me know if you guys want to see more videos like this. I'M learning it's a learning experience. Hopefully the next one will be way better, but yeah. You guys enjoyed this video, can't wait to see you guys next time and thanks for watching bye, guys love. You, oh don't forget, to subscribe.

Comments
Gretel: love how you went straight to the point, we stan
Delaya Briscoe: I think you did great for your first time. The color looks good on you.
JoAnna Johnson: You did a bomb job on this!!!! It looks great!!!!!!!♥
YaVonya Hopkins: The color looks great on our skin tones! You did great! And please make that video on how you made the wig
esther o: Woah why doesn’t this video have more views? Great tutorial and you look awesome
Daisy: it looks so good on you !
Simply Crystal: Get it Princess !!! Yay!!! Looks great on you!!!
raindropsofgrace: YOU ARE GORG! love how the color turned out
ShiSha Rainbow: Thank you for this video because I'm doing tutorials myself for wigmaking and may you could find them usefull as well
Ms. T Angelique: Giving us that storm realness. I love it.
Pacra Foster: Love the video!what concealer and foundation are you wearing it looks flawless
Alison Loren: Soo pretty ✨
ALEXAMOM Bravo: I love it it looks good on you. I was trying to go for a cour like this but mine is still pretty orange need to bleach again and cour again.
EMMA J: You are so beautiful! I usually don’t comment about stuff like that but wow you’re gorg! I low key don’t like the color though just for me if I had to be honest I was going to try that color but I think ima go with black this time.
Sandra Kumi: Yaaassssss you did that
Michelle Moseley: OMG That Wig Thou♥️
Just Joia: Def did a decent job.
Its Hermajesxy: LOVE THE COLOR YOU ROCKING IT NOT A FAN OF THE HAIR
Nailz by Ray Ray: Talent.
Mabee: It still looks a little purple, u need a clarifying shampoo to get rid of the hue