1Month Update Touch Up And Restyle On A Curly Lace Wig|Julia Hair
- Posted on 07 December, 2019
- Fake Scalp Wig
- By Anonymous
No.1 ___________ ★ JULIA HAIR ★ ____________ No.1
use cold "ytb15" get 15% off
same hair in the video http://bit.ly/2DVZ621
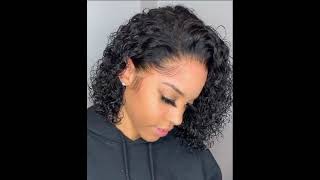
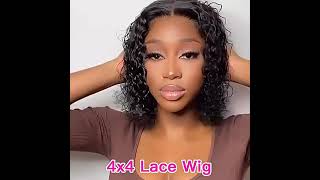
hair detail: curly wig in 150% density in 24 in with 13*4 big lace frontal
Many girls like Brazilian curly wig with 13*4 lace frontal http://bit.ly/2sUgLVx
Sex body wave wig with 13*4 13*6 lace frontal http://bit.ly/2OYoPNr
Top-selling wig in our store http://bit.ly/2PkpHeu
Affordable hot selling curly hair http://bit.ly/2qs2XAE
over 12k sold Brazilian straight hair http://bit.ly/2YojfXS
Order over $89 ,$15 off WT15
Order over $159 ,$35 off WT35
Order over $199 ,$50 off WT50
Julia hair official website https://www.juliahair.com http://bit.ly/2Lwn3B9
New arrive 13*4 13*6 lace frontal fake scalp wig http://bit.ly/2YnrK5o
new arrival hair &wig http://bit.ly/2OW2LDi
transparent lace frontal & closure http://bit.ly/2Lx4ZXs
AliexpressJuliaHairstore ➡http://bit.ly/2Rspk4c
Subscribe #JuliaHair monthly giveaway on YouTube: https://goo.gl/6z9tvz
Follow IG @juliahair_no1: https://www.instagram.com/juliahair_no...
Welcome to IAmBeautifulHustler Channel
Be sure to SUBSCRIBE & TURN ON YOUR ALERTS
CONNECT WITH ME✨
Personal IG: Iambeautifulhustler
Business Instagram:_Beautifulhustler & @thebeautifulhustlerbrand
Twitter:_Beautifulhustl
YouTube: IAmBeautifulHustlerTV
Hey beauties and welcome back to Anam beautiful hustle TV today I'll be doing something. I'Ve never really done on my channel before, and this will be a touch up and restyle video for you now. This is also a one-month update. Video and this hair is from Julia hair. Now, if you seen the installation video on my channel, then you know this was a side part installed with the baby hairs and everything like that and if you haven't just go ahead and check that video out it was kind of recently posted but um. She had this install in for a while now, so I'm gon na go ahead and show you how I do touch-ups on my lace, install mins and get into the restyling of this hair. So it will go from a side part to a center part lacing installation with you know, baby hairs, of course, so because her hair is short - and it's not long enough to break down on that's why you guys seem that little throwback there but she's getting ready To take this out anyway, and we just wanted to do like a quick little touch-up, so I decided to show you guys what I do now for starters, I'm gon na start by re, laying in the back of the wig, so I just took some 99 % Alcohol and a little cloth and just claimed the back area of the neck all around and I'm just gon na apply at least two layers of their boat whole act of glue. So I can take that wig. Well, that's actually the boat hoe extreme cream, but um. So I can, you know, test that weak back down in the back, but I didn't want to do the whole three to five layers thing because, as I mentioned, she will be taking it out. So it was just like a quick little retouch, but um once this glue starts to turn mostly clear, I'm just gon na go ahead and begin to pull that lace down into that glue, especially with the back like you. Don'T have to really really wait honestly for it to turn completely completely clear, but as long it is you know long as it is tacky just go ahead and you know lay that glue down. But if this is a fresh installment and a person is expecting to wear for a while, and I highly recommend using three to five layers and do let that glue a turn completely clear, but because it's just like okay, this is a quick fix. Um. I just you know let the glue get tacky and apply the week now. This is what the hair looks like and she does not comb or brush her hair at all. So um it's not as bad as I thought it would be, especially for curly hair, because you know curly hair is a lot of maintenance and if you don't keep up with it, it can get tangled Wow, nappy and matte it. But because this curly wig is good quality, even though it looks like it may be a little tangle honestly guys when I applied water and more later on in this video and actually brush the wig out, you will see I didn't really get any tangling nor shedding And you will see that later on in this tutorial, like this week, was really like a good quality wig, and I have no complaints about this week whatsoever now, even though she had this wig on for a while. It really wasn't much of the lace lifting, but I did just go in with that alcohol and just lick it up a little bit in certain areas. Just so I can we stick it down. You kind of still want to try to clean off the old glue, and you know if especially there's any you know residue from like cotton or anything like that. You just you do want to clean that up and not just you know, just slide glue underneath the little lifting cracks and take it back down like you still wanted to look like a nice neat and clean install. So that's why I did go in with that alcohol and clean those areas. I failed. There turn black or look at you know just not clean and fresh, but you know just apply your layers right underneath there and just use that tail comb to tech. That area you know those areas down and I'm also coming out the bay Harris, because the placement of the baby hairs would be slightly different because you know she's switching over to a middle part. So that's why I did just go ahead and comb. Those baby hairs out and just you know, clean their hairline off and right now, I'm not really trying to lift a lace, but I did see like some dirt and stuff on the front of the lace. So I did just go in with that alcohol and just gently up, you know brush off and clean it, but because this glue sticks so good um. It really didn't lift as much as I thought it would, with that alcohol being there 9 %, but at the same time I didn't really like soak it and try to remove it. So that's probably another reason why I didn't lift as much, but I'm just gon na focus on tucking down this corner over here and once I get everything tacked down. Once again, I did my like hair steps a little bit out of order, I'm with this video, but the results still came out good, but once I get everything you know tack down once again, um the next thing I'm going to do is start by. You know the next I'm going to do issues part the hair down the center and I'm just gon na comb. All those baby hairs out once again because, as I mentioned once, the part changed, the placement of the baby hairs will change as well, and now I'm going to comb out the area where their part is, and I'm going to part this way down the center. And I'm going to show you exactly what I do if you're gon na do a part change like how to get it back flat and smooth, and everything like that once again, so once I get the part where it is, I'm gon na apply that wax. Stick at the top of the parting area, and I also kind of went a little bit in between on the other side. Like I spread it, the part you know the area where you know it was flipped over to the other side. I split it that part into two and I apply the wax in between those areas on this side to Jesus specifically because it was like shaped and molded to the other side, and you really want to get like that part out. That was there and just get everything smooth and even on both sides of the part. So that's what I'm doing right now and I just took a little bit of water to just soften up the hair a little bit. So it's easier to, like you know, spread apart, but don't get the water on the roots, because you need those roots to be dry to hot comb. So I'm just taking a comb not going all the way down, just down at least about an inch and a half just so you get those roots like a really really really pressed out. So once I get that side, nice and flat, as you can see like that, hump look it's going away. I would do the same thing to the other side as well, and I would just you know repeat this step for a little bit until I feel like you know, everything is flat enough and smooth enough to proceed on to the next step. Now I'm just gon na you know, I don't you know, I'm a perfectionist guys. I always mentioned I like to make sure, like my part, is straight straight straight so now that I got that part where I wanted to be I'm just going to continue to hot comb, those roots out combing. You know how come in the hairline and everything like that, because I am gon na get everything nice and smooth before I begin to swoop baby hairs once again and also because when I did that side part, I did not hot comb. The roots of you know of the other side, only the area where my parting area was so. I do want to make sure I get all of that. You know nice and sleek and yeah that's pretty much. What I'm going to be doing for a while until I get into actually doing the baby hairs? Okay! So now that that's all situation are situated, I'm gon na go ahead and - and you know part of the section for my baby hair placement once again, um some of the hair should be sure already, but it might be a few long pieces in between. So I'm just gon na go back in and cut those down really short, as I always mention, and just using it on their all-in-one gel. I'M just gon na go ahead and sweep up those baby hairs and what I'm going to this side. I would do the same thing to the other side, of course, and just you know, as far as the baby hair placement, I will do a baby here across the center and you know just go with the flow of the pattern of you know where the baby Hair should fall once you do that center part baby here, but, as I always mentioned, the best thing to do is, after you swoop the baby hair like after each baby, hair school just go ahead and blow-dry it that way, it's molded to where you want it To be - and you know you know, you don't mess it up or anything like that doing other things, so I'm just gon na go behind each baby, hair, soup and blow-dry that and I do blow-dry that on warm heat, if you guys were wondering, I always use Warm heat for everything pretty much, and I really have no choice to be honest because my blow-dryer is like stuck on heat, so it's just like at the end of the day. It worked out best for me because I do everything on heat anyway, so yeah just blow dry their own. You know warm heat and that'll help it dry faster, and I just like to slick the baby hairs into the rest of the wig. That way, everything just blends and smooth looks so smooth and neat, and you know like non separated and I'm just gon na go ahead and do the same thing to this side. But with this side um, I didn't really have to cut more hair like that. To do the baby hairs because it was like perfect oneness, and so I just you know, went in and just started swooping the baby hairs. That was, you know, already cut short and then just like it just fell into the right place. Where I needed to just worked out perfectly for me, but um once I get all of those baby hair souped, I will you know blow dried them of course, and I still will have to like you know, get this hair situated as far as detangling, which it Wasn'T even tangled it just needed some moisture to you know brush, you know, bring the curls back to life and everything like that, so yeah and just to piggyback on what I said earlier. I did do things a little bit out of order, but you guys can try doing things this way too and see if it works best for you, as you can see, I swooped the baby hairs first and then I sprayed the bed head and now I'm tying It with that elastic band to like secure the lace so um. I actually did like this method as well. It wasn't like an intentional thing. I was trying to do. It was just like I did things out of order, but it still came out like perfect, so um. I think I'm gon na do some new tutorials trying that way out like doing the baby hairs and everything first and then I'm spraying it and everything like that and we're gon na see. You know how that comes out, but in this video it didn't work out for me, but now that I have that elastic on now, I'm just gon na go ahead and I'm just going to soak this hair with that water. There'S nothing in this container, but just water, and that's because I will go in with mousse and define the curls and brush everything out. But right now, like I mentioned, I'm just going to soak their hair up and I'm going to just get like a wide wig brush and begin to brush the curls out and, like I mentioned when I tell you guys, you will see here in this clip like It really was not tangled at all, and even when I put the brush to the camera, we'll see it was literally little to no shedding like barely anything, and I mean anything on that brush. I kid you not like. I was so surprised myself that it was nothing coming out in the brush like that, because most of the time curly hair sheds like crazy and I'm gon na show you again after you know, I continue to brush his hair and I reach the other side like How it was really like no hair on that brush like I, was just really really amazed and yeah guys just disregard the little screaming yard in the back, like my son, is on the phone on YouTube and he just you know, go crazy. You know how three-year-olds can be, but anywho uh-huh, I'm just going to continue to just wet and brush this out, and then I will go in with that mousse and define those curls and just you know, really get the hair saturated with that mousse as well, and That will keep that tight. Look for your curly hair! That way it can be dry, but it would still have that wet type of look. So I'm gon na just put that in a row be smooth all over the top all over the hair period in general, and just you know, brush everything in and smooth everything into. You know the wig and get those curls popping popping some more and I'm just pumping pumping pumping pumping pumping pumping pumping pumping pumping pumping that moves on it. Get is so tiring guys, like my arm muscles, be like tired, but I'm just rubbing it through that hair, and I will go away with that brush and you know brush it all in but make sure you do get the ends of the hair. That'S very important, like you, don't want the top to be all define and then the bottom is just like frizzy still so yeah just brush everything on and - and you should be good. So now it's time for me to remove that elastic and um. Like I said it's not that actually worked out for me. Well and all I do is go back in with my comb and just you know, smooth anything. I feel like that out of place we're removing the band, but, as you can see, these curls are now popping from that mousse. So now I'm just going to concealed up their part, and you know black spray it into the finishing touches, and you guys just let me know what you think about this touch-up video down in the comments. So, thank you guys for tuning in to iron, beautiful and TV, and I will see you guys on the next next video stay tuned.


Comments
Ms Pretty Hustler: Omg that bold hold lasted for a month? That’s amazing! Great video as always
t dagbo: That glue stayed in for over a month?!?! Wow!!!
Anttanay: You do a amazing job
Ayuana May: Thank you for all your videos ❤️
YaGirl Malasia: What did you spray on the edges before wrapping them?
Jj Francis: Great job. She is gorgeous...
full figure beauty: I love your work
Shandell kute: Mi nah lie mi love this curly hair ❤
_Vanntastic: Looks like it’s her real hair. Bomb job.
Milani Carter: Beautiful ! What Length Was This ?
Shandell kute: Nice touch up on a nice chocolate skin gurl❤
Ronisha Gardner: It look so good but the way my scalp set up I be den ripped it off my head after a while
Yvonne Hunter: did you take it off or just add more glue her hair look dry !