How To: Detailed Ways To Wear A Wig For Beginners Ft Hairvivi
- Posted on 10 September, 2019
- Fake Scalp Wig
- By Anonymous
This video is reposted from Erin Ross.
▼▼▼Specials For Beginners▼▼▼
Save 10%! Code: BeginnerWig
►►Earn Extra $20 Cash Back►►
1-Min Put On & Go Challenge
1.HD Vid Within 1 Min*
2. Cut The Lace (Not Necessary)
3. Put The Wig On W/ No Glue*
4. Adjust To Fit & Laid*
5. Share On Instagram @HAIRVIVICOM Or Youtube With Hairvivi In Title
Wig in the video:
https://www.hairvivi.com/wigs/the-quee...
All 48 hours expedited shipping wigs:
https://www.hairvivi.com/pre-made-fake...
No cornrow & cap Needed!
No Stocking Cap&Fake scalp Needed!
No Plucking&bleaching Needed!
Elastic Band + Free Shipping
5.5” Lace Front Wigs: https://www.hairvivi.com/wigs.html/?re...
Hairvivi Official Website: https://www.hairvivi.com?ref=24
360 lace front wigs: https://www.hairvivi.com/wigs/360-lace...
Hair Length: 12 Inches
Hair Density: 150%
Cap Size: Large
Fake scalp color: Light Brown
Follow Hairvivi on Social Media:
Instagram: https://www.instagram.com/hairvivicom/...
YouTube: https://www.youtube.com/channel/UCWK7J...
Facebook: https://www.facebook.com/hairvivicom/
Black Bob Lace Front Wig Straight Indian Virgin Hair: https://www.hairvivi.com
Lace Wigshttps://www.hairvivi.com
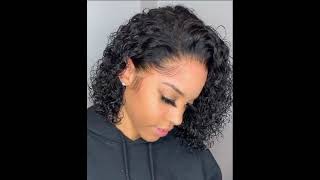
Hey guys, okay, so this is another hair BB review, as you guys can see. This is what the wig looks like straight out of the box. I have not altered this wig or anything like this there. This is exactly what you will get out of the box. It looks super super good, I would say they're getting so so good at these hair lines. It looks very realistic. Of course it comes with that fake scalp comes an adjustable cap and also that elastic band. Alright, so I'm just putting it on so you guys can see how versatile it is and how good it looks. Alright, hey, okay! So in this video it is gon na be a little bit more informative. Now I have kind of showed you guys Clips like in depth of the wig, I'm just going to be going over some questions or some things that are commonly asked and what people are really really confused about. Mostly my first time, wig wears okay or people who are looking into wearing wigs or some people who would even be wearing wigs for a while, and they just have some questions. Okay, so this is what the wig looks like like. I said, I've already did like the in-depth, so this is this is what it is, so this wig can be worn with a wig cap or without a wig cap. I always wear a wig cap just because my hair is so long and it's very hard to manage when I do not have on a wig cap, okay, but you definitely do not have to wear one okay because it comes with a built-in wig cap. Also this way it can be warned glueless or it can be worn with glue. Now I know a lot of people get pretty confused about that, because on a lot of tutorials people will say glueless, but they're still used in jail. Okay, so a way to actually not use any adhesive, I'm not even gon na use, got to be Jail. Okay, this elastic band is going to help you a lot. If you hear squeaking, that's my chair, so you know it's, this elastic elastic band. It'S going to help you a lot as you guys can see, it is made like a bra strap, so you can adjust it to your head shape. I absolutely love that I do not like the ones that are just a straight pant and you don't get to adjust okay, so it helps out a lot. So this elastic band is going to help you heavy glueless and also the adjustable cap. I think a lot of times we don't pay a lot attention to the adjustable cap. We just think of it as just being there. This cap is going to really hold your wig snug um, like I said, a lot of people, don't even pay attention to it. So, as you guys can see almost every week, almost every week comes with these the adjustable cap. Alright, so if you want to make it glueless, you definitely want to move like your little Clippy thingies. You want to move them to the middle or you just want to move them closer until it fits really snug on your head. Okay, so I'm going to take them and I'm going to move them over all right. So I like to put mine like all the way in the middle, and this is just a great way to adjust it and, as you guys see, let me show you. This is what it looks like now. Okay, so it will make your wig fit even more snug, even with your elastic bands. Okay, so I'm going to go ahead and toss this on alright guys. So I do have the wig on now and, as you guys can see, everything is just laying down it's laying a pretty flat to say that I don't have any type of sorry any type of adhesive. That means um got to be spray or gel. Nor do I have actual glue on it. These type of wigs can be worn for every day. I wear a glue this week to work every day. I don't always like to put glue or got to be glue on my hair, and it's really really really hot. So all I do is, I have it every day, work with that's kind of similar to this one I just pop it on and I just go in his face all day. The key steps that you really have to remember is the a gesture cap. Okay, so you want to make sure your cap is suggested. Also, you want to make well adjacent to your head. Okay, I would suggest moving it further into the middle. Also, you want to make sure you have that elastic band pretty snug to fit into not too snug to where you get a headache, but very snug. Now a lot of people say people always take glueless, but they use glue our gel a lot of times that people will do that, and I do it to is because sometimes the ear tabs do flap. They are gon na lay flat, but they won't be as flat as they would be. If I added just a little bit of little a few drops of got to be, and then it would lay even like more flat alright. So that is the reason why a lot of people choose to kind of put just a little bit of adhesive and when people say glueless, it's true you're not using actual glue, because you know there's glue and then there's jail. Okay, so you know using actually glue. But you are holding down with jail, so yeah, but, like I said this week, you do not have to. You know, use anything to hold it down it. She is snug now, if you do want extra security, of course, of course, you can add just a little drop. A few drops of got to be - and I normally just add them here or like like on the side half way on the side, just a little bit of God to be on each side and then I'll be good to go. I don't always do it, but sometimes I do okay. So I'm going to be also showing you guys how I cut my lace, okay, which I've done a tutorial on this before, but I will show you guys again. So, let's get started so what I like to start out with I like to get like some clips. Okay, so I'm going to make sure my lace is pulled down to pretty much where I want it. So I make sure my lace is pull down to where I want it, and I just look at the way my actual hair line flows and also how it goes. Okay and also the hairline of the weave. So I just look at this and I see like where my ears are and, as I can see, the wing is coming a little bit over my ears. So what I do is all I do is just do it like that. I look at it and I start carving out a sheet of C shape, so I will start cutting like these okay, so it'll be just like like a curve, I will cut in a curve, but I do it little by little, just because you want to make Sure you don't cut off too much and I kind of like this sideburn side. Bang look! So I'm gon na cut off a little bit and a lot of times. I will take the wig off so that I can actually see what I'm doing um I'll, take it off and continue to put it back on. I would suggest for people first time wink wears just take the wig off and put it back on. So sometimes you will cut into the hairline okay. Now these weeks are not made exactly to fit your head, so sometimes you may have to cut into the hairline a lot of times you in order for it to fit, as you guys can see. Now it is perfect. Okay, and all I did was. I did a c-shape and now my ear is exposed, there's my ear right there and it looks good. So I just do the same thing on the other side and then I'm good to go so I have both sides already cut. I think I have look to cut is my actual hairline part, but I do want to say this first before I cut that part one enough. Don'T then I suggest is that you do not cut your legs off on a medic and hit okay. I always suggest people, for you know you guys to put it on your head, so you can see your head shape. You can see exactly where your ears are. It'S very very tricky on a mannequin head and I would rather you guys just put it on your head and context. Let'S take it off, so you can get the perfect cut when you cut on a mannequin, you don't always cut precise and sometimes you end up cutting too much. You cut you, you know you're like too far back. You cut your ear tabs too much and now that's legs gone and you can't really do too much about it. So that's something that I really do not recommend doing. I do recommend you, like, I said, just put it on your head and see how it is and go from there also um. I do also recommend, like cutting in a kind of zig zaggy type of motion, and try to follow your head shape kind of as much as possible, um and that's kind of like what I do. I try to make the lace like a little bit like jiggidy. Instead of putting it like straight across, that's just because when the lace is kind of jig it, it gives like this different effect alike on the skin. Okay - and I don't like the cut too close at all um, I like to leave a bit of lace on. I just don't like to cook like super super close on to my hairline. I know some people cook all of the lace off I just don't. I like to leave a little a little room. I just like the look of it. I don't know okay guys, so this is how the wig looks completely clueless. I don't have any glue or jail in the week as you guys can see alright guys. So all I did was kind of bump it like bump the week a little bit. I did into a whole lot, so this is what the wig looks like glueless, no adhesive at all, just elastic being in the adjustable strap. It looks really really nice and it looks super natural. This practically looks alike. My real hair, as you guys, can see it's got a lot of body and a lot of like flow to it, and I freaking love it okay. So the only thing with wearing your wig, like this you're not going to really be able to wear it up or back or anything because of a simple faith. Your ear tabs will be kind of like exposed, but that's what it looks like glueless, alright. So the wind kind of blows a little bit. I don't know your business might be out in the streets just a bit, but that is pretty much what it looks like now. What I like to do y'all is I like to go in, like I said, with a few dabs, I've got to be jail or you can use a spray either or it doesn't really matter. I prefer the jail, so I just go in with a little bit. You'Re in it doesn't take a lot and you don't have to use glue. Some people think that you have to use like hair glue. No, you absolutely don't have to use clothes alright guys. So here is the wig all kind of styled of what was already stashed right out of the box, but all I did was just go in and bump it a little bit, and this is what she looks like. So I showed you guys. Would it look like glueless now? This is what it looks like, what a little bit of got to be jail on there. Okay, remember that is not glue it. It is water-soluble, so you do not have to worry about it. You know scrubbing your edges or using alcohol or anything like that, and this is what this side looks like. I think this week looks super super super natural and I love it. It looks like pressed out like African American hair, like literally it looks like a my hair like when I would get like a perm, and I would get it like fluttered. Okay, I just think it looks really good. The hairline looks great, so I didn't touch the hairline or anything like that. This is just how it came alright, so just to give you guys a idea. So if you're not good at plucking or anything like that or you're like a first-time person - and you want something - that's quick and easy, then this is the week for you. So this is the parting space. You just go back pretty far, not to already come bleached in everything like that, so anyways guys. I hope you guys enjoyed this video slash tutorial. Let me know if you guys learn some things. Maybe you learn something that you didn't know about glueless and all that kinda stuff, like that, just let me before I go. I did want to mention that hair baby is doing this like $ 20 cash bag. Type of thing - and all you have to do - is kind of follow a few rules that they have and you can easily get $ 20 cash bag on your order. Okay, so some of the things - and I would have this listed down below - but you can make a one-minute HD video, alright, make sure you tag them in you know the video on Instagram or, if you share it to any other type of social media. Okay, also, you can put on your wig without any glue like in the video. You can show you putting on your wig without any glue showing how you can just put it on and go showing like the convenience of it. How quick and easy it is showing off the hairline and how good it looks. You know you can make a video like that and mention them and you can easily get $ 20 cash bag on your order. Okay, so, like I said, I would have that down below and yeah. I think that's pretty much it any questions. Comments concerns please also leave those down below and I'll see you on my next one.


Comments
whatwhat720: Excellent tutorial. Right to the point, without a lot of unnecessary talking! As a first timer, this video is just what I needed to see.
Doris Gullette: Excellent tutorial! Thank you!
Jennifer Anderson: Brilliant thanks
Renee Tandiswa Anderson: What was that product that you put on the hair before you used the hot press comb?