How To Create A Natural Hairline On Wigs!! Beginner Tricks No Bleach Ft Unice Hair
- Posted on 30 March, 2022
- Fake Scalp Wig
- By Anonymous
#unicewigs #waterwavewig #humanhairwig
✨Hello Beauties, if you’re new here welcome to my channel where I share tips I've learned while managing my alopecia universalis. Let's normalize hair loss together! ❤️✨
⬇️ FEEL FREE TO SKIP THRU⬇️
1:25 The Wig
3:40 Lace Tint
4:55 Goodie Bag
5:25 Plucking Tips
8:20 Results
10:08 Lay the Lace
13:54 Curls Poppin!
15:55 Finishing Touches
17:28 Conceal Knots
Within 30 Days NO Reason Free Return Only for My subscribers Place Order
●▬▬▬▬▬▬▬▬▬♛ #UNiceHair ♛ ▬▬▬▬▬▬▬▬▬ ●
I am wearing curly HD lace front wig in video: https://bit.ly/3NwKxUX
https://www.unice.com/ ➤HOT 50% OFF: https://bit.ly/3qIEC5K
Can Not Miss!!! Invisible HD lace Wigs available : https://bit.ly/3JTGvUq
hair information: 24inch curly HD lace front wig 13*4 150% density
TAX SEASON UP TO 55$ OFF Using code:myunice
AfterPay & Klarna & Quadpay & Sezzle PAY 4 Equal payment Within 6 weeks!
More Affordable V part wig available now: https://bit.ly/3Lh9i5Q
Zero Skill Throw and Go head band wig : https://bit.ly/3Du988r
Recommend human hair bundles with closure: https://bit.ly/3uG8ErI
Want To Save More??? Download “UNice” App on your phone➤
https://link.unice.com/appdownload-you...
Bargain Now! To Get FREE HAIR on “UNice” App➤
https://link.unice.com/bargain-ytb
Exclusive Price Hair ONLY for “UNice” App Users ➤
https://link.unice.com/exclusive-youtu...
Aliexpress UNice Hair Store ➤ https://s.click.aliexpress.com/e/_pvse...
Amazon UNice Hair Store ➤ https://amzn.to/2zxP2gm
Instagram @unicehair: https://www.instagram.com/unicehair/
YouTube @UNice: https://www.youtube.com/c/UniceHair
Facebook @UNiceMall: https://business.facebook.com/UNiceMal...
Want To Promote? Order Problem Contact: [email protected]
#unicehair #unicehdlace #unice
Other Products Used
▶ Lace Tint Color: Tan
https://truconnoisseursolutions.com/co...
▶Hot Comb
▶ Aunt Jackie's Curl LaLa
✨RELATED CONTENT✨
-THE MOST NATURAL WIG I'VE EVER TRIED!! HAIRVIVI REVIEW & INSTALL| ALOPECIA
-First EVER Closure Wig!! ZERO GLUE |Detailed LUVME Hair Review (From Start to Finish!!)
-My Alopecia Story
JOIN MY VANALI BABES ON INSTA & FB
https://www.instagram.com/vanali_co/?h...
https://www.facebook.com/vanali.co/?ei...
EMAIL QUESTIONS ANYTIME
Filming Equipment
ZV E10 Sony- https://amzn.to/3fjt4Qh
19inch Ring Light - https://amzn.to/2ZAsh9p
Music Credits
Music by Ryan Little - blessings. - https://thmatc.co/?l=80AD6139
Music by Mr. Chase - Walk on Water - https://thmatc.co/?l=7E08F583
Music by DJ GONZ - The B Cut (Instrumental) - https://thmatc.co/?l=DFE3BC86
Music by Beats by Egomi - High Road - https://thmatc.co/?l=A89692BB
Music by Damien Sebe - Clover - https://thmatc.co/?l=9BB6F9DD
** Any links used in connection with my videos may include small commissions to help support my channel.**
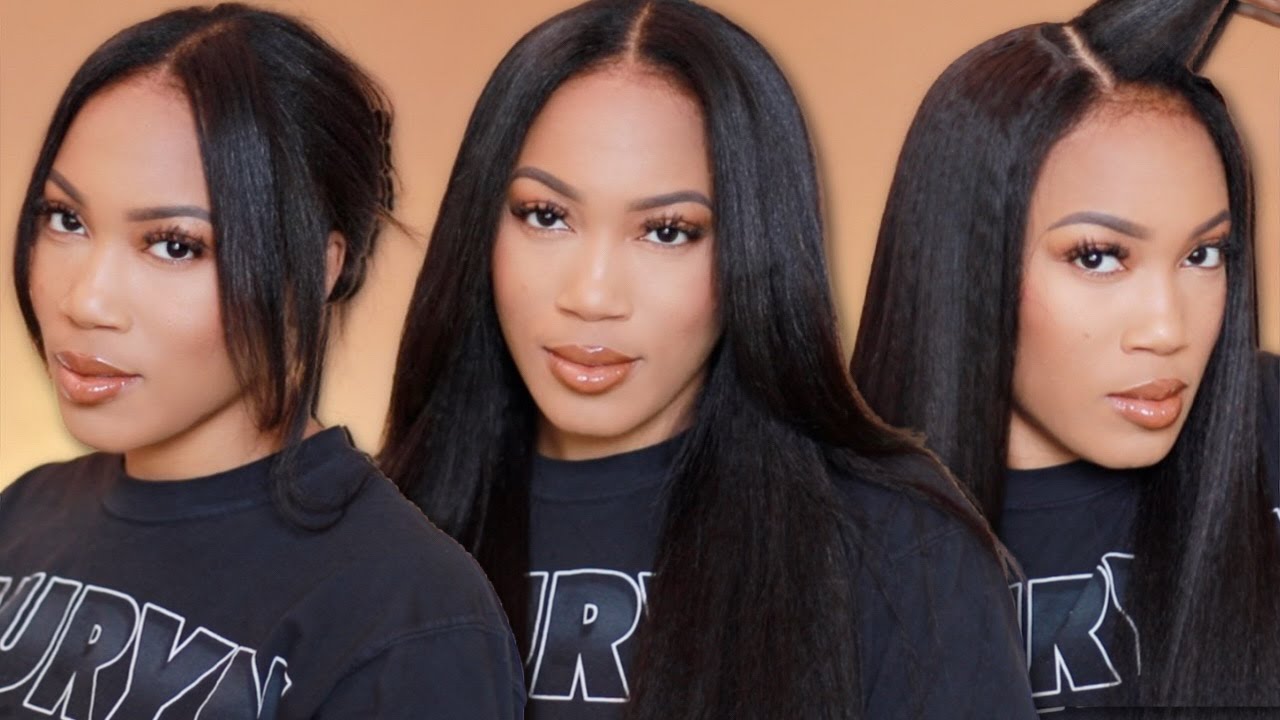
Here'S a little sneak peek of what's to come and the final look. So if you want to know how i got these results and how i got it to look more natural without any bleaching to cover these knots, then you definitely want to stay tuned. Hey loves! Welcome back to my channel today we are reviewing a gorgeous curly wig, but before we get started, i just want to let you guys know if there's a certain style or company, maybe even that you want me to review, then definitely let me know down below okay, Because i love hearing your feedback number one and two, i want to make sure that it's stuff that you guys want to see things you may want to know whatever it is questions or not drop it down below okay, so today's wig is coming from, i'm not Sure how to say it eunice are you nice, i've heard it both ways. So someone please tell me, which way it's supposed to be, but um the wig i already have on the mannequin head because kind of guessing. We need to do some work on her, so they actually already separated the baby hairs, which i think is pretty nice just so you can choose to use them or not, but either way it just gives you an idea of what you're working with it's a gorgeous 24 inches long very so it is a 13x4 lace construction. It doesn't have a middle comb which i love, because i don't use it anyway and you have the two on the sides and one in the back. If you choose to secure your wig that way, you can and then extra piece of lace, which i would definitely cut off before you even get started. Now, let's throw her on and see how she looks. First impressions, i'm in love with the length i mean if you're gon na go for it. A nice comfortable length for me is one: that's gon na sit where you want it to without having to fidget and move it so the length and weight on this is really nice. If you want to keep the hair in front stays right there, it's not going to be slipping off of your shoulder. When you move side to side, it's pretty perfect there. I will definitely debate on whether i'm going to use these baby hairs or not, but more than likely, i'm just going to go ahead and thin them out anyway, whether i use it i'll show you the length from the back and for the lace they are calling Her an hd, let me know what you think on this blend, how it's looking, because you know you guys, i can't really see as well as you can see in a little camera screen now this was a personal preference. Honestly, this hd lace was doing a pretty good job and was looking pretty melted against my skin. But i now just love taking that extra step to go in with this tan lace tint and make it even more realistic and give it that extra touch to blend. Even more on my skin tone, now, of course, there are a lot of other products that can do this or other options. I just happen to like this one, so, whatever you choose to use or if not at all, no worries, but with this particular one, it's very easy and you just blow dry it to set it and it's not going to transfer or rub off so now. For the powder i use the one by two face and it's in the color warm sand. I just go ahead and pack it onto the brush and lightly blend it in you. Don'T really want a bunch of transfer into the hair, so don't go crazy. You just want to get a nice, even layer to help conceal those knots without having to bleach that wig. Now, for this i love love, love that they give you a elastic band that has velcro, makes it way easier to apply without having to tie it, and then they also supplied a wig grip headband as well, which definitely comes in handy to give you that extra Security, if it feels a little too big and with this lace grid, you don't have to worry about covering up that band even came with a cute little necklace, definitely very charming packaging and, of course, a set of lashes. Now, if you're wondering why i have these two pieces of tissue when it comes to plucking the wig and getting that more natural gradient, look if you have something white underneath a white towel or paper towel that just helps you see what you're doing so much better. So this was just the closest thing i had to me. I probably wouldn't recommend you using tissue because it can tear very easily and you don't want to mess, but it did what it needed to do. So. You can see more clear how i'm plucking the the hair off the lace. So in the beginning part of this wig you could see it was a pretty good separation between the baby hair and the start of the wig. So if you start one section at a time in a downward motion, you can kind of see where you need to thin it out. Trust me, i'm not the best at plucking. Nor do i enjoy doing it. It'S a very uh, tricky thing. You don't want to go overboard. You don't want to end up with any balding spots, but just try to keep it moving work wherever it looks too thick and then start to part the hair back, and this was one side done and one side not. So you can already see the difference of the gradients and as well as how much hair came out of this wig, it was insane. But again, this is a personal preference. You don't have to do this, but for me when the wig doesn't have so much hair in the beginning and it's at least a little more gradient, then it's more realistic. Looking less wiggy, you know so again, just showing you how i take it in sections again downward motion and then once you feel pretty good with that section, go ahead and work your way back and you don't have to go very deep again. It'S all up to the look that you're going for, but i was pretty pretty pleased with the results and i feel like it really did, make a big difference now. The hot comb is also another way for you to see exactly what you're doing a little more clear and as well as flatten out the hair, because you don't want it to look like it's lifting or levitating over your head. You want it to lay flat and don't worry if at first, you feel like you're, not really doing anything, go ahead and pull the hair back. So you can see the whole picture and, as you can tell, i removed quite a lot of hair. If anything maybe got a little carried away in certain areas, but again that's what happens with plucking, so be careful. You'Ve been warned, but it's definitely something worth trying and getting better at because it can really transform your wigs. So, first things: first before we cut off this extra lace, we want to make sure it is sitting where it needs to so just go ahead and clip the hair back following the line of your ear to make sure everything is laying where it needs to, and Not rubbing or irritating you do now. Normally i don't go ahead and cut my lace all in one piece. I go ahead and section it out just to make it more manageable, but the more and more you do this, the less afraid you are of messing up. So i wouldn't exactly recommend to do this on your first one. Honestly, it's even better to cut the lace off. So if you have that mannequin head, we started with while it's on there, you can see a whole lot clearer and get a more precise cut. All the way around just make sure never ever ever cut in a straight line. It will look way too noticeable zigzag and imperfect is the key. That'S what you're looking for now that our excess is gone, go ahead and roll. It back make sure the area where you're laying down the lace is nice and clear. You can even go in with some rubbing alcohol, if you like, just to make sure you're getting the best hold possible and no oils or anything are getting in the way of your application. I'M going in with the lace in place mist. I generally use the foam a lot more than the spray, but this time i decided to go on with the spray, just add a couple of thin layers and then slightly dry it or set it if you will, with the blow dryer on a cool setting. This is just kind of giving us our our base. If you will now that we have a couple layers of a sticky base, i'm going ahead and making sure that the wig is going to sit exactly where i want it, because there's nothing worse than laying those layers underneath and then you roll that lace forward and Realize you were completely off so i like to set that base slightly back just in case and then once the wig is down perfect it and make sure the edges are saturated as well, because that's what's going to help you get the best result and an easy Way to make sure you can keep that lace exactly where you wanted. It is just taking out a couple of sections normally by the ear and maybe at the temple just to help you pull down those sections and make sure it's staying nice and flat. Now you can go ahead and apply pressure with the fingertips. You can also use a comb but honestly to get the very edge of your lace. What works best for me is rolling the finger back and forth and making sure that it's really pressed into that spray, because that's what's going to make your lace disappear even more and give you the skin melt that you're looking for. I could have gone with the no baby hair option, but i am keeping these pieces at the temple for later to go ahead and cut into some very slim baby hair. You know nothing too crazy, but again, that's a personal preference. So if you're not going to be using it, you can go ahead and push it back if you like, or just use it for the elastic band in order to get that melt and then remove it later. But as you see, i went in with the foam. Just to give it an extra little melt before putting on that band and again this band is the perfect width and so comfortable. Now the best time to go ahead and install your wig is, while you have on this elastic band cause it's gon na. Keep you from lifting everything up if you've seen a few of my other videos, then you know i've been crushing on this curl la la by aunt jackie's. It smells amazing and if you aren't going to wash the wig as soon as you get it, which i do recommend then at least, if you use a product like this, it will be smelling so good that people will think you did just wash it. But i love that it helps to find the curls and limit that frizz. So now i'm just saturating the hair and when you go through it with your brush or your comb, you want to make sure you're going from the bottom up, especially if you did any plucking, because there is going to be a lot of hair that you need To rid from the rest of the wig and then with the product, you can run it through with your fingers but honestly to get the best result with the product if you brush it through, while it's nice and saturated, and you see that moisture lock into those Curls, when that happens, then don't mess with the curls. Don'T run your fingers through it, don't disturb them and it will stay pretty sleek. Now, if you like, the big hair, look then go for it run your fingers through it volumize it. Whatever you like to do and trust me, it'll give you big hair vibes, so that's just a little tip for either way that you prefer to style your curly hair, wigs and, as you can tell just from a little bit of love and moisture. These curls are beautiful. Now you can see why i absolutely love elastic bands. I feel like it's not complete. Unless you do that step, you get such an extra melt and don't freak out. If you see the hairs are stiff or in a place where you don't want them, just go ahead and lightly run your comb over it and it breaks all that stiffness up now, i'm going in with the eyebrow razor to go ahead and cut these baby hairs. I don't like to cut them too short from the jump, because of course you can't put that hair back so just in case give yourself an extra length to play with, and then, if you decide as you're styling it, you know what i can trim here. A little there, then you can do it but be on the safe side and leave yourself some extra hair to work with now to set your baby hair. Do the same technique, use the fingertip roll it as you're using that blow dryer on a cool setting. That'S going to make sure everything stays exactly where you want it now, for this final tip, that's going to make it look like you did bleach those knots it's going in with that same powder, but on top and again you're going in very lightly, i'm using the Dual end side of this brush, which is a very small tapered end and you're just lightly blending that powder in which is going to conceal those knots and make it look like it's coming out of your scalp and voila here. She is in all her glory, gorgeous wig, gorgeous curl pattern and with a little bit of tlc and love, you can definitely customize her and make it how you want it make it look more realistic. So let me know what you think: love to hear your comments down below and i'll see you next time bye, you
Comments
Nikki Shelton: You did a wonderful job teaching. I love that you’ve been showing more beginner friendly wigs demonstrations I need all the help I can get. Thank you once again.
ShaylaRisong: I have alopecia areata as well and you have been a great inspiration. I really really would love to have a wig someday and apply what i have learned from you♥️
sugarcookiecube: Great video! I really like your instruction on applying makeup to the part. I see a lot of women on television who get the part camouflage makeup totally wrong.
Natural by Necessity: Excellent. Gorgeous wig on you and very natural.
tommy: You look so gorgeous vanali this wig suits you so much,, love love love,, work it girl
Dy no mite Nash: Can someone tell me why this young lady's NOT modeling? Look at that jawline and those cheekbones people!!! She's gorgeous with hair, without hair, with makeup or without it. Naturally a beautiful girl. Can we get a tutorial on the eye makeup look please? Thanks .
Lori Wilson: Hello! Do you remove your wigs daily? I have alopecia and I am about to cut all my hair off and just trying to figure this lifestyle out
Gees: Can you do a review on a five inch lace wig.
Esther Sowell: Do you cut off all of the lace i leave some and i sleep in my units my head get cold i pull it up and cover it sleep on a silk pillowcase