Orange Ginger Wig Install + Unboxing + Review Ft. Unice Hair | My First T-Part Wig
- Posted on 15 September, 2022
- Fake Scalp Wig
- By Anonymous
Thanks for watching! If you have any questions please feel free to comment below.
CLICK THE NOTIFICATION BELL! DON’T MISS NEW CONTENT!
SUBSCRIBE HERE ➡️
Get to know me
Age: 20
Born & Raised: Philadelphia, Pa
Instagram: https://instagram.com/leilaanoel?igshi...=
My Brand: https://noelbeauties.com/
My Brand Instagram: https://instagram.com/naildbynoel?igsh...=
Wanna collab? Send me an email! ➡️ [email protected]
same hair in the video ➤ https://bit.ly/3BFoqYT
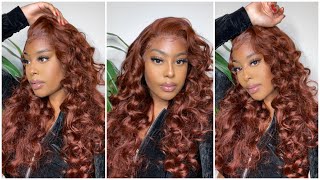
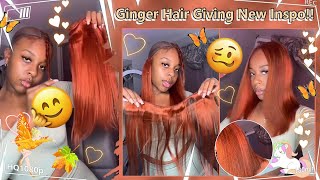
Hair Info: 22 inch Ginger Orange Body Wave Lace Part Wigs
#UNicehair Official Store:➤ https://www.unice.com/
#UNicehairstyles #unicehairwig #UNicehair
Instagram @unicehair: https://www.instagram.com/unicehair/
YouTube @UNice: https://www.youtube.com/c/UniceHair
Facebook @UNiceMall: https://business.facebook.com/UNiceMal...
Tiktok @unicehairofficial: https://www.tiktok.com/@unicehairoffic...
Hey beauties welcome back to my channel and if you're new here welcome beauty, it's your girl, leila noel and today i have another wig review for you guys. This wig is by eunice hair and i love this. Wig can y'all believe this is a tea part. It'S a given tea part. I don't think it's giving tea party, so i'm gon na go into all of the specs of this unit. I'M gon na tell you guys how it came packaged, how i styled this unit and also how i installed it. So, let's hop right into the video ladies! So before we get started, i just wanted to give you guys a quick unboxing of this unit. You nice did send me a really pretty pink silk bag to package this unit in they also sent it in the box. So i thought that was pretty cool to have both now they also sent me a robe, which you can see in that pink packaging right there with their logo on it. So i thought that was pretty cool as well. So when i open the box immediately, i do have my wig. It came with like a fishnet around it, as well as tissue paper to keep the shape of the wig. They also gave me a wig cap and some other goodies. I believe, like an elastic band. Um, the next product, i'm about to show you, i believe it's like a hair, conditioner or heat protectant. Something like that now. I did not use this product, but i will use it in a future video so that you guys can see how this product works, and this is the wig um right outside of the packaging. So there were no like threads or anything that was out of place. So i do love the construction of this wig. They also provide you with three wig combs that are already attached, and you have the option to take those out if you would like, and they also um provide an adjustable strap on this unit as well, and the lace looks pretty good. I did not have to tint the lace and i did not have to bleach the knot, so that's a plus so immediately out of the packaging. I decided to shampoo this wig and i did not smell or feel any harsh chemicals on the wig. But, however, i do have sensitive skin, so i just wanted to make sure the wig was. You know fully cleaned and shampoo before i did an install, because i wanted to make sure that i didn't have any allergic reactions now, when i did shampoo this unit. I did notice that a little bit of the color was coming off of the unit, as you can see here. That'S not necessarily a bad thing, because i'm guessing that they use like a semi-permanent color and if you know anything about semi-permanent colors, when you shampoo your hair, the color is going to come off. So that's not necessarily a bad thing. Um once i did go back and condition this wig and everything the wig felt fine, like it didn't, feel um like it was, you know hard or brittle or anything like that, and there was no shedding with this unit. I literally had no shedding, besides the middle part that i plucked, so that's also a plus for this unit in my mind, so this is the next day after i shampooed the unit. I did let it air dry just so you guys can see the natural texture. Now i'm just going in with my blow dryer, because i did want to add some layers to this unit because i was doing body curls and y'all know me. If i do body curls, i need my layers of my hair, so i was trying to blow dry this unit as straight as possible, but i couldn't get it as straight as i really wanted to so in the next few clips. You guys will see me still pressing the unit just to get it straight, so i can have a really precise cut and not miss anything so yeah. That'S why i decided to still press the unit before i curled it now, i'm not sure which barrel curlers that i use in this video. But i will try to find the link for you guys and put it down below in the description box so that you can check them out if you want to use the same type of curlers that i use to style this unit me. Oh, oh, baby, baby! So now that my unit is styled, it is time for the install part of the video y'all already know how this goes. I'M using my stocking cap and then i'm using a makeup on top to tip my stocking cap to make sure that it matches my forehead. Now i have been using a darker color than i have in my previous videos. I don't know why, but it seems like towards the end of the summer i'm getting more tan than i was throughout the summer. I don't know it's just not making sense, but i will leave the link um in the description box down below to the exact color that i use. Also. Yes, you guys do see a hole in the lace. Your girl went a little bit overboard with the plucking in the middle, but once i installed the unit you could barely see that hole anyway, so that doesn't even matter so now, i'm just taking a napkin with some alcohol on it just to remove any oils or Makeup that may be on my skin um, because i didn't want it to interfere with the whole me down spray that i'm using to stick down my lace. You just want to make sure that your skin is very clean before you apply these products, because if they do mix together, your install will not. Last the same, even though i was only wearing this wig for a day and taking it off that night, i just still didn't want the products to interfere with each other, and then my lace be lifted halfway throughout my day, and also, if you do want your Install to last longer, you can either use glue, of course, or you can still use the hairspray if you wanted to and just apply more layers for this install tutorial. I only use two layers, but you're welcome to use maybe three to four. If you want a longer lasting install in my mind, baby baby is, he was holding me me um. Now that my lace is cut and my wig is in place, i'm just going to go ahead and take my elastic band from nowherebeauties.com and further secure that lace in place. This helps the lace really like melt into your skin, so i definitely um would recommend getting you an elastic band if you do not have one so now that i have my lace exactly place where i want it to be, i'm just going to take my blow. Dryer between warm and cool air and i'm just using that to dry the hairspray that i put down there earlier and, as you can see, i don't have any attachment on my blow dryer like a comb or anything like that, because i don't want to really touch The style of the wig, i'm just making sure that the hairspray is dry from earlier. So now i'm just going to use my hot comb to make sure that all of my flyaways and everything is laid down. You can also find this hot comb on nobelbeauties.com. If you're interested listen, i didn't use any product on this hair besides um yeah, besides the holding spray, and that's pretty much just on the lace area on the hair, i didn't use any product. This is just all hot comb work, so i strongly suggest you getting you a good hot comb and again you can find that on thewellbeauties.com. So, once that holding spray is dry, i'm just going to go in and remove that elastic band and, as you can see, my lace did a really good job melting in, like it did a really good job to be a tea party unit and i'm so proud Of myself, this is my first time working with a tea party unit by the way. So now i'm just going in and putting the finishing touches on my style. But i did use a big tooth comb and i kind of regret doing that because the big tooth comb i kind of like lost my curls, so i did have to go back in and re-curl the front of my hair and i and then i used a Little bit of this sebastian shaper holding spray, i believe, that's the brand of it but yeah. I just used a little bit of holding spray and the style came back together. The way it was supposed to be. I will leave the link to this wig in the description box down below. I hope you guys all enjoyed this video and if you did learn some tips and tricks from this video. Please comment and if you haven't already, i need you to like and subscribe. Thank you, beauties and i'll see you guys in my next video you

Comments
Kenya Downer: I would have never choosen such a bold color but you pulled it off beautifully. The unit was nice but you brought it to life!