*New* Bald Cap Method + Hd Lace Wig Install For Beginners | Hermosa Hair
- Posted on 20 December, 2022
- Fake Scalp Wig
- By Anonymous
●▬▬▬▬▬▬▬▬♛#Hermosahair♛▬▬▬▬▬▬▬▬●
*Get Extra 18% Off With Code: YTB18
Direct Link ➤ https://bit.ly/3WroLpp
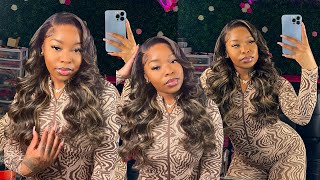
Hair Detail: HD Blonde 1b/27 Highlight Human Hair 24inch 220%
#Hermosahair Official Website: https://bit.ly/3jfRCP6
More Best Selling Wigs:
Lace Front Wigs for Sale☛: https://bit.ly/3Wvbht0
Invisible HD Lace Wigs☛: https://bit.ly/3v1q5Uw
Hot Colored Wigs☛: https://bit.ly/3v3IiAJ
❥Follow our social media:
YouTube @Hermosahair: https://bit.ly/3HQLchD
TikTok: @hermosahairmall:https://www.tiktok.com/@hermosahairmal...
IG @hermosahairmall : https://www.instagram.com/hermosahair...
FB @hermosahairmall : https://www.facebook.com/hermosahairma...
Email: [email protected]
Whatsapp: +86 13253731788
-----------------------------------------------------------------------------
PRODUCTS MENTIONED:
Adhesive https://amzn.to/3v3TxsU
Flat Iron https://amzn.to/3BQ75vY
Curling Wand https://amzn.to/3v89Rso
Wax https://bedeckbeauty.com/products/wax-...
Melt Belt https://bedeckbeauty.com/products/melt...
Edge Control https://bedeckbeauty.com/products/edge...
Bling! Hot Comb https://bedeckbeauty.com/products/elec...
Mousse https://bedeckbeauty.com/products/hold...
Shop Bedeck Beauty: https://bedeckbeauty.com/
-----------------------------------------------------------------------------
Hey Girl Become a Love Bug ✨ by subscribing here: https://www.youtube.com/c/AshleyBedeck...
Email: [email protected]
Monthly Wig Sale: https://ashleybedeckhair.com/
My Amazon Store: https://www.amazon.com/shop/ashleybede...
Let's Stay Connected:
Instagram: @AshleyBedeck
TikTock: @Ashleybedeckofficial
Twitter: Ashley Bedeck
Facebook: Ashley Bedeck
#ashleybedeck
My P.O. Box:
P.O. BOX 52103
Irvine, Ca 92619
-SMOOCHES
Hey love bugs welcome back to my channel, I'm Ashley if you're tuning in for the first time - and I just finished installing this beautiful wig from start to finish for this one, I've teamed up with Hermosa, hair and we'll be doing the ball cap method, we'll be Plucking tweezing and doing a beginner friendly, install on this beautiful wig. So if you're interested in getting the tea and seeing my updated ball cap method keep on watching. So for starters, I am starting off with my current favorite wig caps. These are brown. They go good with my complexion and I get them on Amazon. Prime I'll have them linked down below now. One of the keys is to really stretch the cap out. Hence why you'll see people cover their entire face with it, because the more you stretch it down like on your face, the thinner the cap will be, but I didn't feel like doing it over my eyes, so I just kept it right above the Brows, I'm going To cut ears inserts for my ears - and this is just going to help so that when the wig is dry, it'll be super flat around the ear tabs. So I'm going to take this product from Eben. I also get this from Amazon, and I'm just gon na apply a nice generous coat from ear to ear. The trick is to make sure that the ears are down, because sometimes the cap will not be super flat where your ears are or like the Sideburn area. I went ahead and blow dried until it was predominantly dry and applied a second layer. Now you can definitely skip the second layer, because this is time consuming, but this will help to preserve the longevity of your ball cap, especially if you may be like switching out your wig. If you're going to keep the wig bonded down, it really doesn't matter as much, but once that second layer was dry, I proceeded to go ahead and cut off the excess cap. Now you can definitely cut your skin, so be careful. You see I'm kind of just like doing little slips or Snips. If you will - and it's kind of like snipping it snipping it snipping it getting as close as I can, but I feel like when you snip and move and snip and move you're less likely to like cut your skin. But if you like, snip snip snip, like a normal cut, you're more likely to grab a piece of skin and cut. Hopefully that makes sense now that we've cut off all the excess lace from ear to ear. You guys can see it's super flat. If you have like air pockets or pieces that are lifted, you can either cut them off or you can use more adhesive to like Bond it down. If you will now that we're done, I'm going to just take my Foundation powder and just apply it generously along the hairline. Now I am done, you guys can see how seamless it is, and this is going to be a perfect base before installing your wig. So this is the wig that we're working with today she is a beautiful, highlight, lace, wig, the color is 1B 27 and it definitely has a Dark Root. The dimensions are 200 percent or I'm sorry, 220 percent density. Let me not play with Hermosa hair and the length is 24 inches. Texture also is body wave. I want to get all that in so we're definitely clear on what we're installing today. Of course, there is a direct link in the description box. Now, let's go ahead and cut off the excess lace here, I'm deciding. If I want to do ear, tabs or not the first cut along the hairline was more so to just make the lace shorter so that I could go ahead and see. Then we went ahead and cut the lace around the ear so that the wig fits perfect. Now, I'm just going in to decide how I want to style the hair. Initially I was going for a center part, so I went ahead and did the dynamic duo, which is the wax stick paired with the electric hot comb, and I got it super super flat and sleek and you guys know this is key for me. I really really love when the base or the lace of my hair is really really really giving flat flat flat. Here I proceeded to go ahead and tweeze out the hairline I feel like it definitely can use a little bit more work. As far as customization goes. You can definitely stop here and cut off the excess lace, but I just wanted to do a little bit extra. So what I do is I just uh tweeze along the entire hairline once that's how I like it, I go ahead and, like part out a section, A Thin section of hair and move it forward, tweeze that out and then I will repeat that one more time Going back so for this one, I went back twice and then three times, if you include the hairline the third time I kind of cut out, so it wouldn't be too long, and this was kind of the results. You'Ll get the best results. If you do it like on a wig head, and that just is the honest truth, but you know you can make it work with the wig on your head now that I did the opposite side off camera, let's go ahead and cut off the excess lace. Keep in mind that once you cut out the excess lace, you can definitely still go in and customize even more. What you'll see me do a little bit later with the baby hair. I am using an eyebrow razor. I feel, like you, get the most like Jagged or raggedy cut when you do it this way, which is what you want. You don't want that perfect. Scissor blunt cut, you kind of want it to be Jagged and that's how it like melts a lot more into your hairline. I noticed a little bit of imperfection with my um hairline, so I twist it out a little bit more added some liquid foundation to the hairline set that, with my even spray blow dried and then we are going to go ahead and do a glueless install. I'M going to use that same spray along the hairline making sure to apply it along the center, the sides and making sure everything fits exactly how I want, because this one definitely fits on my head. I didn't have to hold it down while bonding it down, but I am going to blow dry on a cool setting until it melts now. Let'S go ahead and form some baby hair. I wanted to do two swoops, which I did one on each side. I used the wax to kind of go in and just make sure that it is trained to go forward and like everything around it is nice and smooth. Here I kind of just decided. Maybe I should do a half a pep down, wasn't quite sure yet, but I knew I did not want to do the center part anymore here, I'm going in for the Instagram baby, hair method and just using a tiny flat iron to go in and curl the Hair away from the face cutting off the excess. Now I'm going to go in with my edge control, only applying the edge control to the base of that little swoop or baby hair, and just going in with the comb to make sure that it's smooth. It'S straight and kind of like moving that product from the base To The Ends while making the soup as perfect. As I needed to be once I got it to how I like it. I kind of just move on and just make sure that the entire hairline was super flat. I did apply a wax to the hairline as well to make sure that it was just really really really smooth and flat and Gabe like a salon. Quality finish. You know that it's key for me as long as the party and the hairline are good, we're good off camera. I did decide to do sideburns and I definitely amped the wig up now, I'm just going in and perfecting it by trimming out or tweezing out the baby hair a little bit more and that definitely made a big big difference. Now I'm gon na apply my melt belt from beadakpity.com. This is a fresh one because I'm the type of person, even though I have my own own product and I have a whole full stock of these. I will use each of my products so they're empty until they're messed up until the wheels fall off. So finally, I gave in and just shopped my own inventory and ordered myself one, so this is going to help that lace to really really dry, almost like suction and melt into the hairline really good, and I allowed that to set. While I went ahead and wand curled the hair - and this was the result - it came out absolutely beautiful. I wanted the sexy loose like fun, bedroom, curls, and then I went in with that Foundation powder and just applied it generously along the hairline. Until I got it, how I like it now, the beauty is, if I want to customize the hairline even more, I can definitely go in on a separate day, but for now we are looking snatched and beautiful. I love this color combo and how gorgeous it looks, especially with no parting, absolutely perfect and flawless. Okay, so we are done with this look and I'm so proud of myself. I really took my time. The only thing I did not do was bleach the knots I did do a straight out of the box install, but I definitely went in and just gave this one a little bit of extra TLC. So you guys seen we did do the bald cap method, which I don't do that often, but because I'm going to be wearing wigs all week, might as well go ahead and protect my hair um and then I did go ahead and tweeze out the hairline. We opted for a no part style and I've really been heavy into the no part Styles lately, and because we did such a great job on the install. You can flip it around and do it like so, and you can also take and go ahead and still part it back out for the center part. I probably would tweeze Out The Parting a little bit, so the side part is definitely my favorite look with this one. Before I sit back down, let me show you guys what it looks like from the back foreign came in also the wig was in a pack like this, and it just says body wave, 24, inches, 220 density um and then it's a one B 27. Also inside of your package, you do get a couple of goodies. You get a nice pair of actually two pair of 3D big lashes, really really nice. You get a two pack of wig caps, a wig band, to secure your lace. Then you also get an elastic band and this is like the bra strap style, and this is also going to help your wigs to fit a little bit more snug I'll. Let you guys go. Thank you guys so much for watching. Don'T forget to subscribe, like this video and share with your friends and as always I'll see you in the next one smooches

Comments
Linda DeeDee Harvey: Absolutely beautiful and thank for this awesome tutorial
Jackie Randolph: Hi Ashley it came out beautiful.
Monebyrd: Gorgeous
Eureka Lee: Great video What’s the Amazon link to the wig cap? I don’t see it in bio hun.
Rachel Hebert: Lovin'your Wig it's easy learning how to enstall ball cap method
ladetra paul: