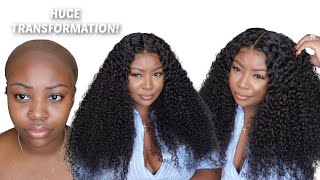
Diy Detailed Tutorial: How To Make A Wig That'S Too Big Fit Your Head
- Posted on 11 June, 2022
- Fake Scalp Wig
- By Anonymous
If your wig is too big for your small head and has that annoying bulk in the back, top or middle, I show you how to easily make it fit your head like a glove. NO SEWING MACHINE NEEDED.
NOTE: PINCH THE AREA IN THE MIDDLE OF THE HEAD THAT NEEDS REMOVING INSTEAD OF THE BOTTOM AND THEN PROCEED WITH THE ALTERATION LIKE SHOWN IN THE VIDEO.
My wig salon is located in Elizabeth City, NC, 45 minutes south of Chesapeake, Virginia. If you'd like to schedule a video chat or physical location consultation, call me at 252-339-8802 (Business hours: Mon-Sat 9am-6pm EST), or email me anytime at [email protected].
Learn more about me, my products, and services, and join my mailing list to get updates about what I'm doing next: https://myhairunits.mailchimpsites.com...
VISIT MY ONLINE STORE (https://form.jotform.com/2135229005841...) To Purchase New And Previously-Worn-By-Me Stock Hair Units At Great Discount Pricing! (bookmark link for easy access)
CUSTOM WIG AND HAIR UNITS: https://myhairunits.mailchimpsites.com....
If you need help with ordering or just want to talk about your hair loss situation, call me at 252-339-8802 or email [email protected].
Visit my Facebook business page at https://www.facebook.com/MagicWigMaker...
Thanks for watching my videos! Please leave your comments so I’ll know your thoughts, likes and dislikes. Subscribe, like, share, comment and enable the notification bell so you’ll always know when I’m working my Magic!
#magicwigmaker #wigrepair #wiginstall #
I’m also on https://www.facebook.com/TheMagicWigMa...
FEATURED PLAYLISTS:
Wig and Hair Unit Installs♨
https://www.youtube.com/playlist?list=...
Creative Hair Units ⭐
https://www.youtube.com/playlist?list=...
Beauty Makeovers
https://www.youtube.com/playlist?list=...
Hilarious YOUNGER NOW Episodes
https://www.youtube.com/playlist?list=...
00:00 Introduction
01:24 Getting Started
02:04 How to determine excess lace
06:49 How to cut away excess lace
07:45 How to sew cap back together
10:17 How to keep the same wig density
11:01 How I install my new resized wig
Hi everybody welcome to my channel. Thank you so much for joining me. You know how much i appreciate it. I really do if you are like me, you love front lace, wigs because they are easy to maintain. They cost less than a full lace, wig. But, of course, if you're, someone who wants a full lace wig, you know i can have that made for you as a custom order. So keep that in mind, but right now we're talking about the most popular type of wigs, which is the front lace wig, that they look fantastic when they're on you adjust that back, strap the tightness that you need it and it fits snug all the way around. Your head, but when you start feeling it and rubbing across the back of it for most of us, you've got this bulk right back here that you try to make work for you, because people looking at the front, they don't know what you got going on back. There that's why i'm going to show you today how to make your front lace wig fit your head just like a glove so that you can wear nice ponytails and leave some of your own hair out in the back and twist it up into little cute styles. So we are going to get started by taking the wig off turning it inside out and we're going to undo these adjustable straps and put the wig on your head with that wrong side out. So you can get an accurate fit and you can see now that if you stretch that wig to fit so there's no gapping in there, the front of the wig comes way down here and that's never going to work. So our goal is to take that excess bulk out and have it nice and tight. So when you put it on, it will be right at your hairline and it will feel very smooth back here. Make sure that your ear tabs are in place and put the hairline to where you want it. You can see right through there put your hairline where you want it and then pull all of this excess tracks and lace down in the back hold the front of the wig right in place. So it doesn't go too far down or too far back. You want it exactly where it needs to be, and then you come in the back and you just get a hold of all this excess and now with the front in place. You know where that is, you can use both of your hands. Have that adjustable, strap out of the way and just go and gently just grab that chuck that tuck of whips and use your tailless chalk and at the top, where you've got your fingers together and you've got this tuck of lace just mark the top go underside Mark the bottom do the same thing on the other side. Holding that front in place, get that tuck and find that tuck and go on the top side and mark it up under the bottom and mark it go to the middle of your head and the top is going to probably be a little larger there, because the Contour shape of the wig, so you want to get that tuck. Keeping that front make sure that that front is where it should be mark the top and then go under the underside. Get that cone out of the way and that's it and now take your wig off and you can see where your markings are. Do you see how much of a gap there is there wow now? Next, you want to put the wig on the wig head with the wrong side out and stretch it so that you can see your lines clearly and then use your t-pins or your sewing pins in different locations. To lock it in place. Be careful, don't put it into the lace so that it snags in the lace just enough to hold it on. You want to make sure there's no puckers in it, and it's nice and smooth like that. What we want to do is we want to take those wefts out in this area and we want to keep the um adjustable strap intact. So i'm taking out one two, three, four five welts wow. The bottom width is going to be right here, and you want to draw your line just above that stitch line just a little bit above that stitch line. That'S going to be for that first row that you're going to be taking out and then i'm going to do one two three four five there's my fifth one right here and i'm going to go same thing beneath that stitching following that line all the way across And i can go clear over here to my line, but we need to try it on again to make sure we've got a good fit a perfect fit before we actually cut, and what you want to do is you want to match these two lines and then Use your pin to hold it in place and now turn the cap correct side out and put the wig onto your head, bring the front hairline where it's supposed to be align the ears and then go to the back of the wig and pull it down firmly. So we're just going to be cutting this section right here out these small scissors, not anything big and just give it a little knit right there and just take your time and just cut the lace right on that line that you've made, and you want to go Underneath right above this adjustable strap right, there just go right to where that track is snip back there we go okay. Now, what you want to do make sure everything is aligned like it was go ahead and put that in like that all the way across it aligns me, take and move your adjustable strap up, because you're actually going to be sewing on that adjustable, strap, keeping everything Aligned see how i'm doing it and you can see where the contours are going to fit. You need to put a pin on the top and bottom and just keep right on following the contour stretching is necessary and then letting your adjustable strap meet right with where you cut it should all be even, and you can't even tell where you made the adjustment, Do the same thing on this side, so you can see all the way around where it contours and we're going to pull this down everything in place. Okay, okay, now you are all set to sew these two seams together, starting over here right at where the lace meets you want to go under and catch it right to that front lace! That'S going to be your first stitch. Do several of those stitches to make sure that you are joining the adjustable, strap and then you're going to start attaching the band and where you made that cutting line. Closing that final gap, a couple of lock stitches and that's the end of our alteration. This feels so good, no bulk flat to your head you're gon na love this and you can do it yourself, but for those of you who want to have it as thick as it was before, you took your tracks out just cut the individual tracks off. Put the rig back on the mannequin head, take those extra tracks and just lay them above that track and just sew. It all the way around, and i really suggest that you use these uh the tracks from your wig. Instead of like going to a beauty, supply store and getting tracks and putting them up, there might not be the same texture whatever and one other thing that i'm going to do where i have inserted those hooks in this adjustable strap i'm going to go back and Take thread and just go ahead and secure these in place so that they won't ever come up again and i am ready to install my newly custom fit front lace wig that is going to fit so much better, and once you do yours the way i've shown You how to do it you're gon na love, wearing your wig without having that bulk in the back use a little holding spray to hold the hair back. When i put my wig on align it for those ear tabs, so once they're in place just pull the lace into place, i take that back comb and insert it up under my hair, and that holds that in place. Everything fits perfect smooth back here. I want to, i can wear a ponytail or if i want to do a cute up style. Somehow i can do that with a natural hairline in the back wow. This is a fantastic fit now you know how to adjust your wig, so it fits your head perfectly thanks everybody for joining me. I really appreciate it and, if you like what i'm doing here on the magic wig makers channel for women with hair loss, please see my contact information in the description so before you leave. If you haven't done so already, please subscribe. Tell others like comment. Most of all enable that notification bell, so you will always know when i am working my magic thanks. Everybody for joining me i'll, be back real, soon. Take care, bye,


Comments
Dominican Kandie: Omg, I've been wrecking my brain as to how I can make my favorite unit smaller. I was just about to take it apart, and remake it on a dome cap. I'm going to try your method asap. Thank you! Thank you! Thank you! ❤️
KidzRRelevant2: I am subscribed. I do tell others and share your videos. This is amazingly helpful. We have to get you out there my sister. More people have to know about you because the advice you are providing to us is priceless. Thank you so much and God bless and prosper you!
Roni B: THANK YOU SO MUCH FOR THIS STEP BY STEP TUTORIAL. My little head never fits my wigs and I will be trying this technique with some of my old wigs til i am comfortable doing it with my new wig that I have not installed yet.
Ambitious1: I was going about it the hard way. Thank you so much. This method was so much easier.
L J Scheible: Thank you so much. This is exactly what I need know.
Laura phillip: wow you really did that! thank you so much for the tutorial because i was about to throw mine out!
Linda Carter: I’m doing my first custom lace front. I’m going to be ventilating the perimeter and put tracks in the middle. Question: I was concerned her first mold wasn’t accurate so I had her come back, got over zealous with the tap. Afraid it made her mold go up a size. Instead of having her come back a THIRD time, I was thinking about making most of the wig then call her in for an adjustment. Your Honest Thoughts please.
Sheneika Hill: We need more Tutorials like these I too have a little head one of my insecurities, but if I could find. Wig that is made for my head or how to make a unit fit a small head like mine it would truly help , so keep making more videos like these
Nia: This is so helpful, thank you! Could you please tell me if I can I use the same technique with an open-wefted wig? I'm wondering if the absence of the mesh base means it would be problematic sewing it back together...? Thank you again!
MzNickyR: Excellent wig tailoring video, just what I needed. What is your favorite way to remove Ebin adhesive from your wigs?
Dora williams: So much help everyone doesn’t have big head friendly ❤️
KW: You make it look so easy but I'm confident I could do it
Zakeya Brookins: Ms. Lola you are a blessing. Thanks for sharing. xoxoxoxo
Patricia Williams: Thank you thank you. I cannot wait to try it
Queen Bluntress: I can not believe I found Ms. Lola ❤️❤️❤️Ms. Lola been the same age forever she dont age. Everytime I see lace wig videos I think they learned that from Ms. Lola. The Godmother of Lace ❤️
Rosa Camacho: Will that help with the ear parts, where the wig sits on my ears, and can’t put the wig behind my ears to show?
Quiet Storm: I have a short pixie wig, non lace. Will this work on that as well? Does it compromise the style of the wig taking those wefts out?
April Johnson-Hazel: Excellent!!!!
Quiet Storm: Great instructions and I'm going to subscribe and try this. I am wondering why you are using that spray on your forehead? It cannot be good for your scalp. It is likely in part, due to alopecia but in addition, your scalp can't breath and your pores clogged. As a suggestion and I am only recommending it (respectfully). Since you are wearing a lace front and maybe a wig here or there, free yourself, cut your hair and start anew'. It is a relief and the emotional attachment we have to our hair no matter how much or little is draining. You will feel so free. Besides, if you aren't doing anything with it anyway, why not. Good luck and I love your video!
Dominican Kandie: I came back to watch again, something I usually do before attempting any process myself, and was wondering how you didn't cut any hair?! I mean the wig was flush against the canvas head inside out, but not of the hair appeared to get cut. Plz explain thank you
ashley green: Hello so good to have u back. Thanks for sharing
janice White: Thank u, Thank u and thank u!
janice White: I have some old wigs. Im gonna practice
V.V.: Very Talented.
Sarah: I love u
Mertella Reid: If u come to jamaica i wil be the first customer