$12 Lace Melts Into Skin! Slay Band! Clear Lace Fake Scalp Sweatproof Wig Install | Ebin Lace Glue
- Posted on 11 June, 2021
- Fake Scalp Wig
- By Anonymous
MELT your lace with a sweatproof wig install using the Ebin Wonder lace Bond Glue.
Wig in Video: https://bit.ly/359whwJ
Enjoy extra savings on this wig by using discount code " Marie " at checkout!
Length: 22 inches
Lace: CLEAR lace
Cap: 13x6 Lace Frontal wig
Density: 180%
Follow Prettyluxhair on Instagram
@prettyluxhairofficial
PRODUCTS IN VIDEO:
Wig Slay Band https://bit.ly/3wlacau
Ebin Wonder Lace Bond Glue https://amzn.to/3gnlR1A
Light & Brown Wig Caps https://amzn.to/3gvSQRi
Curling Iron https://amzn.to/3cCcdXJ
Babyhair curler https://amzn.to/2TilNIC
Edge Brush https://amzn.to/3ghgbaM
Razors https://amzn.to/3pLwRdn
Stay Updated! Follow Me Here:
My Website: https://mspreciousmarie.com/
BeautyByMarie Vlogs https://www.youtube.com/BeautyByMarie
Instagram: https://www.instagram.com/mspreciousma...
CUSTOM WIGS: https://www.secretkreations.com
Business Collaborations Email: [email protected]
Send me a video request: [email protected]
TIMESTAMPS:
Wig Slay Intro 00:00
Wig Details & Wig Hairline Prep 00:38
Pre-Style Hairline On Wig 1:28
Bald Cap Method 2:12
Ebin Wonder Lace Bond Glue Install 3:03
How To Use Slay Band For hairline 4:12
Should you wear wig cap with Fake Scalp Wig 4:47
How to remove Lace after wig is glued down 6:06
How to create Curled Babyhairs 6:58
Using Slay Band To LAY baby hairs & Lace 7:35
FINIAL RESULTS!! 7:54
*Hair or products shared are my OWN personal and honest experience. This video may contain sponsored content and affiliate links which I get a small percentage that helps invest back in my channel to continue to bring great content! Thank you for your support!* #MELTLACE #WHATLACE #MSPRECIOUSMARIE
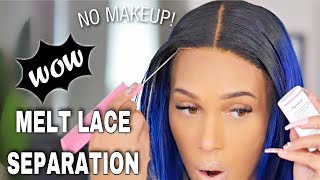
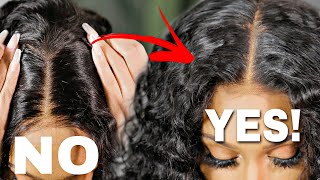
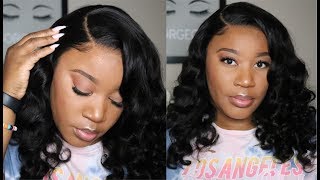
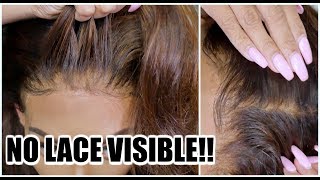
If you clicked on this video, i'm pretty sure you were intrigued by what you saw and you want to learn how to get your wig to look and lay flawless. So today's tips, i'm going to share, is going to give you a summer, sweat proof, lace, wig install. If you would like to see that, let's jump right into this video all right, so we're going to glue down our wig today, i am going for a sweat proof. Wig. That gives me a longer wear. So today's wig i'm using the clear lace, wig and this wig already been washed. So all i'm going to do is go ahead and push that hairline back with a hot comb. Now i like to do that so that i will not have hairs in the way - and i think it's very important so that you can get a clean, install a lot of times. If your hairline is in the way you have too much hair there, you will get lifting. So you don't want that. So push that hairline back the best way you can so for this wig. I am going to kind of pre-style the hairline a bit so that i won't have to do it after my wig is glued down a lot of times. I like to make sure that everything is done before i apply my wig. That way, i can get a clean, install. This wig does come with a pre-plucked hairline. However, i'm just taking out a bit of hairs right here at the sideburn area, because if there's too much hair at that area, you will get lifting. So i like to just get rid of some of the hair whenever i'm using wig adhesive, i do the ball cap method. This is the way i protect my edges when using wig adhesives. I do have a video detailed on how i do my ball cap method. If you want a walkthrough for that application, however, we're just going to jump right into it and i'm going to take some bronzer and apply it around the edge of that ball cap. That way, i can blend that area with my forehead and when i go to apply my wig, there will not be any separations or a line. Let'S get into the wig install today, i'm using the even wonder, lace glue, and this is their active glue. Now i shared this before in a past video of my first impressions. Today'S wig install is mostly about sweat. It is not about water or pools or swimming. I like this glue because it's only twelve dollars and is good for sweating. So the first thing i did was apply small dots around the hairline. This is a white adhesive, so you can do this. It'S not going to be sticky. It'S not going to be messy. I'M taking a coffee stick and spreading that glue around the hairline. You will notice that this glue will turn like a neonish, bluish type of color. You want to let it dry completely clear before you put down your lace now again, the wig that i'm using comes with clear lace, so this will be very undetectable when you use it. If you don't know what the clear lace is check out. My previous video, i did a full detail. Video review on the clear lace so make sure you check out that video, so i'm just using my comb to press down the edges and then i'm applying some slits in the lace so that i won't get that wrinkling around the hairline. This step is very important to how long your wig is going to last i'm going to take my sleigh band and i'm going to apply it around the hairline. Now, using this type of band is going to precisely place pressure on the hairline so that you can lay your lace very flat since i have not cut the lace. Yet i'm only going to use this band for about 15 minutes and then after 15 minutes. I'M going to remove it, so i'm going to go ahead and style. This wig, i think i'm going to do a center parting. For today. Today'S wig application does have that fake scalp material on the inside. A lot of you always ask me: well: if it has the fake scalp material, do you still wear a wig cap? Yes, i still wear a wig cap under my wig. Even when i did my video on my fake scalp method, i still wore a wig cap and that is to lay my hair flat um. So that's why i like to wear wig caps, but, as you can see, the parting for this is amazing. The knots are bleached. I did not bleach knots on this wig, but the fake scalp material on the inside. I use the color tan or beige, and it works out really well. I'M gon na go ahead and drop the link to this wig in the description box. Along with all the products that i use in today's video so make sure to check that description, box below and i'm gon na go ahead and style. This wig and i'll be back to remove the lace in a second all right. So now it's time to remove that band. Let'S take a look at the hairline and see what is going on. The thing i love about this band is that it does not stick to the glue a lot of times. The satins, bonnets and scarves can stick to your wig adhesive, but yeah. This actually looks really good. It lays it nice and flat. So i'm going to remove the lace with a razor. You can use some really small scissors if you don't want to use a razor like the little fingernail scissors work good, but i'm just using a razor because it's going to get really close to that hairline. I'M going to create edges around the hairline and i'm going to do the curl baby hair method. I will be sure to link this curler down below. I just got it and it's so much better than my old one. I told you guys i had the other one for the longest, but this one is amazing, so i'm just bending those hairs and then taking a razor and cutting them. I do have another video more detail talking about this, so i'm not going to go into too much detail but yeah. I really like the curl baby hairs. It looks so natural all right so now that the lace is cut and the baby hairs are created, i'm gon na go ahead and apply that sleigh band around my hairline again and this time i'm going to let it sit for about an hour, because i want My lace to lay flat alright. So after an hour i remove that slay band and yeah. I really like the even glue it did. What it was supposed to do. It helped me through sweat. I worked out with this wig and my edges lifted just a little bit, but it didn't come completely up. I would recommend if you are sweating afterwards to make sure to tie that hairline back down with that slay band. It will really keep your lace in place while you're sweating, and it will help it adhere better, and this one does have the velcro attachment. So again, everything will be below in the description box be sure to check there, and i hope you guys have a wonderful day. Thank you so much for watching
Comments
Alicia Norman: Thank you so much, I have been able to improve my wig game because of you!!!
Shalonda H.: You constantly bring us the up front and personal slay methods. Music: check, slayage: check and selfless sharing of all-things wig: PRICELESS! You are absolutely my favorite!
UNEEK BEAUTI: Come through MsPreciousMarie with this slay ban let me go ahead and get mine. #MsPreciousMarieSquad
SheShe B: I love it, I was the one that I asked how to do the baby hairs I just want to thank you so much I learned so much from you all the time thank you❤❤
Melanie Rice: Great application! Love the slay band.
Beauty by Jay Morris: Love the slay band Marie, the application was amazing thanks for sharing #precioussquad
SIOBHAN DEGUERIN: Love the application and your background music, so relaxing!
Char F: I want my own slay band too.. lol. Beautiful results. Tfs ♀️
Lusher Manuel: I liked that a lot!!! Very pretty and quick!!!
Bev Pryce: Love this video; and the wig band!
Mother Legacy: Yesssss I love your slay band you did that
Ty Crump: I have learned so much from watching your videos
Feeneishia Rodgers: You educated us as usual. I have one question, is that elastic band able to be used on us "peanut head" ladies, 21 inches or less?
Fan Marie: I've been looking for the comb you use ALL the time, where can I purchase it?
monike woods: I agree love to slay and band, i want my own to lol.
Kimberly Kyles: it enjoy your wkend. Peace and blessings
janice robertson: I am really trying to like this glue but the hold does not last. I purchased the extreme firm hold. Can't be mad at the price because I would really be upset if I paid $30+. Thanks for the video! Love that wig dealer lace glue! Have you tried that?
Yolanda Byers-Goodwin: Will you be selling anymore wigs?
Luxury with Taijah Hunter: $12 lace??
Zesus 2010: I love the slay band but 25.00 shipping
Naruto: I would love the band but 25 to ship an elastic band?
High Q: Why does this say $12 when it’s well over $200?