Diamond Fake Scalp Curly Lace Wig Install Tutorial Some Mistakes To Avoid And Adjust | Afsisterwig
- Posted on 08 January, 2020
- Fake Scalp Wig
- By Anonymous
Subscribe here: https://bit.ly/332sdM0
Curly wig in the video: http://bit.ly/37u76UE
Video by @Ashley Bedeck
Coupon: YT10 to get 10% off
Afsisterwig’s diamond fake scalp wig:
Fake Scalp + Extra Diamond Lace SOFT | NO WEAR | NO TEAR
This wig comes with a fake scalp constructed and the extra delicate dimiond net to protect the fake scalp cap and harmless to your natural hair, which is also breathable and more comfortable.
6 INCH Deep Parting Space
Natural Looking Pre Plucked Hairline
Four Combs (Front*1& Sides*2&Back*1)
With Adjustable Strap At Back
INVISIBLE KNOT: A new knotting method will create the most undetectable look, the hair just looks like growing from your real scalp.
Wig sku: AF0145
Hair length: 16"
Hair density: 180%
Cap size: Medium 22.5
Cap construction: 13X6 lace front
Contact Us:
➞ website: https://afsisterwig.com/
➞Email: [email protected]
Follow US:
➞ Instagram: afsisterwig
➞ Facebook: https://www.facebook.com/Afsisterwig/
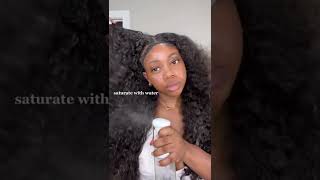
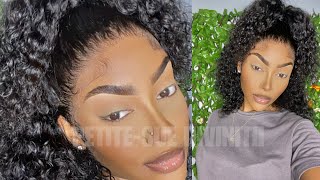
In my laughs, welcome back for another video if we tuning in for the first time, I'm Ashley and welcome to my channel, welcome to a new decade. It is 2020 and we are all about the glow up. So today we're gon na be doing a start. To finish, slay featuring AF sister wig: this is the wig and it's natural texture straight out of the package. Of course, your girl went ahead and go wash the wig off camera. Now here I am blow-drying the lace and kind of just prepping it before I apply it doing. A complete install of the wig is completely wet, is absolutely a no-no and just a disaster waiting to happen. So I just blow-dried more saw the hairline where I'm gon na be bonding it down, and I also pressed it what the how come a little bit also said it's just flawless straight out of the pack, as you guys got a clue or a glimpse of this Is a fake scalp, lace wig, and this is what she looks like when you first apply her now get a load of the texture. It'S absolutely gorgeous. It was gorgeous straight out of the pack, but of course it pops even more after I washed or Co washed. It with a moisturizing conditioner and again, I went ahead and hot comb the hair line a little bit so that you guys can get a great clue or glimpse of what the hairline is all about. Of course, she is pre plugs. I feel like this is one of those ones where you can pretty much install and you're ready to go now. I do not have an elastic band attached underneath and you guys can see it does not fake Lula's. But if I go ahead and attach that elastic band that was provided, we are good to go and this one will be definitely Lulu Liz. Now I am gon na speed this one up in different areas, just because I don't want it to get new too mundane, but you guys about to see that I did a straight fail. Try something new! I went ahead and slit like what is it four or five slits in the lace thinking? I was gon na work section in like section by section and I went ahead and applied my adhesive, which is the got to be glued spray, and then I proceeded to bond awake down and, as you guys can see, there are lumps and bumps everywhere. Now I didn't get too nervous. I was a little bit freaked out, but I wasn't too nervous what I did not realize at this moment that realize now is that all I had to do was cut off all of this excess lace and bought it out. Like I normally do, and we would have been back on schedule back on track for our original program now I don't even know why I didn't think of that, but the slits are not cut behind the hairline. They are cut pretty much to the very front of the hairline. So again, if you find yourself in this mistake like this just cut off all that excess lace and bond it down like I normally do. I apply the heesu to my hairline and pull the wig on top pretty much top from ear to ear tab and allow it to dry using the blow dryer on a cool setting to get an even tighter bond and you're good to go. So this was a pretty much a long time out process where I pretty much just kept applying the adhesive little by little section by section and using that blow dryer on a cool setting until it was dry and in the end I was able to finesse it And it came out amazing, but, as you guys can see right here, I was a little bit freaked out and I definitely applied way too much adhesive. We can kind of see it getting white along the hairline, but again once I was done, I'm so good at you know finessing these wigs at this point that I really wasn't too worried, because I knew at the end of the day it was gon na come Out right now, I love the way, those ear tabs aka the sideburns. Look, I'm getting better a little by little at those, because I used to be super horrible at it and I feel like I still have room for growth, but I'm definitely definitely getting better. A little by little, even with the install this was, I think, a day after maybe today's after Christmas, and it is now new year, so I'm still wearing this wig and it is beautiful, ivko washed it once since, and it's beautiful the hairline is amazing. I did not have to go in and plug anything out of. Of course you can go in and open up the party even more. That is it. That is your choice. Sorry, I'm speaking too fast. But again, this one is a beautiful week and of course, the fake scalp sets it off the lace itself. Blooms flawlessly with my complexion, as you guys, can see here and again, the fake scalp makes it. So you don't have to wear a wig cap underneath you don't have to add powder to the parting or the hairline you're, pretty much good to go on that end and you guys can see the hairline is white. I'Ve been doing these tutorials where I've been switching up the way and stuff for a while, and I kind of have just realized. Maybe I should just go ahead and watch some of my fellow creators here on YouTube and see how they install their wigs to kind of get a glimpse at what I'm doing wrong and why mine's always comes out white. I don't really watch her reviews here onto YouTube as much as I should just because I thought I got the basis of it, but as I tried new techniques, it's always great to just draw inspiration from my fellow creators and figure out. You know different ways and techniques of saving time and energy, and just doing it the right way off the bat. Now you guys can see. The hairline is a little bit funky with that white, because I applied away so way too much adhesive, but again we're gon na be able to finesse and, as we add more product and do different styles on the airline, it's all gon na work itself out now. I find the foam motion to be the solution we are looking for somehow if the hairline is white and I apply the foam lotion into the baby hair, all of that literally just cancels out and goes away but be sure to be careful with the foam lotion. If you apply directly to the hairline or if you put too much on the hairline, it will lift your lace as it is a water-based product, and we did use pretty much a non glue adhesive that it's gon na be easy to remove. Now, here I'm showing you the parting space, you can see how beautiful and flawless and natural, most importantly, how natural it looks. Now this is a lace, closure wig, you guys can see here and you will be learning to track. If you go too deep with the part, so I just make sure to go around with our track to make sure that none of that is covered or showing on each side as well as the back. I didn't really part too neat in the back, but again my purpose and my goal is to just make sure that everything is covering the tracks more so than anything you don't want to try showing at all whatsoever. So my topknot or my half-up half-down situation isn't as big in voluminous as I would like it to be again because it's the closure and not a frontal wig, so pretty much. I wasn't able to like make the ponytail up top super big, but, as you guys seen in the beginning and in the thumbnail and you'll see in just a moment, it's gon na be just as beautiful as if there was like a big, huge oversized. Ponytail going on up top now, I know a lot of you are wondering: why are using heat on a weight that you're pretty much just gon na wet down anyways? I don't know if you're watching this transformation, but literally by using that hot comb. That literally makes the lace look like it's melting. It literally makes the hairline look like it's growing out of my scalp. It makes it so flawless and so beautiful that I really just don't like to skip this step now. I'M gon na go back in for the sideburns, as I said, I'm getting so much better with the sideburns. What I do here is, I kind of just use a pull method to thin it out. If I use the tweezer I'll be here for a good minute, and the sideburns literally will take forever to form you want it to be super thin, we don't need the sideburns to be thick at all whatsoever. All you need is like 10 to 20 hairs right. There to swoop - and you are good to go also the bonus is - I leave a little bit of extra lace right there. So I don't know if you guys can look wholesome. You can tell, but there's extra lace there. So if I get tired of the sideburns or if they thin out too much, I'm able to cut off all of that literally - and I literally won't have to worry about those anymore, especially because the ear tabs always have to be repotted down every day. If you are like me, and you get them a little bit wet in the shower now, I'm gon na do that on both sides, and I'm gon na make sure that I cut off the length of the sideburn. Anything that goes below my actual earlobe is making it way too long and as you guys can see, it comes out super beautiful. So I'm gon na melt everything together by adding this scarf and allowing that to a lot of a thing to bond and dry and late as it should for about five to ten minutes and then I'll come right back and remove it and you'll see how beautiful Everything will come together now. One thing I've learned over the years is that whenever you do any here, if it's stuck to your hairline or your forehead, it looks so much less natural than if it's like light and fluffy and airy. My sideburns happened to be a little bit too long and too thick, so I just use a rat tail comb to kind of comb them out. I'M going to use a tweezer to get an out just a little bit. The hair line is pre bleached. So if you go in and out too much, it's going to be bald within a week or two, so you want to leave some hair there, but you just don't want it to be way too thick and to me and my opinion that looks a little bit Better shout out to my baby girl. She loves to be on my You Tube channel, and you definitely will see her so much more coming soon. I'M definitely gon na allow her to do a hair series or me to do a hair series featuring her so that you guys can learn a lot more about baby and toddler here, just as much as lace, wig application. Now here is a step that I've never skimp on, and this is pretty much taking a piece of hair from the ponytail and pretty much wrapping it around the base of the ponytail aka, the scrunchie or rubber band. Just to give it a more chic look by covering up that river bed and just having hair cover now we're ready to go ahead and style, the remainder of the hair or the length of the hair, the wig is bonded down and ready to go. I love how fluffy and beautiful the curls are the way they were, as is pretty much after they've been Co washed, but I kind of want to add a little bit of pop and give it a wet look. So I did dampen the hair with a spray bottle and water, and now I'm going in with a little bit of mousse and I'm just raking that through I really didn't use a comb or brush and I didn't need to. There was no excess, shedding no craziness. Even when I co washed it everything was pretty much normal. You got your normal amount of shedding. There was no crazy smells, and this week just overall was constructed really nicely, and this gave to here a nice sleek wet. Look. It made the curls pop before the curls were nice and defined, but they were a little bit fluffy and now they pop now. This is all of the hair I got and shedding pretty much from styling the hair. This is pretty normal, especially because we've cut the lace, and now my shirt is wet, but the hair. It looks good and we are good to go. I'M gon na give you a quick look at the back of the hair. The curls are absolutely gorgeous, like I'm super pleased with this install I'm gon na buff out the hairline and, as you guys can see, it looks pretty good. So I hope you guys enjoyed this one again. She came from a eff sister rig. All of the details are listed in the description box. Thank you guys so much for watching, don't forget to subscribe and as always I'll see you in the next one smooches


Comments
Lisa Marie: