Make Your Lace Wig Look Like Scalp | Pre Bleached Knots Wig No Work Needed | Hairvivi
- Posted on 08 July, 2021
- Fake Scalp Wig
- By Anonymous
►►►$25 off code (Limited): faithfully
Wig in the video:
https://www.hairvivi.com/collections/1...
►►►$10 off code (permanent): faithfully
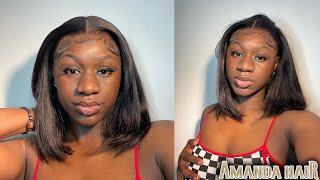
Hair details: 16 inches, Medium capsize, Look 2, 13x6 frontal wig
#HDLACEWIGS:
https://www.hairvivi.com/collections/1...
#LaceFrontWig Meets Your Budget:
https://www.hairvivi.com/collections/w...
★☆ Hairvivi Innovations ☆★
2016 ☞ Pre-sewn Transitional Hairline
2017 ☞ Pre-bleached Knots
2018 ☞ Pre-made Fake Scalp
2020 ☞ Piano Key Elastic Band
2021 ☞ Replaceable HD Lace Hairline
Melt Your Frontal Wig Like A PRO! Pre Bleached Knots Wig No Work Needed | Hairvivi
lace melt, How to melt lace frontal, bleached knots wig, preplucked wig, lace frontal wig, prebleached knots wig, Hairvivi , Faithfully Asia, fake scalp wig, skin melt wig, how to melt lace frontal wigs, preplucked bleached knots wig, most realistic wig
Hairvivi Official Website:
https://www.hairvivi.com?sca_ref=27786...
Follow Hairvivi on Social Media:
Instagram: https://www.instagram.com/hairvivicom/...
YouTube: https://www.youtube.com/channel/UCWK7J...
Facebook: https://www.facebook.com/hairvivicom
-------------------------------------------------------------------
Let's be friends
I N S T A G R A M : @faithfully_asia
https://www.instagram.com/faithfully_a...
Hair page: @fab.u.luxe
https://www.instagram.com/fab.u.luxe
➤➤ Shop wigs reviewed on my channel at discounted price: www.shopfabuluxe.com
LIKE...COMMENT...SUBSCRIBE...It's FREE! :)
♡ ♡ ♡ ♡ ♡ ♡ ♡ ♡ ♡ ♡ ♡ ♡ ♡ ♡ ♡ ♡
▼▼SHOP PRODUCTS USED IN VIDEO:▼▼
►Electric Hot comb: https://amzn.to/2ASZ4Hd
►Clairol Root Touch up: https://amzn.to/3s7efnM
►Curling Iron: https://amzn.to/2O93LSy
►Wax Stick: https:/www.shopfabuluxe.com/products/wax-stic...
►IC Hair Polish: https://amzn.to/3pqWtvP
►Erica J Hold me down glue
►Ruby Kisses Foundation/Concealer: https://amzn.to/3B8NZz3
►Dark Brown Wig Caps: https://amzn.to/2M3QYzL
►Eyelashes: www.shopfabuluxe.com/collections/mink-...
Don't have Amazon Prime? Try it 30 days free: https://amzn.to/2Ve4Vyq
--------------------------------------------------------------------------
WATCH MY OTHER VIDEOS:
No Customization Wig! Blonde Highlight Ombre Wig For Beginners | Prebleached + PrePlucked Myfirstwig
Fix Balding hairline | Old to new realistic wig | Preplucked Replaceable HD lace hairline | Hairvivi
Installing My First Wig Using Celebrity Hairstylist Arrogant Tae's Master Class Method
Celebrity Hair Stylist Secrets Revealed! CLEAR LACE & CLEAN HAIRLINE LACE WIG ft XrsBeautyHair
Celebrity Film HD Lace wig Revealed! | Hairvivi *New 13x6 Highlight HD Lace Wig
Hair Rehab! Fix Your Balding Frontal Wig & Restore Tangled Matted Hair
HIGHLY REQUESTED: MY TOP 5 Hair Companies/Vendors | Honest Review
Realistic Beginner Friendly Glueless Lace Wig - My First Wig Bob
Most Realistic Beginner Friendly Glueless Full Lace Wig - No Baby Hair! Yaki Straight
VIDEO/RECORDING EQUIPMENT
►Camera (Canon EOS Rebel T7i): https://amzn.to/2BPa3AM
►Lighting (Fovitec Soft Box) : https://amzn.to/2CKMqLx
►Diva Ring Light: https://amzn.to/2SulhC4
►Alternative (Cheaper) Ring Light: https://amzn.to/2LGZq7K
This video is sponsored, however the views and opinions expressed in this video are my own.
The description may contain amazon affiliate links, which means that if you click on one of the product links and make a purchase, I may receive a small commission. This helps support the channel and allows us to continue to make videos like this.
---------------------------------------------------------------------------------------------------
B U S I N E S S I N Q U I R I E S
I do NOT need free wigs! For product review or serious business opportunities, please email → [email protected] #hairvivi
Hey dolls, your girl has finally did it. I finally figured out how to make these units look like it's literally growing out your scalp, while gluing it down. I'Ve tried a new method in this video, and i think i perfected it. If you want to know how i did it make sure you stay tuned, okay, so to start off a great install you're going to need to start with a good unit and, as always, you guys know, hair vv delivers one of the best quality units hands down. Guys go ahead and take a look at that hairline. The hairline is already plucked to perfection. The lace on the unit as most hair vv lays are just bomb. Wait till you see when i put it on how clear it is, but before i do that, i want to show you guys what the inside of the unit looks like it's the standard wig constructions with the two combs on the side, one in the back. However, hair vivi does have the piano key elastic band, which helps the unit to fit a little bit more comfortable on your head. Now guys, look at this hairline, as you guys can see, is plucked. You don't need to do anything to it and the lace is so clear. You barely can see the lace on my skin, so a good install begins with a good unit. It makes it a lot easier. Okay, so now i'm just really obsessing over this hairline. So i'm just making sure y'all really could get into this, but here's the gag, so i'm trying a new method. So what i did was something that i don't normally do for a heavy unit is, i actually went in and i plucked one side of this unit. Now i decided to do one side because i wanted to leave it as a comparison and you guys could be the determining judge to see whether or not you feel like that extra pluck was necessary, but i'll explain a little bit later on. Why i did that. So i'm kind of over plucking this unit more than i normally would because, as i mentioned, heavy units usually come pre-plugged and ready to install. So i just want to let you guys see what the unit looks like on the left side, where i plucked it compared to how the unit looked when i received it now, of course, some people like that balding, i'm losing my edges, look for their wigs hay To each his own, if that's the type of look you're going for have at it pluck the unit as much as you want. So the next thing you're going to need to do is make sure you clean the skin with alcohol, make sure it's free of any oil and makeup before we begin applying the glue. Next, i placed the unit on my head so that i could mentally mark the placement on where i wanted to apply the glue. So for today's install, i decided to forgo wearing a ball cap or any stocking cap for that matter, and i'm going to just lay this unit down. On top of my hair for today's application, i am using erica j's homie down glue. This is my first time trying it and i actually can't say that i really do like it be careful when applying the glue, because you don't want to get the glue on your hair. Gluing unit is not really one of the things that i enjoy doing, because i always have issues with either the white from the glue showing underneath the lace or the glue, not sticking. I just always usually run into some type of issue, but i can't say that this install was fairly easy and i don't know if it's just come from me: practicing applying glue a little bit more or if it comes from the glue. But i can't say that i was very happy with its use: it's a little bit pricey, so the small one was all i could afford. I'M using a popsicle stick to just spread the glue along my forehead and i'm spreading it back because i don't want to make the glue go too far down my forehead, because i am going to be short and place that lace in front of the glue. And i just really hate when my wigs are too down on my forehead. I know some people like that look, but for me i just don't like it, even though in hindsight i do think i could have pushed this unit a little bit farther in my forehead, but i digress so i decided to go for three coats for today's install Because i did intend on wearing this unit for a few days and i wanted to make sure it stayed on so so before i begin the installation, i decided to apply some makeup to the inside of the unit. This is going to help it blend better. With my complexion now that i'm ready to install this unit, i'm just going to take the lace from this unit and lay it ever so slightly right in front of the glue once you're done with the placement. You just take a comb and slightly comb. The hair back while pressing on the lace and that's going to help the lace blend in and melt in with the glue. That'S on your forehead, then i went in with my blow dryer on a cool setting just to kind of help that dry a little bit quicker, and then i went on top of that with my elastic band and i'm going to let that sit. On top of my head for about 10 minutes and that's going to help everything melt all together so once the 10 minutes is up, this is what the unit looked like once i took it off. Okay, y'all so pay attention, because this is what i did different for this install first off, you want to use a razor to cut the hairline. I first started off using my regular eyebrow razor, but that one was dull and you want to make sure that you use a very sharp razor now, i'm going from cutting it on the bottom to cutting it on the top you're going to notice my hand, changes Positions because i'm just trying to make sure that i get a really good grip and i don't cut myself and the key to what i'm doing different when i'm cutting this lace is that i'm cutting it slightly behind the hairline. So, typically, i cut the lace without cutting a hairline, but i noticed that to get that look of the hair, looking like it's literally coming from out of your scalp. If you cut it behind the lace - and i just did it slightly and because i did it slightly - that's why i didn't necessarily need to over pluck that side too much, because i didn't take off too much. But i took off just enough to where i'm cutting it behind the lace and i'm just gon na. Let you guys watch and see how i did it and i just repeated the same thing on the other side and then once i was finished, i just went on top of the forehead where i didn't have any makeup and i reapplied my makeup to get it All to blend, and then i'm just parting, the hair in the middle and i'm using my wax stick to lay down the hair. On top. So for this install, i decided to go with the middle part that it initially came with, even though you'll see towards the end that i did eventually change to a side part. So this part remains the same. You just go ahead on top of the hair and you apply the wax stick and then you comb on top of that using the hot comb and that's going to make everything lay down nice and neat. And you want to make sure that you do that across from the front to the back as well, to make sure there's no lumps and bumps on the hair and now, instead of using like the black hairspray. That is sometimes used to kind of clean up. That parting area - i have recently started using this. What is this clairol? I don't remember the name of it i'll, have it linked in the description box down below, i saw irikante use it, so i started using it and it works a lot easier to apply on yourself because with the hairspray it works easy if you're doing it on Someone else, but when you're doing it on yourself, it's really hard to not get that black hairspray on the lace and i'm just going to add like a couple of curls in this unit, i'm not really doing nothing too major. I had some place to go per usual. I didn't really want to add too many curls, but i didn't need to add something because it's a middle part, y'all y'all know i don't really like the middle part. Even though i've really been doing a lot more middle parts, lately a lot more than usual. It still stands to remain that side, parts just look better on me now this unit did come with curls in it already. So, as i mentioned, i didn't really have to curl too much. I just added like two or three curls on both sides and i just kind of left the back alone because it still had the curls and then i'm just gon na comb that out using a big tooth comb. Because i didn't want to keep some of the curls that i just added last i'm just going to go on top of that using some of my hair sheen to give this hair a little bit of shine, and this is what my scalp is looking like now, I will say i went on a date and my date said - and i quote he said i don't usually like lace fronts, but this looks good. This looks real natural, so when i tell you it was given scalp believe me, it was giving scalp okay, but you know it's a hair bb unit, so it makes everything a lot more easy. You guys saw, i didn't have to bleach. I didn't have to plug. Even though i did pluck a little, but it wasn't necessary because honestly, i'm looking at it, i really didn't see much difference between the side that i plug and the side that i left alone. It looks very nice and natural. This is a nice natural lens. I don't know what, how long it is, but everything, as always, will be listed in the description box down below so dogs. If you are looking for a realistic wig that comes pre-plugged, bleached and ready to install, then this is the unit for you. So i'm going to just give you guys a close-up, so you could really get an idea of how natural and realistic this hairline was looking in real life and, as i mentioned, i did turn around and turn this into a side part just because that's just my Preference, so you can wear this middle side part. However, you choose to rock your unit, but babes y'all already know the drill before we get out of here. I'M gon na need your help, naming this wig. What do you think we should call her honestly this, in my opinion, hands down one of the best installs i've ever done. I need a good one. Dolls go ahead and leave your name suggestions in the comment section down below, and i did pick a name for the unit i reviewed last week, the new name as well as the person who submitted the name will be listed across the screen dolls. If you found this video helpful, don't forget to give it a thumbs up and if you're not already part of the faithful fam make sure you hit that subscribe button before you leave, and it's always important until next time you guys stay blessed and if it be God'S will i'll see you in my next video take care now.


Comments
PYT24K: Nah sis, this install is flawless. Love it! I've learned so much from watching your videos. Thank you!
Faithfully Asia: Hey faithfuls, I’m so excited about this simple change I made. Have you done this before, if so why you ain’t tell me? lol If you have any other helpful tips leave them in the comment section. We are a sisterhood. We can all slay our wigs! ☺️
Eulita Watts: This unit looks sooo natural, you can not tell that's it's a wig!! I love your makeup is the Great Job on both
Vanessa Walton: As usual, your hair is fabulous!!!Absolutely beautiful!!!!
Aniya Summers: Flawless as always cant nobody say that’s not coming from your scalp!
Kisa Thomas: I Love how you Slayed this unit. It looks like it's coming from your scalp. Let's call her Kisa. Simple yet Elegant.
Carol ASN, RN: On Par!! SUPERB! I enjoy your reviews. Excellent presentation.
Jo Joh: Beautiful install. Wish middle part looks good on me like it is on you!
tanquantwal: Flawless! ❤️
Michelle Walker: This unit looks so good on you I would like to try this unit
Shalonda H.: Beautiful!!!
Carmen S: Hey Thanks for using my name on a wig THAT tight!! lol. Beautiful!
Melanie Rice: Love the look! I've been checking out Hair vivi and this video made me order!!!! Thanks.... Call her Meghan!
Lorna Dottin: Love love it it looks awesome I need one like now I live in Barbados
Harmony Nae: Great install!! What was the name of the black clariol product used? Thanks in advance...
CL'audia Anthony: Great review. I would name her Latoya.
Dana Hudson: Nice unit & look amazing on U & hope the date went well
Ms Keys Note: If I name the wig, do I get gifted it? Call her "FAITH" coz she's holding onto your scalp faithfully.
Glamladye1: Gorgeous !! What color cap did you order ? I’m on the fence Lol
Brown Ambition: Great video!! Can you post the name of the product you used to dye the parting area black? You said it may be Clairol??
Amber W: Hi, what was the name of the product used for the color?
Eugenia Phillips: I love Hairvivi wigs! Name her Riley Kay!
Karen Harris: Hello, can I have the name of where you purchase the wig from?
Julia Shultz: First...... you look beautiful thanks for sharing
kasia Borowicz: Looks great! Sadly, I can not afford wigs like that. And those more affordable have darker lace which is difficult for me to blend with my forehead. I will save for hairvivi though. Btw, you said about your date... Do you tell your dates that you wear a wig? This dating while wraring wigs really scares me. Any advice please? Xxx
Kimberly Dorsey: Name her "Heavenly"❣️
Laquanda Lapsley: Very Pretty
Faithfully Asia: $25 Off code: Faithfully (limited time) after that code will give $10 Off (permanent)
73pinkchocolate: So pretty!! Hope ya had a nice date!! Name her Sasha!
Natnice: You always going on a date, perhaps you'll vlog that for us one day..lol...I'm a bit confused however, why did you decide to pluck if you were going to cut behind the hairline?? Your install is flawless btw,tfs!
L B: So, basically you cut off all visible lace?
Michelle Ford: I think the name of the wig should be called Facebook that's a new one or safe anyway you look beautiful in it
GabiKay: She looks like a Fantasia to me :)
Dr Herieth Kamote: I like this unit,where can I buy it?
Annie: I'll call the wig "naturale" cus it looks like your natural hair. Do they come in gray cus I'm 60 and letting my platinum come in and loving it?
Felicia Thigpen: Now that is a beautiful ❤falanna
Kersha Beaver: That wig is snatched
Susette Rosado: Chevon is a good name for that install
butterli bloom: Love you Asia yessss
Chat Jay: What color is the lace ?
Kim Knight: Nope ...not the glue but wig nice that glue is not good they have other things you can use besides glue that forehead break out plus that glue turns your forehead
Brenda Nkhoma: Asia, Asia, Asia!
Felicia Thigpen: Falana adoring and loving is the meaning
Jenna Hudnall: Call her Ebony
BBHair1: Why on earth was he talking about your lace!!!???
Armenia Jones: I thought she was never was going. Take up to much time
Karen Taylor: The unit is flawless. Name the wig lady k
peepla7: Call her Dater.
Renae Cobbins: Call her black beautiful
Armenia Jones: Smile more
Black Diamond29: Sasha is her name!
Armenia Jones: Take. To long with. Your clue
Armenia Jones: She look mean
At this moment: Nairobi