Straight Wig Lace Melt On Chocolate Skin |Lace Melt Adhesive |Dola Hair
- Posted on 17 February, 2020
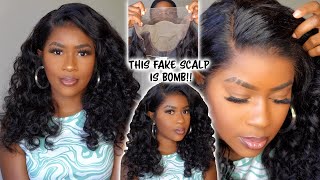
- Fake Scalp Wig
- By Anonymous
#dolahair #invisibleknotwig
The same wig in the video invisible knots wig
Dola Hair Super Fine Swiss Lace Wig https://bit.ly/37bX76u
Dola Hair Breathable Fake Scalp Wig http://bit.ly/2Q5xEWl
360 Fake Scalp Wig http://bit.ly/2MyJyGD
Hair Bundles With 6X6 Closure http://bit.ly/33OFM1P
Dola Hair Real Customer Feedback http://bit.ly/37QKoqS
Follow US On instagram http://bit.ly/33uNsWk
Welcome to IAmBeautifulHustler Channel
Be sure to SUBSCRIBE & TURN ON YOUR ALERTS
CONNECT WITH ME✨
Personal IG: Iambeautifulhustler
Business Instagram:_Beautifulhustler & @thebeautifulhustlerbrand
Twitter:_Beautifulhustl
YouTube: IAmBeautifulHustlerTV
✨SLAY WITH BEAUTIFULHUSTLER✨
TO PURCHASE MY PRODUCTS :
WWW.iBhSlays.com✨
Lace Melt Adhesive,
Melts Belts,
GLAMWAX
and more ❤️
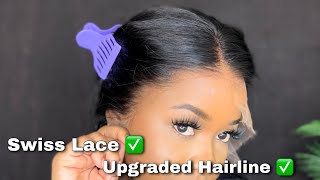
Hey guys and welcome back to my channel, I know it's been a minute, but I am back with a new tutorial now before I even get into actually installing this wig. I just want to show you guys my like bald cap method that I do now today. I will be using a cap, that's closer to her skin tone versus a nude cap and doing the foundation so first things. First, I'm going to go ahead and just take a little cloth and I've cleaned her hairline with 99 % alcohol, and these are her brain. She brought her own hair guys, but she was she had a fro for a very, very long time and this money has got longer long enough for her to actually break it down. So she just went ahead and braided her hair down what she did. Rebranded it cuz. I brought it down the first time in the last video, but she regretted them herself and I'm gon na show you how I do my cap method now. First things. First, once you place your cap on, you just want to split two little holes on the ear tabs. That way, the ears are outside of the cap and you don't have to worry about like spray getting all over the ears and you know pulling the cap off the ear. Now you just want to go in with the holding spray. You can use a Bed Head. You can use bio silk, you can use the God to e. It really doesn't matter just your preference of hair spray you like to use, and you just want to spray their hairline from ear to ear and just blow-dry. It won a heat setting on from ear to ear, just using your hands to kind of push that cap into the skin. So it can be nice and flat and once it completely dries and you do have to let it completely dry, just go ahead, and I like to slip the middle using my scissors and if the cap is a little too far down. I just go in with my fingernail and just like pull the cap up and you want to cut as close to the cap as possible, like as far as the root of the cap. That way, everything that you cut is still tucked down really really good. And I'm just lifting and cutting off that extra cap from around that hairline and just cutting a little flap around the ear as well. I'M not gon na cut the thick piece in the back of the cap because I like to use that to hold the wig up, hold the bracelet underneath the wig, even though I do sew around the cap. I still like to just keep that thick piece that just in case and if you ever feel like it's too much cap, I'm still far down just you know like I said you can use your finger and just slide underneath to pick up those pieces, and you Know cut off the extra, and once you do that step I like to just go back in with some alcohol and clean that hair line once again to just make sure the application of the cap is nice and neat, but now we're gon na get right into This tutorial portion of the video today's henna sobota by a doula here, and oh, my god when I say guys this week, was so so freaking dope, like it was extremely soft and so so full like this is one of the best wigs that I reviewed for A company as far as stray hair, like the quality of this hair, was everything no lie and as far as bleaching, I'm plucking a nice. It was super easy to bleach the nice and pluck this our unit. This is a 13 by 6 unit, so it has a lot of parting space in the center, but it is more of a least one as far as being on the sides. So today, as far as styling, we will just do a simple middle part with some in baby hairs, and this is also going to be a race mode, video on a dark skin. I have a 50 Satori's on my channel, but you can never have too much of the same thing just you know, because some people may have seen my older videos and some may have not so first things. First um, if you are using a dark tab like I am, then you don't have to do the foundation method onto the cap. But if you are using a nude cap - and you have a client with darker skin, make sure that you do apply your foundation that matches their skin tone the best as far as even if it's just like one shade, darker or one Lichter, just make sure you Put that dog Foundation and I'd like to use the Ruby kisses foundation for her skin tone in level 16, and I just applied that foundation on the inside on the top of my lace and if I am using a new cap, I do apply that on your New cap as well now go on and of course I am well. I will be using my lace, melt adhesive and you guys can purchase this glue on my website down below in the description box, as well as mine, melt belt, and my wife stick as well. I'M just used my website and purchase all of your products. I do have the products separately and I do have it as a deal package. So just whatever you need, you can just go ahead and order that down below and I will be using the first layer on one camera and just probably a little bit of the last one before I actually pull the lace down into this clue. So yeah just stay tuned for that, and I will come back on when we get to the next step. Now, once the lace glue, dries click and go ahead and begin to pull your lace on into the glue, and I always like to start with the center piece first, when I'm working on my clients head about what's gon na wiggle myself, I always start from my Sides first and then I do the center and then the other side, but because I do have help with the client holding the lace down, I decide to start from the middle and have them hold inside. As I place it, and these you know the you know the lace, you know the place where I wanted to lay or whatever. So once I pull that middle down. I pull one side down, have them hold it and I put the other side down and put into place and let them hold it as well, and I'm just going to take the comb and just comb all of that lace into that glue. First, before I even begin blow-drying it and I'm just combing the lace downward forward backwards, sideways just really getting all of that lace into that glue, and once I finish calming all of that and I'm gon na go in with my blow dryer on a heat setting And just blow dry that lace, then using my fingers to kinda. You know gently push the lace. You do not want to push it too hard where you mash it in, but a great benefit that you are do get with using my lace minute. He said, even if you do push the license of the glue, it does not give it that you know that black mash down dirty look like the glue, that's usually like sticky and clear. If you push the lace down, it does give you that really dirty messy. Look underneath the lace, but with my lace glue and it being a clear glue that turn I mean a white glue that turns clear. It does not give you that nasty mash down lace, but just all in all do avoid mashing. The lace amber just gently push the lace into that glue, but movin right along I'm, going to go ahead and begin to razor off the extra lace, and I did use my scissors and then just like slit for different sections. That way, it's easier to raise off, and I do like to give myself a little split to make the raised ring on for each section. You know easier as well and just always be sure to do cut that relation around you do not want to need any lace sitting on top of your clients, ear. Just um, you know, make sure you do cut around there and make sure the wig is not sitting on top of their ear, or you know too close to where it can be very, very uncomfortable. So sometimes you have to go in and either cut some of that band. That may be on the lace front, wigs just to make sure that if it's properly or to the clients head because they're gon na be when is install for a few weeks. So you do want to make it as comfortable as possible that way, it's not irritating them around the ear area and I'm just gon na go in with this little spatula and just apply the glue and the little pieces that are still lifting and just spreading it Out using at least two to three layers of that as well, underneath those tiny little places and just pushing the lace until that glue or using my rat tail comb and just really get me melted, melted on in and the same thing, I decide of course, guys You already know I'm gon na repeat the steps to the other side as well to get everything all tapped down before. I tie the lace down with the melt bail to secure the lace. So now I'm just want to take that trisomy and spray that Tresemme all over the front of the hairline and then go on with my elbow inside on that lace. You want to let it dry completely before removing the band that way you don't have to dry. It after you take the band off, and just this combination alone just gives you that really melted look like to the max, and it helps you secure your lace down letting the glue and everything just really marinate into the skin and just give you the best. Perfect results ever another. That'S completely dry, I'm going to go ahead, remove that band and, as you can see, it's pushed into that skin and I'm just gon na go ahead and just comb out the baby hair. That is, I mean not the baby here, but the holding spray - and I love this trust me because when you comb it out, it does not give you any flakiness and it still gets right back soft, the same way that it would, if you were to use Mousse to do this method, so I really really love, distrusting me holding spray and I'm just going to go ahead and begin to part this way down the center as far as getting ready to the styling, using my wax stick to apply on the front of that Hair line on the top of their parting area as well for my preparation to hot comb, the lace and just make everything super flat. Super neat and super cute before actually getting into the styling of the baby hair, so we'll just hot comb. How calm hot comb until I have reached my final look of flatness and, as I always mentioned, the key to getting your install super super flat is to braid down the shoes underneath I always spread the hair down the center first before braiding. That way, it's not a braid in the center of the head, just in case the person wants to do a center part, and you just want to braid it as small as possible just to really get their really really neat look, especially. The person has really thickened fool hair. You really want to take your time and write that down nice and small, and that's how I get all of my wigs on my installs to be super freakin flat like that is so important when doing a lace, because, yes, we know it's the lace. Yes, is we, but just get it as flat as possible, and you know it will help you get those bond results and right now, I'm just taking some alcohol and just cleaning up that extra holding spray to make the hair like super neat and clean, because how Clean on the install is it's also very, very important, so just clean up any message you may have left over from the holding spray, and that way everything is just me and where it needs to be, and I'm just going to continue to hot comb out everything Until I have reached my desired flatness, as I mentioned before, getting into the styling and placement of the baby hairs and now it's time to get the placement ready for the baby here. So I just like to part off small little sections and to make the front look very neat, I'm trying to create like a symmetrical triangle, looking like part in the center, where it's not just. I grab the hair directly from the middle I like to just grab a hair a little bit over away from the part that way it just you know in my pan looks better, but I'm just going to grab those in little sections and I'm going to just Raising them down really short and use on my new technique of drawing baby hairs by using a holding spray to UM, create my baby hairs. I'M going to just spray the holding spray onto the hairs and just using my edge brush those baby hairs into place, and the blow-dryer, if necessary, to blow-dry the baby here, and I got a thing I like to do - is just take that holding spray as well And spray it on the teeth of my edge brush comb part and use that to sweep and comb the baby here and it's just kind of like distribute the product all over the hair. So it makes it you know quite easier for swooping, and I'm just going to do that now. The kids are, the baby has is just cutting them short enough to you know where it's easy to swoop, and it still looks good so make sure you chop it down at least about an inch or a little less, but never too too short, where it's nothing. To suit guys, like just be mindful of how you're cutting it and, like I said, just use them as that, I'm using to create those baby hairs if it works for you and just blow-dry it, and just repeat that steps until all of your baby hairs are Complete and then I would get into the finishing touch she's of this style, you so now that I am done doing the baby here. I'M just gon na take a little holding spray and just spray. You know everything on back just to make it nice and smooth not too much just a little bit to just get all of those little flyaways and make everything nice super neat and sleek, and just you know just give it that perfect, clean look and, of course, I'M going to our indecision by concealing and black Springs apart, to make it very very precise and clean and perfect, and once I do that, I am done with this style. Like I mentioned, this is one of the best wigs that um I have purchased from. I mean whoa, not that I purchased, but that I have reviewed for a YouTube company, and this wig was super. Super soft, like you, can tell from the video of the unboxing just looking at it like the wig, was everything, but this pretty much sums up this tutorial, I'm drunkest it in this part. I am just pretty much finished, I'm just going to add a little shine to the hair just to get it like a nice shiny look, but thank you guys for tuning into I'm beautiful TV. Of course we have more mature, more tutorials. Coming so make sure you turn on your notifications and be prepared to see the new videos. I just want to thank you guys and I love you guys for the constant support the orders everything he's doing to support me in my channel and my business and thank you all. I love you and I will see you guys on the next video


Comments
Zahrea Clayton-Williams: Beautiful!!! From her skin to the install!
AmbitiousBonnie: You did such an amazing job!
rcottman02: That looks amazing.
Jasmine Brooks: Girl that hair looks super silky and just so soft wow, u did that baby I love it
DamnPamComeOn: Bruh...this was a mfn melt. Like a MELT.
_Vanntastic: How long does 5 layers make the lace stay down? The more layers the longer it stays down right... I’ve only been doing 3 but you got me wanting to do more.
Princess Toyia: I missed you girl!! Flawless as usual!!!
Jonnie Cheatham: Fantastic job and your client is Beautiful!
Moon-Brook Reacts: Yasssss I needed this!! your videos is a God send
LolaRenee Robinson: That’s one pretty black sista right there And she’s SLAYED
Kia: Hey girrrl! I love watching your videos..I was wondering if you can do a tutorial on how to style a 6x6 closure unit in a style other than a middle or side part? Like maybe in a half up half dwn tutorial from start to finish. I have a 6x6 unit coming and im not real big on middle parts. It is a loose wave unit btw. So if you could squeeze in a video on this type of unit I would LOVE that..lol..thank you and stay blessed!
India Gibbs: This is amazing
Jas: FLAWLESS JOB!!! Are your lace melt packages available for pickup in Miami
Life With Nae: This has me sold ordering my lace melt n belt now
Emmanuélla O.: did you bleach the knots beforehand?
Jose Quijano: Bravo !!
thetalkofnewyorkk: How do you get rid of the halo hairline?
Charminque Greer: How long is shipping on the lace glue I live in Maryland
Hair By Zy: What spray are you using?
christabella201: Well done. She's one fidgety client tho
deseraymiles87:
O'shenique Colar: Quick question being that you bleach the knots why did you put concealer on the lace ? I’m very curious lol is it to match her skin color being that the when you bleach the knots the color wasn’t the same as her skin tone ?
Ngozi E: My lace is always so light... what do I do?
Melanin Queen: What color is this cap