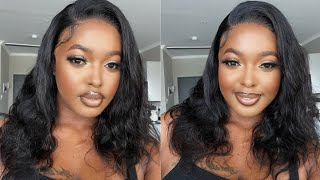
What Lace?|Slay Your 6*6 Lace Closure |Body Wave| Ft.Celie Hair
- Posted on 09 September, 2019
- Full Lace Wig
- By Anonymous
★Celie Official Store : www.celiehair.com
( Use Coupon Code: “wig10”Can Get Extra 10% Off )
Follow us on Ins to get free gifts: http://bit.ly/2sD7ttm
Celie Bundles With 6x6 Lace Closure➤ https://www.celiehair.com/bundles-with...
Celie Bundles With 5x5 Lace Closure➤https://www.celiehair.com/bundles-with...
Seller Recommend 360 Lace Frontal Wig ➤https://www.celiehair.com/wigs/360-lac...
13x6 Deep Parting Lace Front Wig ➤https://www.celiehair.com/wigs/13x6-la...
New Arrival Full Lace Wig ➤https://www.celiehair.com/wigs/full-la...
Hot Sale 13x4 Lace Front Wig➤https://www.celiehair.com/wigs/13x4-la...
2019 Celie Fashion Sale ➤https://www.celiehair.com/promotions
WhatsApp/imessage: +8617537405382 Email: [email protected]
#celiehair#celiebodywave#bundlesdwith6x6laceclosure
Follow Us Save More Money:
Facebook: http://bit.ly/2R8fZui
VOTE FOR BEAUTIFULHUSTLER ‼️
CONTESTANT #2 ON @LUVMEHAIR
IG PAGE
Welcome back guys and before we get into this tutorial, I encourage everybody to please go vote for me on at love me, hair paint on Instagram. Please comment number two and tag beautiful hustle on Instagram. I'M really trying to win this contest. So please do me that favor, but let's jump right in the tutorial. So today I received hair from Seelye hair company and they sent me over a 6x6 lace closure and three bundles of body wave hair. Now I love how big this closure is, because it takes up so much space and I was able to do a more creative look for you guys today with this tutorial video. So here is what the closure and the bundle looks like right out of the pack. The burners are extremely soft, very full, and I love how full and how big this 6x6 lace closure is as well and it did come. Pre plugs and I just plucked a little bit more and I went ahead and bleached my knots and everything like that. So we're gon na jump right into this video. As you can see, I already have her hair in the ball cap and everything, and like I mentioned this, is a 6x6 closure and it does take up most of the space on your head as if it was a frontal. The only thing you're probably have out is the one like an inch on each side by your ear, like you can see there in this clip here. That'S all that you will have left out, so it does take up like most of your head space. Now for today, I am gon na show you a little bit how I sew down that 6x6 lace closure, but this will be a actual, quick weave video. I would just like to do a little quick little one, two one, two on how I bombed in the bundles, but first thing you want to do is have your client hold inside of that lace closure, and that way you can begin to sell that closure. All around now it is a little bit harder because the closure is so big and it can bend in different areas like that. So, as you saw, you just want to stretch that closer stretch that closure out all the way that way it can still lay nice and flat when you want to part it, and everything like that, so I just kept, you know, put some force on and pulling It that way, you can still lay smooth and just stitch it. You know as close as you can without you know, you don't have to do it like super super close, but just enough to make sure that it is laying completely flat. Now, like I mentioned before, I will be doing a quick leave installation today. So after I finished on this closure down, I will begin to bond in the tracks in the back now, because this is really really full and my sister hair is small. I did not need the full three bundles, so I probably got like two and a half in, but that lace closure takes up so much space that your hair will still be full. Now I'm gon na go in with the longest bundle, which is a 24 inch, and if you notice, I placed that second cap on top of her head on top of that closure, and I sewed it down as well, because I'm going to bond that hair. All the way up to the top until I get to that lace, closure and I will cut that extra cap off the top now I recommend - and I always do this - and I've been doing this for the 70 years up and in this hair game. I always use two stocking caps when bonding in hair some people use one. I don't think it's the best idea to use one but to each his own. I just like to make sure that my clients will have no glue in my hair when they take out their bond ends and they never I've never had a complaint about anybody having any glue on their hair, and things like that. So if you are like heavy on glue, I recommend you use two caps see I'm light on glue, so even with one cap is still gon na, be nothing on their hair, but you know just do whatever works best for you, but if you really do want To protect your clients, hair use two caps, but if you decide you want to use one tab, then I do recommend that you get some black tissue paper and put it on top of their hair before placing this and cap 1. Now I am I'm just body man, the tracks all the way up to the top, and I'm just wanting the same. Like seeing my circle motion, you just want to build the tracks going all the way up till if it's perfectly around that lace closure and once you get it all the way up to the top. You will cut that extra cop cap off at the top, and that way you could begin to lay down your lace, closure and everything would be nice and flat, and everything like that so here I am cutting off the extra lace. I mean I don't know what you say unless you guys, but I cut them, cutting off that extra cap around that closure and I'm just gon na bond one or two more tracks, because I just wanted to be very, very seamless when I laid it down now. For today I will be using a boat, hold lace, glue and I am using a boat hole active and I'm going to lay down her lace closure with that I love this boat hole glue and I also love the ghost barn as well boat holders. My first choice, ghost bond, is my second so yeah, those pretty much the only two glues that I use. But if you guys do want me to do a review or my some other glues that you're curious of trying just comment down below what glues they are and I will look for them, purchase them and you know, do some videos with how to use those blues. Now, when it comes to the closure, you want to make sure you do the same steps as any of my other closure videos and cut off those extra thick tabs on the side and, as you can see how I cut it for me, having that closure pull It back and I'm just gon na go ahead and lay that boat hold active and just using a spread. Stick. You want to spread that glue out nice and flat and smooth as possible, and that will also help it dry clear, much faster, so make sure you are spreading it out really really really smooth and flat. That way, you don't have to worry about any white residue underneath the lace and it won't be all clumpy and ever and it will also dry much faster. So for her care, I did use four layers, so this is after layer, four I'm going ahead and pulling that lace down into that gloom, and you want to make sure you just have them hold inside down nice and firm and take your blow dryer and take Your blow dryer on warm to hot heat. I know I get this question a lot. What'S happened? What temperature am i using I'm using heat? My blow dryer is broke. It is stuck on heat, so everything I do is on heat. So every time you see me do a lace blow dry. My hair anything just know it's on heat until I buy a new blow dryer nice by buying new blows, I'm still probably gon na blow dryer on heat, because to me it just melts so much better. That way, anyway, but once you finish, blow-drying that lace just take your razor comb, your razor eyebrow razor, sorry and you know, remove the rest of that excess lace and taking your glue just go ahead and tack down those areas and melt them into the skin. Using your teeth on your comb and just pushing it one in, and I also use my students just to cut off a little extra lace like you, don't want to make. You know you don't want to have that lace too far down. So if you feel like you need to move it go ahead and cut it off now right here. This is my meat unpackaging, my beautiful hustler melt belt, and I made this melt belt long enough so that you can least cut it in half and that way you can have two belts out of one purchase instead of buying two each pack is, it gives you Like a good length, so you can use, you could cut your belt in half and use it as two separate belts. So the one gets dirty and you don't feel like cleaning. You can pull out a fresh one. So I went ahead and tied her lace down with my melt belt, which you can purchase on my website and the link listed down below, and I laid her lace down and like here for about ten minutes. I did not do the moose method. So if you do the moose method, you might have to let it dry a little bit longer that way your legs does not lift at all, but because I did not use any moose today and I just tied it down. I only had to let it sit for 10 minutes, but if you do use loose, I recommend between 15 to 20 minutes under a dryer, so it can be completely completely dry. But here I am just sectioning off the hair, where her baby hair is going to go for today's thought, as you seen and its thumbnail would be a top ponytail, and this is body wave hair. So I just added just a slight curl into the top layer of the hair, to give it a more defined, curl look and I'm basically just parting off a square and the biggest thing to me about these 6x6 clay Soldiers, like you, wouldn't even think that this Is a closure like if you sing her out on the street, you probably think she has on a lace, wig or a fun tool and stuff like that, but this since past exclosure has so much parting space on it that it's just like unbelievable. Like I absolutely love these, I think this has become my favorite size, lace closures. So I know I would definitely be adding all these 6x6 closures to my site soon. So, yes, honey, let's get into the styling. So now that I went ahead and sectioned off the top part, where the punch that is gon na, be I'm just going in with my shoes on collection of wax and using my hot comb and just pressing out the roots all around. Where her parting area is because you want that to lay nice and flat when doing any hairstyle is some very important that you be neat, because that's what people look for, neatness, consistency and everything like that. So just take your time, do it yeah. I know most people hate the hot comb, but they want to be late or they want to be playing. It'S just that simple. You want to plan your hair or you want me to leave so they want to be late, tell them they have to get their hot comb to the roots because ain't, nothing else gon na, do it better, but, however moving forward, I am just taking our wedding. Now and just putting it all over that top area where her ponytail is going to be, and then I'm gon na hot comb that out as well, because you want that ponytail to be smooth in me as well. And once I do that, I'm going to take some got to be spray, and just for just a little bit like towards the top, so no hairs or any flyaways will get in the way of me laying her ponytail and be careful when you are hot call Me because you don't want to burn any holes in the lace or you don't want to burn your clients, so make sure you be very cautious of that. And here I go with the got to be spray, and I'm just like, I said spraying just a little bit and I am going to secure her top ponytail with a black rubber band. Just you can use a black scrunchie of a banner, don't matter, but the thinner. It is the better that way when you use a wrap around part around the ponytail. It'S not bulky is like small skinny and neat, so I would definitely recommend a rubber band. Of course, but if you do have like a finish, scrunchie that'll work as well. So here I am putting my hair up in a ponytail and I'm just gon na do the wrap around part and when you're doing the wrap around you just want to take a thin piece of that ponytail here, and you just want to wrap it around that Rubber band that makes it look so much more neater versus you just leaving a rubber band showing like the look, will look so incomplete. If you do not do this step so make sure you guys complete this stuff, whether you're doing the full head in a ponytail. Just a little piece less than in two ponytails, I don't matter what you're doing just make sure you guys do that wrap around. It makes a major difference in the finishing look. So now I'm getting into these baby hairs I'll cut that hair down to about an inch or less and for the scoops today I will be using the black got to be gel um guys. I think this is just my favorite way to do the baby hairs, but I would do a four bit here tutorial and I will do me doing moose baby Harris first, since the got to be baby hairs and you guys were vote which you were, which way Do you like best so that's coming very, very soon so uh tune in and keep those bills turned on and make sure you are subscribed. So you don't miss that footage that I will be releasing but yeah after you do each baby hair, but they got to be gel. I recommend that you blow each blow dry, each baby hair as you go along that way, your legs won't lift or anything. So you know that's what I like to do. I just put a little gel on the back of my hand, use my edge brush I swoop, and then I grab my blow dryer once it's smooth where I wanted to go, and I just blow dry it down in place before I move on to the next One so as far as baby hair place me, you know everybody is different, so you kind of you know just got ta go with the flow of somebody's head and you got ta kind of just know like where a swoop would look good at so I just Went with the flow as far as her baby hair placement for some people, they don't like in the middle of they had some people love it. So you do want to ask their preference and then you do what you think it's best for the look to look. You know really nice, but that's so simple, so easy and look how fast it is. Will you do the got to be gel? If I were to did the moves, I would have had this hurry up into a wait, dance, how you down dam, let it dry and it's just like it makes the hair styling process so much more longer. So that's why sometimes I just get straight to it. Like as far as they got to be gel now, like I mentioned before, I am going to add some light Wong curls to this. So I'm just taking my little conure of curling iron and I got this from Walgreens and it probably looks like no more than 30 bucks, but they do get really really hot and I like them. So I just wrap the hair around it and I just hold it for a few seconds. I scrunch it up and then I release the curls, but I'm not going to show you me curling the whole entire thing, so I'm just showing you like just a quick little snippet of me, the one that ends and one side of the ponytail and I'm gon Na do the other side off-camera and then come back and show you guys the finishing look now as far as how parts on the side, I did go ahead and do my black spray and concealer method just so. The parts could look so much more cleaner and this is pretty much the finishing look like I said I just added those who want curls lightly at the top layer of the hair, and this is the finishing look. She can wear the ponytail to the side or just right down the middle, but I hope you guys did enjoy this tutorial. Let me know what you think about it in the comments and don't forget to vote for me or love me, hair. Page number. Two. Thank you.

Comments
Camilla Venise: This is BEYOND BEAUTIFUL amazing job!
Aislin Bailey: You should do a workshop for traditional sew ins, frontals, etc. Cuz I would most definitely pay for u to teach me.
Kierra Malone: Het hair looks awesome. The hair looks so bouncy and full.
SkindeeP 001: I came here to see perfection but u hit me with some excellence lol great work as usual
AngieHairandNailz Joc: Beautiful work!!!! Wish it was a DOUBLE BUTTON ....AMAZING
Sari: You did that !!
Nettie: Cute as always hunty ❤
Shannakay Griffiths: Hands down one of my fav youtuber when it comes to hair
Netta Bear: Who are these people that dislike the video? Like really? How? Why would you???
Yesenia Vasquez: What lengths are these bundles?
Robbie Johnson: Beautiful
Jie Rogers: Can you do this with a 5x5 closure ?
Islandgal_ Rae: bro ,she bad wit them wand curls when she started curling i'm like oh ok she certified wit it period sis love dis❤
MzInDependant_Tisha: damn u a beast!! love love love this...its beautiful!
ShesA Diamond: Wow, talent
Lisa France: Beautiful young lady.♥️
IAMBEAUTIFULHUSTLERTV: PLEASE GO VOTE FOR BEAUTIFULHUSTLER (#2) on LUVMEHAIR PAGE ON IG PLEASE AND THANK YOU
Shandell kute: The way you turn her head crack me up lol you the best
Shanequa Shuntay: Do a quick weave with the grow protect
Ms SeaPortCredit: Flawless...Your sister is so pretty
Truthbetold: pretty
Jay🧿♥️:
Keeping Up With Kira: Can you do a review on walkers tape. Also if you need any hair models lmk I reside in the South Florida area
Shanikaa: can you do a review on lace grip?
Zipa stewards: what was the length of the bundels
Deelkas Jones: What's the link to this hair??
orua mercy: You are extraordinary good ma
Killaxflow:
Tempestt Daniels: Did yu use all 3 bundles?
CoCo Lun: Yoooo
Princess Dior: Do you have a baby hair video ?
Call Me Bailey!: Why not just get a frontal?
ItsDalora✨: Bruh why do y’all be putting the wig wayy too far on the forehead? it makes it look more fake. Her eyebrows are almost touching the hairline..
Peaches Nicholson: There is no “such thing” as the word “sunt”. It’s “I received”...Just a lil FYI.