Mila By Jon Renau In Fs26/31S6, Salted Caramel, Wig Review, Color Details, Compare To Julianne Lite
- Posted on 10 February, 2023
- Full Lace Wig
- By Anonymous
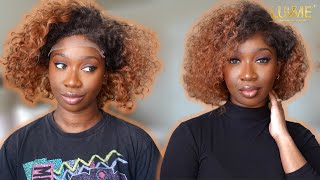
This is a wig review of Mila by Jon Renau in the color FS26/31S6, Salted Caramel.
** I purchased Mila from Wig Studio 1 with my own funds using my employee discount. You can purchase Mila at Wig Studio 1 - https://www.wigstudio1.com/products/mi...
Mila is a beautiful wavy, mid-length style that is light to medium density and has an extended lace front, a mono top, and a wonderful hairline!
In this video I also discuss the color details for Salted Caramel and include styling tips for how to keep the fibers out of the face and how to style her into a low ponytail. I also compare Mila and Julianne Lite by Jon Renau. Lastly, I show Mila in outdoor lighting.
** I purchased:
1. the "isteam Steamer for Clothes" from Amazon
2. the AWD Medical Silicone Scar Sheets from Amazon
** Links to previous videos:
1. my wig steaming video - https://www.youtube.com/watch?v=jcDltc...
2. my review of Julianne Lite in Shaded Mocha - https://www.youtube.com/watch?v=eB--hj...
My head measurements are:
Circumference 22”
Ear to ear 12.25”
Forehead to nape 14.5”
Hairline to bottom of chin 7.25”
I can be reached at [email protected]
Follow me on Instagram @micheleswigreviews
#wigreview #jonrenauwigs #jonrenau
Hi everyone I'm Michelle, welcome back to my channel this week. I have another lovely wavy synthetic style to show you. This is Mila by John Renault in the color salted caramel. I'Ve been wanting to try this color for quite some time, and I just love these mid-length loose wavy Styles, so I'm very excited to show her to you before we start. I wanted to mention that I am one of the admins for wig studio ones, wig and topper support group on Facebook and I purchased Mila here with my employee discount. So let's go ahead and look at some of the details for this lovely wavy Style. This is a bob style. I would call this a mid-length style and it reminds me a lot of Julianne and Julianne light. I actually have a julienne light that I've trimmed previously and we'll compare these two Styles a little later in the video. As you may know, Julianne and Julian light are angled bobs and you absolutely have longer fibers in the front than you do in the back for Julianne and Mila. Here is all one length pretty much. There are a few layers here and there we'll look at that. More but it's really one length, so let's go ahead and look at the lace front first, and this is very well done - you can see there are some lighter fibers in the front there helping create a really soft hairline, and then you have that dark rooting. And interestingly, Mila did not have a zigzag parting. When I received her so um, we will go ahead and add some scar tape under there, but I don't need to change that parting really. I do think I'll want to steam the fibers away from my face, because this is what she naturally wants to do and if you've been watching my videos, you know that I like to steam fibers away from the face so that they don't fall in the face. As much so uh yeah, let's go ahead and look at this beautiful style from all sides. I have not done anything with this style. I just took her out of the box, so we will do the styling together, but let's get a good look from all sides here. She is from the right and the back and the left just a very Charming wavy bouncy style, and I love synthetic fibers because they require less maintenance than heat friendly. Synthetic fibers do next we'll go ahead and steam these fibers away from the face together. We'Ll look at the cap: construction for Mila, we'll compare Mila to julienne light, look at the similarities and differences we'll go over some styling options for Mila and, lastly, I'll take her outside. So you can see this beautiful color in natural light all right. So I have Mila on a blockhead here and we'll go ahead and steam these fibers away from the face. I love to do that with my synthetic Styles. Even though these are not heat friendly fibers, you can absolutely style them with steam, and I have a video that I filmed previously with all the details about my steaming method, and I will link that in the description box down below so looking at Mila. I see that the on the left side here, I think the fibers are already staying away from the face quite nicely. I don't think I need to do any steaming on this side. It'S just on the right side here that I think we want a little more lift and we just want the fibers to stay out of the face. So what I like to do is create two separate sections. I feel that that helps with the Steam and it's just more effective. So I just create two loose sections make sure they're about equal and then I pin it in place. Give it a little twist and pin it in place all right and we can start steaming, and the one thing I do want to caution is that when you're steaming you want to be careful and the direct the steam towards the fibers, not the delicate lace front. Here so this is my eye steam steamer that I like to use turn it on okay. So let's go ahead and steam that back section all right. I think that's good and we can go ahead and steam the front section as well. We will want these fibers to cool once we're done, I like to give it a little twist and then I'm going to clip it behind the other section, and that's what that looks like in the back and if it's too tight, I like to loosen it a Little, I really want the the steam to get into the fibers to change that style. So, let's steam that all right, I think that's good. Now I will let her cool and we'll put her back on my head and see if we like the results. So now the fibers are nice and cool and we will go ahead and remove the clips to see if we like the result. But first I just want to show you what I like to do to create a natural scalp appearance. I like to place a piece of silicone scar tape on the underside here of the part line to help create that scalp appearance and I like to use the AWD medical. I just always like to show you this. Just in case you haven't seen my previous videos, so you just remove the tape from the backing place it on the underside, where the part line is - and you can do this with a mono part or a mono top, and it adheres really nicely, and you can Even wash your wigs and it often normally doesn't come off so there we go now we'll go ahead and put her on, and I like to place the lace front on my forehead, which I do shave a little bit, I I just find that the lace melts Into my skin more, it has a very natural appearance if I don't have any little baby hairs that are peeking out there. So I place her on my forehead and then just pull the cap over my head. Okay, so let's go ahead and remove these clips and with my curly Styles, especially, I really prefer finger combing to using the genre no wide tooth comb. You can do that. I just find that I really like how gentle this is for the fibers and if there are any Tangles, then I feel them very quickly with my fingers and can be more careful and gentle. Oh, I think that's nice. Yes, that's how I like it. So let's go ahead and do the test to see if these fibers really will stay out of my face now again absolutely now they will still fall forward a little bit, but certainly much less than they did before, and we will go over styling options as well. For holding these fibers back or clipping them back if you're working throughout the day and really don't want any movement with those fibers, so I think this is adorable and I will absolutely finger comb these curls a little bit more and uh just loosen them up. You can also shake your wavy Styles if you want to just separate the curls a little bit, but this is what we have, and this is how I like my wavy styles. This is very pretty. These curls are just so lovely and I find that with the synthetic fibers, the curls don't relax as quickly as with the heat friendly synthetic fiber. So next we'll go ahead and look at the Cap Construction. First, you can see we have a full mono top, and I love that, because that allows you to part this style Center left or right, whichever you prefer. We have an extended lace front. You can see it comes almost halfway down the ear tab on both sides, and that is a feature that I absolutely love, because that allows you to style this wig away from the face and have that appearance of hair growth all along that extended lace front. So I absolutely love those. Then we have the ear tap soft ear tap with metal stays inside. We have an extended nape for a bit of extra coverage and velcro adjuster, so you can adjust her to your circumference. Now John Renault wefted caps tend to run true to average. I have a 22 inch circumference, and this cap fits me very comfortably. You can see, I left the adjusters where they were, but they could be loosened or tightened a little bit depending on what cap size. You need, and Mila here also comes in a petite size, so you're in luck, if you're a petite, so you have the wefts here in the back and on the sides and those are nice and stretchy. I love that and then let's talk quickly about permatease now this style does have some permatease. I found permatease here in the crown area and in other areas as well and but I don't feel that it's too much at all. I think it's well done. I think it looks very natural with this kind of a wavy curly style. We actually have members of our family that have curly hair and it often is coarse and very thick, and so I think it suits this style very well and because you have that mono top that top monotop area is very natural and light, and you don't find Permatease in that area, it's in the remaining areas of the cap and one more thing that I noticed and I hopefully I can show you this in addition to a bit of permatease, which, if you can see it there, that's where the permatease is. We have some wefts that have shorter fibers attached to them um. This is in the crown area. I hope you hope you can see that and I think again I think the permatease and these shorter fibers are added to the style just to give a little volume and lift and help maintain that wavy bouncy style. So it's really well done, but I did want to mention that this style does have some permatease so overall, a lovely Cap Construction. So let's compare julienne light to Mila since I happen to have Julianne light. I reviewed her previously and I'll leave a link to that review. In my description box down below Julianne light here is in shaded mocha and, as I mentioned, I did trim these front fibers a little bit and um. She had she's an angled bob, but since I've trimmed those front fibers, you can't see that unfortunately, so we can't compare that aspect of the style, but we can certainly talk about the cap, construction and also the curls. So let's go ahead, perhaps and do a side by side first, so you can see the similarities and differences. Mila is overall a longer style and not an angled bob like Julianne light is when you get her out of the box here they are from the front and the right, the back and the left. So you can see the curl pattern is very similar. Just loose. Wonderful curls and uh. You absolutely have a lot of similarities between the two now Julian light is a light density style. A low density style and Mila, I would say, is light to medium density, absolutely has more density and has some permatease as we discussed and julienne light is a fully hand-tied cap. So you will always have much less permatease if any with a fully hand-tied cap, and this style absolutely has very little. I found a little bit at the nape, but very little permatease on julienne life. Let'S go ahead and look at the Cap Construction. So this is what the fully hand-tied cap looks like in comparison, as you can see no wefts anywhere on this cap and of course this is the light collection. So you have that ear to ear lace, front polyurethane on the ear tabs, a silicone nape and so absolutely the similarities. Are they both have a mono top the this is ear to ear lace front as compared to the extended lace front on Mila and a lighter density and slightly shorter style for julienne light, so plenty of similarities uh, but also some differences, and it just depends on What it is you're looking for in terms of volume and length, perhaps, and if you like, an angled bob or a more straight one, so next we'll go ahead and we'll look at some styling options. First, I always like to test the ear tuck. This is just a great way to keep fibers out of your face throughout the day and not have them bother you at all. I think that's a cute look on this side. I like to do a little half tuck, because you do have some density here. You can do a full tuck as well, but I think I prefer the half tuck. That'S a cute look and easy to go about your day and not have any fibers in your face whatsoever. Then, with my curly Styles, I do like to take just these front. Fibers give them a little twist, and I have a mini claw clip here, fasten that there and that's another way. You can just go about your day, not be bothered by any fibers and then when you're ready to go back to the original style. It'S very easy to remove so then I have the headband. Let'S go ahead and try this. I always like to do this because this allows me to show you exactly what kind of coverage I'm getting from this style. Okay, so that is absolutely a cute little look. I think, with this length, I love that pulled back that way. Um I do want to point out. I see a little edge here. I think this is where that lace front ends uh and is part of the ear tab. I personally, if I wear this style away from the face like this, I would take some dark eyeliner, some dark brown, eyeliner and just color this in cover this, so that it blends with the dark hair and I think, the dark fibers as well yeah. These are dark fibers, so I would, I would just color this, and this would blend much better, but let's go ahead and talk about the coverage um. We have the lace front, and it goes from about here to about here on me and again, all my measurements are listed down below if you'd like to compare them to your own uh. I think here also, you can see there's a little bit of a separation. You just have to play with the style and it depends on the color and how much of a lace front you have. But here I probably would put some dark color wow root powder to try to blend these fibers a little more with my bio hair, either that or lighten my bio hair with blonde root cover up. If I want to really try to make this look perfect, so the ear tabs go from here to here on me and I do have a low hairline. If you watch my videos, you know that and uh. I absolutely love this little pulled away from the face. Look then, let's try, I always love to. If I have enough length, I like to try a ponytail with this style I'll just take a few of these Little Fibers in the front and leave that out and we'll just gather this and make a very loose low. Ponytail, I have my bio hair all tucked under the cap, if you were wondering - and I've wrapped that twice, okay, so great for the summer time, if you really don't want to feel any fibers on your neck, I love the option of pulling the style away from A face in a ponytail or an updo, so let's get a quick look from all sides in the back and the left. So quite a few options for this lovely mid-length, wavy style. Next, we'll go ahead and take Mila outside and get a good look at this beautiful color in natural light. Let me go ahead and read you the description first, so we have a medium natural red Brown. You can see a lot of that and it is Blended with a red gold blonde, and these are bold highlights you can see, you have bold highlights throughout and then it is shaded with a dark brown, as you can see there, and of course we have that Silicone scar tape, underneath let me go ahead and show you the sample from the color ring. So these are the colors um. We have the the red color, the darker color, the 31, and then we have that blonde, which is the 26 and rooted with a six. So that's the root color there. You can see that those are the colors that are Blended together and I think it's just a lovely, dynamic blonde and red color and you absolutely have some striking highlights. I will say, though, that you do have the lighter fibers in the front, as we said to create that natural soft hairline in the front and the highlighting, because you have that rooting I feel like that - looks quite natural. Sometimes, if you have highlighting that goes all the way to the root, some feel that that's a little bit of a stripy effect that they don't like. But here because you have that darker rooting. I think that that works really well and looks quite natural, but a very striking color. Overall, let's get a good look from all sides here we are from the right and the back and the left so absolutely a stunning color, this salted caramel, you absolutely have the the caramel reddish brown there, and then these bold beautiful blonde highlights. I just think it is a really nice pairing with this wavy Style, so final thoughts, Mila here, is a beautiful style. I really love this style, I'm so glad that I tried her she's, not new, but she is stunning and these synthetic fibers are so easy to maintain. I think this is a wonderful option for a mid-length, wavy style. I think she has a bit of volume. You have a little bit of permatease, but that just really suits this wavy style and I don't think it's at all overdone. I think it looks very natural. This way absolutely love this style. I love these loose relaxed waves. You have some layers in the back. Just a few to help give it a nice shape. I think mostly it's one length. It'S not at all. An angled bob like julienne light, is um, so really a lovely option. If mid-length waves is what you're looking for - and I think there's so much you can do with it, the density is low enough that you can easily tuck this behind an ear, and you have enough length that you could style it into an updo or a ponytail. So lots of Versatility with this style as well, this color salted caramel that I've been wanting to try for a while, doesn't disappoint. It'S absolutely really interesting color. This reddish blonde, it's a very warm color, and then you do have that dark rooting. So I think, if you're interested in something like this, this is absolutely stunning and I think it works really well with a wavy style like this also. So I hope, as always, that my review has been helpful and informative and I look forward to seeing you next time bye, bye,


Comments
Becky C.: I’ve never purchased a Jon Renau style because I was so unsure of finding a shade. Salted Caramel looks perfect. Thanks for your review.
Jen Nguyen: Where I can get Milan by Jon Renau. Thanks Michelle
Annette Chambers: how long did you steam?