How To Install A Full Lace Wig | Evawigs Tutorial
- Posted on 13 July, 2015
- Full Lace Wig
- By Anonymous
This video is originally filmed by @tressesandtreats
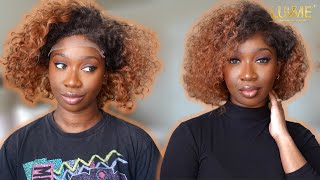
In this video, our diva showed us how to install a full lace wig from EvaWigs.
Hope you guys enjoy this helpful and detailed video.
Hair information:
Product link: http://www.evawigs.com/celebrity/430-k...
sku: csob001
Hair Type: 100% Brazilian Virgin hair
Hair Length: 16 inches
Top Color: #1b (off black)
Bottom Color: 6 (chestnut brown)
Color Proportions: top 20%, bottom 80%
Hair Texture: yaki
Hair Density: 130%
Baby Hair Options: No
Bleached Knots Option: bleached along the perimeter
Lace Color: dark brown
Cap Construction: cap-3B-Glueless Full Lace Cap with Ear tabs
Hairline: natural
Cap Size: average
Follow us:
Instagram: http://instagram.com/evawigs
FaceBook: https://www.facebook.com/EvaWigs
Twitter: https://twitter.com/EvaWigs
Pinterest: https://www.pinterest.com/evawigs/
Hey guys so today, I'm going to show you how I installed my full lace: Eva wig, I'm starting this on freshly washed in air, dried hair, i'm using the bell nouveau coco castro nectar and the two curls one mission, oil to moisturize, my hair and I'm going To detangle using my afro pick, because I can't find my home once my small section is fully detangles, I'm just going to grab it and begin braiding backwards. I did about five or six braids in my hair and I parted my hair. Before I put the lace. Wig on just to make sure that once I did put it on, there was no issue in that my hair was like correctly after braiding up my whole head. I just take a few hair pins and I use them to pin my braids back just to make sure that my ends will be okay and they'll stay up and protected. Now, once my hair is fully secure, I'm just going to grab my black wig cap and I'm going to place it over my head. I'M not going to place it all the way to the front just because I need a little bit of leeway just so that the wig looks realistic once I put it on now after my wig is fully on I'm going to take the bellman lo coco, castor, Pudding and some eco styler gel to lay down my edges and keep them on fleek. I'M going to use a soft bristle brush just so that there's not a lot of snagging and breaking on my hair and so that there's not a lot of tension and I'm just going to apply the mixture to my hair and kind of mix it around and Get it looking right, don't worry! This is not going to be the last time you see me trying to fix up my edges and now it's time to install my unit from evil wigs now this is a full lace, wig and, as you can see, it has about three clips. I use the two clips on the front two sides and I secure them underneath my wig cap just so that they don't have to snag or cause breakage underneath my hair. If I wear them too often - and I could have kind of just left it there and made a little bit easy, but knowing me of course, I wanted to try a a second part just to show you guys the versatility of my way. So I'm using a brush to kind of brush out this new part and to kind of get my hair to lay the way that I wanted to lay they give you guys a little bit of background on the wake itself like I said this is from evil. Wigs this is a Kerry Washington inspired bob and you can see. I have a little bit of ombre going on the longest layer of this unit is about 16 inches. The colors that I used were 1b. I think six and this unit was custom-made. For me. It took about 20 days about three weeks to create and it took about three days to ship from china actually wore this week for graduation, and I was so in love with it, the texture of this hair. It actually is Jackie hair, and it did not look like this when I first received it, it was actually straight and it looked a little bit crimped, but I wound up washing the unit a few weeks ago and when I did it left it with this nice Wavy texture, I just air dried it. I haven't applied any heat to this unit at all, since i first received it and it just feels really nice. It looks realistic and i'm so happy that i got this big in the mail and once I kind of figured out the part i took my tweezers to it and I kind of just plucked out a couple of extra pieces just so that it wouldn't look so Thin and it would kind of look a little bit more realistic and once I did that you know ice crushed it out a little bit and I kind of from there it's really self-explanatory. I lay down my edges a little bit more. I fix the partying a little bit, I'm sorry that the lighting and the focus got a little messed up. I actually didn't refocus my camera when I shot this part of the video hashtag longer problems home. But now you can see I'm just kind of brushing my edges back so that they blend in with the wig and that everything kind of looks as realistic as possible and also just a quick side. Note if you guys are interested in purchasing any units from evil. Wigs, which i totally recommend, because the hair are such great quality, you can actually get, I think, a $ 35 discount on the side if you use the cold 12 tresses. So I just kind of want to make sure that you guys know that in advance. I really hope that you go ahead and shop the site, I'm going to leave all the details below now. The last thing I do to keep my wig looking realistic. If I take a little bit of concealer - and I think that this is a covergirl concealer - please don't hold me because I might be lying and I just apply it to the part in a little bit in front on my scalp so that it blends in and That it looks a little bit more natural and then once i do that I've blend it with my fingers. Take my brush and I calm up my hair and it's pretty much done from here. So I hope that this video helped, like I said, I'm so in love with my evil, wigs unit. I wish that I would have had this video out you guys earlier and as always, if you have in questions any comments or anything at all, please let me know if you love this video thumbs up. Give me some comments. Love you guys i'll see you in my next video bye,


Comments
elizabeth thomson: VERY VERY PRETTY